Stacked Text - Practice

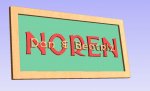
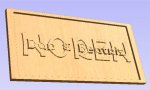
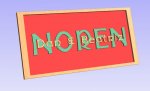
way cool guys! you guys gave me some food for thought last night at work (sundays are a wee bit on the slow side). here is a pic of what i came up with. i went a bit of an odd roundabout route to get this. started out in sketchup, imported the vectors, then worked up the pocketing tool path for the upper letters, then worked it out for the lower letters. after a few false starts, finally got it somewhat right.
 

Attachments

  • dan bea sign.jpg
    dan bea sign.jpg
    59.3 KB · Views: 16
  • dan bea sign 2.jpg
    dan bea sign 2.jpg
    30 KB · Views: 17
Last edited:
... i went a bit of an odd roundabout route to get this. started out in sketchup, imported the vectors, then worked up the pocketing tool path for the upper letters, then worked it out for the lower letters. after a few false starts, finally got it somewhat right.

It's extremely straight-forward to do all the steps in VCarve per the steps I posted.
 
Glad you found the steps I posted, Dan. Looks good!

OK, so here's what I have my CNC carving right now.

ST_Arn1b.jpg

Unfortunately, I was way too conservative with feed speed on the pocketing cuts, so it's coming up on 3.5 hours on this 22" by 8" sign. I ramped up the speed for the V-carve cuts but it's still estimating about 4 hours, so that'll wait until morning!
 
Looks nice Dan! :thumb:

Bill, yup I did run my second sign with doing all the pockets first, then the vbit operations. If your pockets are working like mine, one thing that you might be able to do to save some additional time is to edit the lower pocket gcode to skip the removal of material that the first pocket operation already took off.

I had tried to lower the start level of the lower pocket to .125", but found it really messed up the smaller font's detail. I'll have to play with it more to see if you can set the top of the flat separate from the vbit.

For mine (and I realize we have different machines) I've been pocketing with a 1/4" EM at 45 ipm, .125 max pass, doing the vbit at 60 ipm
 
Are you actually changing bits? I'm assuming you have the workpiece firmly held down.

What are you using to make sure you get your x/y/x reset after you change the bit?
 
Are you actually changing bits? I'm assuming you have the workpiece firmly held down.

What are you using to make sure you get your x/y/x reset after you change the bit?

yes, you do change bits, the vcarve operation has the option to use a different bit for hogging out the flat areas, then going back and cleaning up the edges and smaller areas with the v-bit. It generates two separate paths when it's chosen.

As for resetting, only have to re-zero the Z axis as the zero for X and Y haven't changed. So depending on where your zero is (table or top of the work piece) you zero Z off of that by putting the next bit in and bring it down until it just touches, then resetting the zero on X. Some folks use a little pad made of metal that the machine will go down and touch (with a probe connected to the spindle to make and electrical connection) and the machine will zero, taking into account the thickness of the metal pad.

I do check my X and Y, as I typically put a zero mark on my table for X and Y, so I will check that it's still at zero from time to time by running the table over to where they both read zero and checking to make sure I'm still over my mark. Some folks just use their limit switches for X & Y, but since they are mechanical, I don't really trust that method.
 
... Bill, yup I did run my second sign with doing all the pockets first, then the vbit operations. If your pockets are working like mine, one thing that you might be able to do to save some additional time is to edit the lower pocket gcode to skip the removal of material that the first pocket operation already took off.

I had tried to lower the start level of the lower pocket to .125", but found it really messed up the smaller font's detail. I'll have to play with it more to see if you can set the top of the flat separate from the vbit.

For mine (and I realize we have different machines) I've been pocketing with a 1/4" EM at 45 ipm, .125 max pass, doing the vbit at 60 ipm

I hadn't thought about editing the gcode as you describe. Like you, I tried setting the start level of the lower roughing cut to match the upper and it previewed garbage.

So far, I just followed the settings in the example I found so the upper pocket is 0.05", lower is 0.1". I had the pocket cuts set at 30ipm but have upped that to 50ipm for the next run. I changed the v-bit to 50ipm before I started its run this morning. I used a 1/4" end mill for roughing and a 60° v-bit with the tip shaved a little for the v carving.
 
Are you actually changing bits? I'm assuming you have the workpiece firmly held down.

What are you using to make sure you get your x/y/x reset after you change the bit?

Darren explained the reason for the bit change. On this type of cut, I use the center of the object as my 0,0 start point. I also edited the VCarve post processor to return to 0,0 when the run is finished. Then, I carefully loosen the collet, change the bit and manually lower it to the Z0 level. After making sure the gcode sender is at all 0's, I hit the send button.
 
I don't know if this fits into the discussion but.

You can draw seperate vector boundaries and apply seperate pocketing toolpaths with seperate depths as well as seperate start points. Put them in the proper order in the toolpath list then post them all on one toolpath.

The machine will cut the toolpaths in the order you set.
 
... You can draw seperate vector boundaries and apply seperate pocketing toolpaths with seperate depths as well as seperate start points. Put them in the proper order in the toolpath list then post them all on one toolpath. ... The machine will cut the toolpaths in the order you set.

If I'm understanding what you're saying, that's the way the toolpaths are being created. The V-carve path and its associated roughing pass are created on the same page and form two seperate toolpaths. In my case, I just left the default path names, which are V-Carve 1 and V-Carve 1 (Pocket). Doing the same for the lower text creates V-Carve 2 and V-Carve 2 (Pocket). The bottom line (Est. ----) is a seperate toolpath (V-Carve 3) since it's a V-groove. When I save the toolpaths to Gcode, I choose V-Carve 1 (Pocket) and V-Carve 2 (Pocket) and save to the same file. Ditto for V-Carve 1 and V-Carve 2, but I also add V-Carve 3 to that file.
 
Well, this thing finally finished!

ST_Arn1c.jpg

This is a test carve in MDF - still a little rough, needs sanding.

It took a total of about eight hours between the roughing pass yesterday and the v-bit carve today. I've adjusted my cut depth and feed speeds to reduce the next run time to about half of this one.
 
Looks good! How much do you remove per pass when roughing? ...

Thanks, Darren!

Like I said earlier in the thread, I was being really conservative with feed rate and depth of cut. Although I was removing less than 1/16" on each level, I had the bit set to .01" per pass, so it took five passes for each level. Feed rate was 30ipm. I've reset the roughing to 50ipm and depth per pass to 1/16" for the next run. For the v-bit passes, I ran this test at 50ipm (upped it when I saw how slow roughing was going), but still had it set at .01" per pass. I've reset the v-carves to 60ipm and 1/16" per pass for the next run.

Still a lot of experimenting going on around here!

Ah, sorry, was reading/posting from my phone, so missed that. I've been taking about .125" per pass, but haven't done a finish pass on it since I was going for a rough look. I think mine was around an hour and 20 minutes, but is also about half that size.
 
General rule of thumb for depth of cut is 1/2 the tool diameter. That is in metals. Depending on the machine and the material you can do differently.

In HDU - I cut to full depth, that could be up to 1" deep - even with a 1/4" end mill.

I generally stepover at 75% of tool diameter or more for roughing cuts.

RPM & Feed should be regulated by chipload.
 
I knocked out one of my wedding gifts tonight. This is on birch, which had a lot of fraying around the edges, so lots of cleanup to do. I did get some new carbide bits tonight, probably should have tried them. I plan to cut down the outer edges to about a 1/2" reveal on all sides.

2015-09-22 20.50.45.jpg
 
Top