Curved Inlay - Best Way?

Rennie Heuer

Moderator
Staff member
Messages
11,642
Location
Constantine, MI
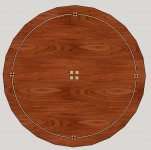
I am working on a design for a coffee table for a client. He wants the inlays shown in the picture. I can handle the squares, simple template and the right guide bushings, but the curved part has me a bit stumped. I can use a router and trammel to make the grove, but how to fill it?

He wants the inlay to be 1/4" wide, so the stuff you buy for string inlay is too small. He'd like it to be maple, but I may be able to push him towards another species (holly?) if the maple won't work. I thought about laying it in thinner strips and building to the 1/4". Oh, and yes, at 40" diameter it's too big to send to Leo. :rofl:

Any suggestions?

Coffee Table inlays3.jpg
 
maple veneer and try to see how much bend it will handle dry. the steaming would need to be close to the curve when dry. dont want to fit wet wood in dry top
I would cut a piece with the same curve radius as the grove and use it to shape the steamed piece to the correct curve.
 
Roy Underhill addressed this issue in an episode where he was inlaying holly into a table top. To get the right thickness he made a jig so he could plane the strips of holly that he ripped from a stick. It helps if the stick is nice straight grained timber. He then lightly steamed the strips by passing them over a kettle that was boiling rapidly. You don't want the wood to get too wet during the steaming process as it will swell and no longer fit in you grooves.

Once the wood was pliable enough it was just a matter of pushing it into the groove and tapping it home with a mallet. Of course he applied glue in the groove first. When he got to the end of the groove he had to trim the piece with a sharp chisel.

When everything was dry he carefully planed/scraped/sanded it flush.

I am sure I left out some important parts but you get the idea.
 
Last edited:
Is the customer against dyed epoxy for the inlay? Just thinking outside of the box.

https://www.finewoodworking.com/1996/06/01/epoxy-inlay


Controlling color bleeding has its challenges.
He’s pretty set on wood. No epoxy in 1905.
 
Wish we were closer. I think you know I could do it.

Shipping would make it an issue for sure.
40" diameter is not too big for me.

Would a template help.
I can make templates for everything on the table top.
I could make templates for locations and for the routes grooves.
A hand held router can do the rest.
I could make the templates in a way as to ship easy.
I can make them so you can reassemble the entire top.

For the inlays - I can make square bungs and the templates will align everything?

For the curved inlays. They could be made with a band saw, or steam bent, or laminated on a jig.
I could make then on CNC,

Anyway - you know me, I'm just thinking out loud again.
Leo, you're a genius!

Call me when you have a few spare minutes.
 
Never steamed..so I would try the hot pipe method..once a suitable curvature was obtained, i would put it in a former to cool and, hopefully, set. If a 'close-enough' radius was maintained, I think that when it was glued in, it will stay as intended. I would route a groove 3/16" deep, 1/4" thick inlay stock. my 2 pence
 
Actually (Thanks, BTW, to all for the great ideas) Leo is going to make up a Lexan/plexiglass template that I can use to do both the cutout and the inlay. No need for bending, steaming, laminating, etc. Using this guide bushing and a small router I should be able to complete the task. Additionally, if I pick an inlay wood with a little grain in it a sharp eye will be able to follow it from the squares through the curved inlay.

1643918102430.png
 
Additionally, if I pick an inlay wood with a little grain in it a sharp eye will be able to follow it from the squares through the curved inlay.
If that works out it will be a super-cool detail. I love having stuff like that in my pieces so I can wait to see if the client notices. I have gotten calls months later about one thing or another . . . "Hey, I just noticed. Do the door pulls come from the same piece of wood as the door dividers?". I think it's a riot even if they never notice but, I have been accused of having an odd sense of humor ;-)
 
Top