Jason Beam
Member
- Messages
- 1,364
- Location
- Sacramento, CA
Well at the risk of leaking too much about the new shop ... i already posted this on another forum and figured you folks wouldn't mind having a gander as well. For those sleuths who found my early progress shots, things are quite a bit different now. I'm at the point where I'm just starting to get things organized. I plan to do a full shop tour when I am completely out of the boxes I moved to this house with lo' those 10 months ago, but for now... i shamelessly cross post:
Since I'm never one to remain predictable, I finally got around to taking pictures of something I made and talk about from time to time. This is my overhead blade guard that I use on my tablesaw. It has built in DC and it's "tunable" such that with the right counterweight, will softly raise as a piece of stock is fed into it. I'm still working out the weight part, but it's getting there
It's made with some lexan and 1" aluminum angle - i had just picked up a set of taps and this project gave me an excuse to use 'em
It's mounted to the ceiling with scraps of birch or birch ply and some spare bits of T-track I had laying around. This gives me some pretty good control over alignment - i can move the guard in 3 dimensions (front/back, left/right and up/down).
The collection truly depends on the cut being made. A regular everyday rip cut with both sides of the blade being buried and only a rooster tail coming off the back, it does great. Catches nearly all of it. A skim-cut where yer only takin' off 1/16 and the blade's half exposed will still spew a good amount at you - I doubt anything realistic could stop it in those kinds of cuts.
Well anyway .. here ya go
(Oh, and pay NO attention to my crummy texturing job)

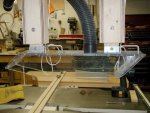
Here we just show the thing in all its glory. Pay no attention to my scooter - I'm in the process of building it a home in a new shed behind the garage (i have a 22' square slab back there which may turn into more garage one day).

Another view of the whole thing. The pile in the background is about half of what i need to organize. I have 14' of base cabinets and 8' of uppers that should house the majority of it.

This shows how i mounted to the ceiling. This lets me adjust for thin cuts as well as changes in position for when I mount the splitter (a project on my todo list).

Just a shot from one side. The little hinged thingy gets pulled up when the DC's on and there's less than about 1/2" clearance - if it's raised any further, the suction goes away and gravity wins. Once I work out the right counter weighting, I think the DC will improve even more.

Yet another view. In the background you can see my latest gloat, too. The Jet 6x48 belt sander with 9" disc. On stand. On a $75 mobile base. I paid $150 total. Yeah. Gloat.

And a view from the other side. The mount is just a few pieces of BB ply, a few lock washers, some regular washers and a nut - they're very loosely held in place - basically finger tight. The lock washers are just slightly engaged enough to keep the whole thing from coming apart yet allow everything to pivot smoothly.
There ya go! My shameless cross post has grown considerably thanks to the ability for me to insert bits of chatter between the pics. Thanks for reading!
Since I'm never one to remain predictable, I finally got around to taking pictures of something I made and talk about from time to time. This is my overhead blade guard that I use on my tablesaw. It has built in DC and it's "tunable" such that with the right counterweight, will softly raise as a piece of stock is fed into it. I'm still working out the weight part, but it's getting there
It's made with some lexan and 1" aluminum angle - i had just picked up a set of taps and this project gave me an excuse to use 'em
It's mounted to the ceiling with scraps of birch or birch ply and some spare bits of T-track I had laying around. This gives me some pretty good control over alignment - i can move the guard in 3 dimensions (front/back, left/right and up/down).
The collection truly depends on the cut being made. A regular everyday rip cut with both sides of the blade being buried and only a rooster tail coming off the back, it does great. Catches nearly all of it. A skim-cut where yer only takin' off 1/16 and the blade's half exposed will still spew a good amount at you - I doubt anything realistic could stop it in those kinds of cuts.
Well anyway .. here ya go
(Oh, and pay NO attention to my crummy texturing job)
Here we just show the thing in all its glory. Pay no attention to my scooter - I'm in the process of building it a home in a new shed behind the garage (i have a 22' square slab back there which may turn into more garage one day).
Another view of the whole thing. The pile in the background is about half of what i need to organize. I have 14' of base cabinets and 8' of uppers that should house the majority of it.
This shows how i mounted to the ceiling. This lets me adjust for thin cuts as well as changes in position for when I mount the splitter (a project on my todo list).
Just a shot from one side. The little hinged thingy gets pulled up when the DC's on and there's less than about 1/2" clearance - if it's raised any further, the suction goes away and gravity wins. Once I work out the right counter weighting, I think the DC will improve even more.
Yet another view. In the background you can see my latest gloat, too. The Jet 6x48 belt sander with 9" disc. On stand. On a $75 mobile base. I paid $150 total. Yeah. Gloat.
And a view from the other side. The mount is just a few pieces of BB ply, a few lock washers, some regular washers and a nut - they're very loosely held in place - basically finger tight. The lock washers are just slightly engaged enough to keep the whole thing from coming apart yet allow everything to pivot smoothly.
There ya go! My shameless cross post has grown considerably thanks to the ability for me to insert bits of chatter between the pics. Thanks for reading!

 Jim.
Jim.