delta vs dewalt planer -12.5-13 inch

I have had my 735 for little over a year now and my son just flipped the blades last night. Not bad longetivity. good amount of use also. But now that they have been flipped, I will be looking for a set of replacements for the shelf. Thanks Roger for the lead for infinity. Will check them out.
Also Welcome Roger. Great bunch of woodworkers here, Look forward to your input and projects :wave:

Tom
 
tom, a tidbit of info, somewhere I know you mentioned temps might present a problem with the rollers on the planer.
I got my hands on some butcher paste wax, and with the warmer temps, I ran tons of wood through it today, not a single snag.I have a feeling the temps did me in a bit.
Should have never tried to use it in 20 degree temps and should have waxed the surface with this stuff the second I got it.
Did all my surfaces today.
 
Never heard of butcher paste wax, must/might be a local brand. You used on the planer table not the rollers right? when I first got my table saw, my son picked up a can of minwax paste finishing wax for the cast iron top. I use it on that my jointer and planer and it sure makes things run smooth on all of the tools. Thanks for the info Allen and I am happy you found a solution and you are making lots of dust :thumb: Good luck on your chairs, I know you will do well on them. You are turning into quite the inspiration:thumb:

Tom
 
ONe quick question.
I have the thickness control knob on the 735 if Im planing to those thicknesses, it keeps it all exactly the same.
If Im going to plane multiple parts to the exact thickness, and odd size, like 1 and 5/8 ths, and its very important they are all identical in thickness, and I dont trust the ruler on the side gauge, can I cut a block of wood to the exact thickness, and place it in the corner not touching the blades or blocking the piece Im going to plane(none are wider than 4 inches,13 inch planer)to guarantee the machine does final plane at exactly same height?
(another way?)
 
You do not have to use that knob Allen, it is just for the basics. I keep a pair of thickness callipers at hand (or a good scale works also) and bring the wood down to the thickness desired. (I take all boards down together at every increment) once your are at where you want to be the plainer will stay there with out that stop block with out changing its position
 
I know the planer has a built in motor to blow the dust, but how long a hose do you think the (4 inch hose) delta 1.5 horse power dc can support if I move it to another end, or outside. I gotta put up some type of hose above head, cause my floor is loaded with dust collection hoses.
Do you think 15-20 feet is too far away for the delta dc I have?

Allen,
My DC is a 2 hp, and I run about thirty feet of 4" plastic pipe - up the wall and across the attic, then back down to my router table, bandsaw, and planer. I've only had one clog in four years, and that was when I was planing a bunch of pine, and was taking very deep cuts. (My planer is a big 3hp Delta 15", so it can take big bites. :D )

If I were you, I'd use thinwall plastic pipe for your runs, instead of hose. The smooth inner walls of the pipe make for better airflow.

Also, the pipe is cheap. A 10' length of it is only about five bucks at my local builders' supply, and it has one end belled so you need fewer fittings - just a few "Y's" or elbows.

Try to make your 90° turns with two 45° ells and a short straight piece - better airflow, and fewer clogs.

I put all mine together without glue - just taped the joints. That way, if I do get a clog, disassembly to clear it will be easier.
 
I have 35 feet of plastic hose. I was hoping to put it to good use and not have to invest any more money.(Ive purchased the y's, more clamps, elbow, and some other parts just this week after i figured out how to hook it all up on the ground where I thought Id just move it all the time)
My run is going up from the garage door(approx), 7 feet to a cross beam, then around 5 feet to drop back down 6 feet with a Y for both planer and jointer.
The other hose will be on floor, out of way to Tablesaw.(if I have to cut long boards or sheets, I have to roll the TS further into center, but thats not often, and the hoses will be cut long enough)
I will use the jointer line whenever I need the mitre saw, I bought a big scoop for the mitre. (I had cut one out of a large clorox bottle, and used duct tape and it worked pretty good, but the hoses lay at the garage entrance and make it so difficult for me to go back and forth)
I was just going hang the hoses, use 2 screws every couple feet, and a piece of wire, and ground it in a couple spots.
very very simple run, was going to try tonight, to at least measure it all up, but the eyes retired early on me. Heres a really ruff sketch of the entire system.

I made no seperate lines for router since when I use it, I can just roll the table where the jointer or planer would be and use one of those line.
(same for band saw, I roll it out to front, and would use one of the two lines)

the dc came with a five foot hose. I figured 15 feet was pushing the max with airflow.
 

Attachments

  • wood stuff 788 (Medium).jpg
    wood stuff 788 (Medium).jpg
    38.6 KB · Views: 13
Last edited:
If this is the 4" corrugated flex hose I wouldn't be surprised if your cut you CFM by about as much as half over the length with any DC especially with a 1.5 HP one. If you can move the DC to the first right angle bend & split the difference it should help. In any case if I were going to use flex hose I wouldn't use more than 10' & just move the hose from tool to tool. Oh by the way it looks like your table-saw & jointer are clear across the shop from each other. To me these to tools are like fraternal twins & should be right next to each other running in the same direction.

In my case I set the saw on a riser approximately 2 1/2" tall & made the jointer cabinet so that the jointer fence was just below the height of the Table-saw & the bench/off-feed table was at a height just below the miter slots in the table-saw. I just push the 3rd wheel down on the jointer & swing the in-feed end out past the end of my router table & I can joint 8' long material. If your planer is on wheels you can plug the jointer hose into it which is what I do I only have about 10" of hose which runs between my Table-saw & bench/off-feed table along the floor off of the drop of 4" PVC & it covers all 3 tools. As you can see the PVC has a Y on the end one runs the the Table-saw & one runs to the Jointer the blast gates are on the machines.
 

Attachments

  • A1 myshop 046.jpg
    A1 myshop 046.jpg
    51.4 KB · Views: 12
  • A1 myshop DC7.jpg
    A1 myshop DC7.jpg
    33.9 KB · Views: 11
Last edited:
since I only ordered what Id need to hook up a few machines at a time on floor, ofcourse I ran short of parts.
I might go with some plastic piping afterall, for the two long runs, since I didnt have enough 4 inch hose.(someone I know told me they have 20 feet of 4 inch hose they dont use, so maybe Ill get it)

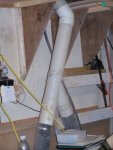
I couldnt do much work today, dont know what happenned, just became difficult, did some flowering this morning in the rain, ran to the nursery, etc......so my son said hed hang some of the hoses at least for now so nothing trips me up on the floor.
I helped him putting alot of clamps and gates on things.
It worked out ok for now, the jointer line is long enough to reach the big scoop in back of the mitre saw.
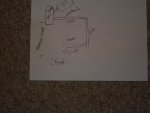
Bart, I cant figure out how to get decent dust collection from the TS, I hook up the 2.5 inch hose, but theres always a mess underneath.(the table saw is usually pushed in front, so its only 3 feet from end of jointer, Im trying to keep all the hoses dropping from center so they can spider out to any machine, right now I only have one quick connector, but it makes changing up a breeze)
Im going to attach a big scoop under it, hook up a 4 inch line, and see if that helps.
I do believe the TS is one of the most difficult tools to hook up unless one owns a blade guard with dust collection, but I dont have the room and Im moving things all the time.
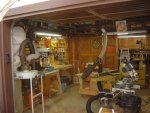
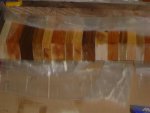
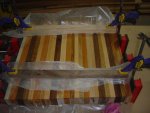
It all worked later on, I planed up a few pieces of the tabletop Im going to use for an end table, no hose on the floor,(to the right of the peace sign, my son put some ladder hooks so I can push the hose up there when not in use.) which is my main concern right now. Its the pits when vision is limited to mostly in front, and I dont pick up the floor, must keep it clear of obstacles.
 

Attachments

  • wood stuff 789 (Medium).jpg
    wood stuff 789 (Medium).jpg
    78.8 KB · Views: 18
  • wood stuff 790 (Medium).jpg
    wood stuff 790 (Medium).jpg
    66.3 KB · Views: 17
  • wood stuff 791 (Medium).jpg
    wood stuff 791 (Medium).jpg
    39.4 KB · Views: 17
  • wood stuff 792 (Medium).jpg
    wood stuff 792 (Medium).jpg
    58.1 KB · Views: 16
Last edited:
Allen I have the same saw and have the same problem you do. I'm starting to enclose the back and made a cardboard template so that I can raise and lower the motor and tilt it without it interfering with the belt. I plan on building a cabinet for mine to help with the dust but for now I am going to enclose the bottom and put a connection on it to connect my dust collector. If you want I can take a few pictures of what I've done so far.
 
For my TS3650, I added a plywood bottom to the cabinet with a 4" dust port on the bottom. The bottom is two pieces with a taped seam in the middle, since I couldn't get a single piece past the flange on the bottom of the cabinet. I was able to close off most of the back with vinyl magnetic "car door sign" material. That way, I can easily move or adjust the back cover when I tilt the saw for bevel cuts. It's nothing great, but I'll try to get a pic of it this afternoon and post it.
 
Here is a picture of what I've done so far on my ridgid ts.I still have to cut out one more piece to mount on the support bars for the motor that will cover the slots but move with the motor when I tilt the blade
5-03-09 021 (800 x 600).jpg
 
we should send this picture to ridgid, maybe the engineers over there can figure something out instead of cardboard and tape, although that is where Im going to go, cause I dont see much more I can do.(Im going to stand a big gulp scoop on a couple of pieces of 2x4s up close as I can get it, and just let it get as much as it can, along with the 2.5 inch hose hooked up to the dust port)
 
The cardboard is just for mockup purposes. I plan to cut a permanent piece out of metal in about 2 weeks. Right now I need to keep the saw up and running to finish a job I'm doing.
 
Top