Dining Table build-40x60 inch

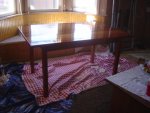
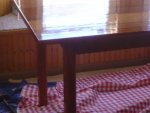
3 coats on the underside, and legs and aprons, beautiful.
First coat on top, I got bubbles. I figure its because the wood grain is open, Im not sure, I didnt think I worked to fast.
Ill sand it out tomorrow with 400 grit on the orbital, and just keep applying coats till the bubbles dont show up anymore.
Then Ill hand sand with 600 grit a few coats.(someone told me maybe after I washed the brush in mineral spirits and then water, I didnt get all the water out of the brush and it leaked out, but I thought I shook it and let it dry good over night)

btw, 24 board feet of mahogany, most of the cut offs are good enough in size for me to use for the next project.
The only waste I had was when I couldnt get a good straight line and wasted around 4 board feet, and there was 1 bf that had a crack in it, so I think the project went well as far as board footage.
 
Last edited:
allen before you sand tommrrow! i think i would try some 320 insted of 400 or maybe back to 220 to gett eh finish that has the bubbles flat then go witha thin coat after that to get the shine.. i ususllay will go two coats beforte sanding to get the pores filled for a real lassy look if that is what your after..the 400 will clog up fast allen when you need to take alot back off.. the 400 is gerally for the filled pores and up.. now i am not apro so if charlie or the others with more expeirnce say i am wrong then go with ther advice but i have made the 400 paper fill up fast when i first started playun with finishn and it can cause you greif with those gummed up bumps on there.. take a read charlies home page it has great info on how to get to where your headed
 
buying a Brand name brush to match the product doesnt help when the idiot applying the product doesnt have a clue.
I have to back stroke the poly and never ever wipe the brush on the side of the can. And slow down the stroke.
Just more sanding, but Ill keep trying.
 
So I listened to those that warned me against screwing a tabletop down, not allowing for movement, and got some table clips.
But being the dufus I am, I forgot to cut some kerfs in the inside of the table apron first, before assembling.
I glued together a few pieces of wood, this should hold the router in place steady enough against the apron.
 

Attachments

  • wood stuff 357 (Medium).jpg
    wood stuff 357 (Medium).jpg
    63 KB · Views: 21
So I listened to those that warned me against screwing a tabletop down, not allowing for movement, and got some table clips.
But being the dufus I am, I forgot to cut some kerfs in the inside of the table apron first, before assembling.
I glued together a few pieces of wood, this should hold the router in place steady enough against the apron.
I thought you had a biscuit joiner. I like those for cutting the kerf for table top clips.
 
I thought the biscuit cutter was too wide a kerf for these clips.

maybe not, Ill give it shot friday, cause anything is better than me using a router
The clip only worries about how far the top of the kerf is from the table top. It should work fine for you and you have the benefit of being able to dial in the exact distance you need. Just make sure your kerf is not too deep.:eek:
 
the finish is almost mirror like, what the woman wanted:rofl:

I still have some bubbles, but thats my own fault, so Ill sand them out tomorrow and put another 2 coats on carefully.

I set the biscuit cutter to "0" size, it cuts in exactly 1/2 inch,and set to 1/2 inch off top, which is fine, the only difference is the kerf size. the biscuit cutter is around 1/8, the clips say use 3/32nd cutter, so I think Im ok.

(I just ran out into the garage and cut a few tests on 3/4 inch scrap)

its pretty exciting, Im on my way to completing my first real piece of indoor furniture, one that is built with MT joints, and made from rough lumber, no store bought stuff.(I have no choice now, I will have to buy a jointer now, I dont want to suffer the consequences of crooked alignments)
 
Last edited:
its good to hear the excitment in your voice allen, and this just the beginnng:D:thumb: you will learn from this project and use that on the next one which you will learn something else,, but first and foremost is that you are doing it your slef and you have learned that there is never a dumb question and the person that asks them isnt dumb either... its those that think they have all the answers that are the dumb ones:thumb:
 
As this table nears the end, or at least Ive reached my end of patience with it.
Heres how it went, and not that I wasnt warned, but like always, I have to use what I have and make the best out of it.
So now I know real quality finishes are sprayed on. Period. Preferably in a seperate area.

I wanted a high gloss super shiny looking surface.

Sanded bare wood down to 400.
First coat, was Varathane poly, oil based.(dry for 24 hours)
Sanded that down to 220 grit on orbital, and put another coat of same on it.(let dry for 24-26 hours)
Sanded that down to 220 again on orbital, and I was verypleased with the surface, very smooth, and I think some of the minor hair line marks were gone or smoothed out by now.
Put another coat on, and it seemed to pool almost, just couldnt get it to go on evenly, syrupy, and I didnt want to thin, but ok enough. Let it dry 24 hours, seemed this time I wasnt getting dust,when started to sand, more gook, so I decided better let it dry more, it was very humid that day and night.
Damage was done, that was a mistake.
Sanded it down again, with 240 grit by hand, recoated it. (let it dry almost 30 hours), but now I had uneven, although looked good, if you bent down close, and scanned across top, it was easy enough to see.
Frustrated, I sanded down with 180 to 220 grit on the orbital, not worrying how much I took off, I just wanted it smooth and even.
Coated it again, bubbles , I worked on them, seems the more coats I was putting on, it was just compounding the bad spots, so I had enough.
I sanded down this morning with orbital and hand, carefully not removing too much, and used Cabots Gloss oil based poly, and applied this coat with decent foam brush(local paint chain), and it went on very even, and I kept it light. Looks ok for now, its impossible to keep dust and anything else off of it, even though its in my house in its own room.

The legs, looked great after 3 coats, but I made a mistake and put a fourth coat , and since I had the legs and apron upside down, the poly ran and pooled a drop near the top, top of aprons, guess it was too thick even though I carefully applied it lightly.

I was told by the wife to leave it all alone, its beautiful, nothing can be seen.
Ofcourse, looking at it from 3 feet it looks fine, but I get on top of it, shine a flashlight across the surface and put on my readers.
My wife told me to lose the flashlight, noone eats with a flashlight.

So the table is done, just last coat drying up.

This wont be my best build with mahogany. I will rub on 30 coats of poly on the next build, a buffet style box cabinet. No more thick brushing on for me.
It takes 4 times as many coats rubbing it on, but the 2 things Ive used it on, Ive had zero problems with the finish.

And Im already looking into someone who sprays varnish, so I might just pay them to spray the next piece.

I posted this so any other beginner with 26 months of woodworking experience that get frustrated with finishes, know they are not alone. Building is easy,(simple things) finishing is the real game.

sorry about pic quality, just cant seem to get a decent shot. Ill wait till I attach the clips and take a picture outside.Its like a mirror, I can see myself in it.
 

Attachments

  • wood stuff 360 (Medium).jpg
    wood stuff 360 (Medium).jpg
    59.3 KB · Views: 33
  • wood stuff 362 (Medium).jpg
    wood stuff 362 (Medium).jpg
    46.6 KB · Views: 38
Last edited:
Allen,

I am not sure how to reply to your posting. Maybe I should start by stating that as woodworkers we tend to focus just on working and shaping the wood. We put all our effort and time in learning this. Finishing is just something we do after the project is complete. Should we not be surprised that the results we get in finishing are not the same as working the wood? We don't put in the same level of effort to learn and understand finishing. You are just beginning to realize that there is a whole level of understanding and effort in the finishing aspect of woodworking.

You can create a wonderful finish by brushing, but it takes the proper technique and the correct products. I know because I have done it, but not without the same learning frustrations you have gone through. Spraying has many advantages, but it has just as much of a learning curve. You are simplifying things by saying all your problems will be solved just by spraying. Trust me, you will have other problems that you will have to learn how to solve.

Please understand that I am still struggling myself with finishing. I, like all of the possible woodworking skills, would like to master it. I really really can relate to your frustrations!:)
 
Im sure finishing is the biggest headache most face.
I have no real experience but one project I see the challenges.
Reading how to do things correctly, like backstroking, wet edges, are all fine, but actually performing something correctly is a different game.

Practice, practice, practice.
 
Im sure finishing is the biggest headache most face.
I have no real experience but one project I see the challenges.
Reading how to do things correctly, like backstroking, wet edges, are all fine, but actually performing something correctly is a different game.

Practice, practice, practice.

Like MANY other woodworkers, Finishing is the part that I REALLY do not like to do, but is a necessary evil, and is Definitely my weakest area. The woodworking process has never really been a problem for me to figure out how to do on my own, OR to read about a procedure and then do it, but Finishing has always been something that has been hard for me to convert written instructions into action. Maybe I'm just "Artsy" challenged.:D I do know that watching someone that is GOOD at Finishing is a whole lot easier for me to absorb, and after I get my shop FINISHED, I do plan to find a good finisher and spend some time with them to at least observe their procedures and hopefully improve my methods and eliminate so much of the trial and error process that takes so much additional time to complete a project.

Oh Yes Allen, Congratulations on the SUCCESSFUL completion of your First Furniture Project. Very Nice.:thumb:
 
Top