Bansaw fine tuning question.

Messages
5,629
Location
Catalunya
All right, now that I'm going to put a US blade in my saw thanks to Larry, I plan to tune it really fine and here is the question.

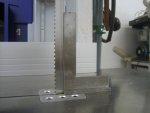
Acording to "The Bandsaw book" the wheels must be aligned and one way of checking that is using a straight stick and placing it against the wheels and it should touch both wheels at the same tine so that both are turning in the same plane.

However, I noticed that in my saw the previous blade didn't stay on the same part of the lower wheel than in the top one. On the lower wheel is always a bit backward (in the cutting direction).

Due to that I have the feeling that the wheels are not well aligned. Am I right? or it is normal?

Moreover, as the upper wheel is the one that we tilt to adjust the position of the blade on the wheel I guess that to check if both wheels are aligned I should first put the top one plumb (vertical) and check the alignment with the lower one. Is that so? Then I could move the lower wheel backwards for the same displacement that the blade has.

I hope I have explained well what I'm trying to convey.
Any help will be greatly appreciated.
Thanks in advance.

I do want to start fidling around without knowing if what I'm doing is right
 
Toni,

Make sure you have the largest blade your saw can use and have it tensioned to spec. With your straight edge, place it across both contact points of one of the wheels and both contact points of the other wheel. If it doesn't want to touch at all four points, measure how far away the top of the wheel is (if you have it flush with the lower wheel) or how far away the the bottom wheel is (if you have it flush with the top wheel). Both ways should give you the same results. If you determine the wheels are not coplaner while under tension, the measurement you took from the straight edge to the wheel is how much one of the wheels should be adjusted. Some saws use a set-screw that attaches the wheel to a shaft and others are on a threaded rod with washer(s) behind the wheel to establish the correct alignment.

If you have the type saw that uses set-screws to attach the wheels, I'd start with the straight edge against the upper wheel as your reference and adjust the bottom wheel if needed. If you have the threaded rod and nut attachment, I'd start with the straight edge against the lower wheel as your reference and adjust the top wheel as needed by adding or removing washers.

Just my thoughts. I'm sure there are others who may have other ideas, too.

Hope this helps,

Thanks Lee. I have four equidistant hex bolts holding the shaft of the lower wheel, and a handled screw with a nut on the top one.

The question is how do I know which on should I take as a reference, because what it looks to me is that the lower one is not on the same plane as the top one even if it is vertical:dunno:
 
toni,
put a blade on it, crank it up "tight" and cut wood......if or when you find it impossible to track a blade or notice the guides being worn prematurally then start fiddling with wheel adjustment.....

unless tuning your saw is just something you feel the need to learn now?
 
toni,
unless tuning your saw is just something you feel the need to learn now?

Well Tod.... not inmediately but it is something I'd like to learn, besides I believe that if a tool is well tuned it performs better.
I've got only the band saw and a small jointer thicknesser, so use the bandsaw for most cutting jobs and I will use it soon for making tenons and dovetails, so I guess that if it is well tuned those will come out better. :D

On the other hand I understand your point, if it didn't bother me before why should do it now? But to me is like leaving a flaw on a piece. maybe nobody will ever see it but I will always know that it is there:dunno::dunno:

And yes! you can call me picky!:D
 
picky ain`t a bad thing, neither is having a well tuned piece of equipment but bandsaws are finicky and when i first started messin` with `em i "learned" for lots longer than i intended:eek:
 
Toni,

Tod makes some good points. If you still want to proceed, with what you've described I'd reference off of the lower wheel. It sounds like the upper wheel is attached similarly to the Delta/Grizzly bandsaws. If this is so, then you should be able to remove the upper wheel (after completely releasing the tension and removing the blade) via the nut on the threaded shaft. Behind the wheel you will likely see one or more washers that act to shim the wheel into the proper plane. Before you remove the upper wheel, write down the distance from the upper wheel to the straight edge that is still pressed up against the lower wheel's rim. This way you can calculate how many washers to put on the shaft behind the wheel. Remember, this is a balancing act. What may be perfect for one blade could be off for another if they don't require the same tension.

Good luck. Let me know if any other questions arise.
 
Often fellows forget the basics when they set up saws. the guides are not there to guide the blade but rather to keep the operator from pushing the blade.

When you put on a new blade, the guides (upper and lower) are moved out of the picture, as well as the thrust bearings (upper & lower) Tension & Track the blade so that it rides on the crown of the wheel When the wheels are in alignment the blade (without the guides in play) will ride on both crowns, Top & Bottom. It matters not if the front edges of the wheels are aligned or not.

Remember that the blade is to ride on the crown, forward of the crown will cause the blade to drift in. Behind the crown will cause the blade to drift out. There is no drift (on a undamaged blade) and you can cut a strip to try.

Only after the blade is in track should you install the guides and bearings. First the lower bearing is moved in (not touching but thickness of a dollar bill clearance) Next the top bearing (again not touching but thickness of dollar bill clearance) Next the guides (or cool blocks) slid in just after the gullets of the teeth. Again they should not touch, dollar bill again is a good gauge. Both upper and lower guides are locked in place.

Now you are ready to cut, if it is aligned correctly there should be no drift or wandering. If you are constantly pushing the blade to the side you are feeding too fast or too tight a radius.
 
bill, with toni living in spain it`s quite possible that his saw will have flat, non-crowned tires. but your advice about adjusting tracking with the guides pulled out of the way is sound no matter the saw.
if this saw has flat tires blades wider than 1/2" should be adjusted so the teeth are proud of the tire with about 1/2 of the gullet on and half off.
 
Thanks Lee. I have four equidistant hex bolts holding the shaft of the lower wheel, and a handled screw with a nut on the top one.

The question is how do I know which on should I take as a reference, because what it looks to me is that the lower one is not on the same plane as the top one even if it is vertical:dunno:

Whatever you do Toni, DO NOT fool with the hex bolts at the 3 o'clock and 9 o'clock position on your lower wheel or you will introduce a whole new set of problems.

For "some" possibly helpful information on Bandsaw setup, you might want to go to the MiniMax USA web site and take a look at their setup procedure video for the MM 16.
 
Last edited:
Hey Bill..... Is that dollar bill a pre-inflationary bill or a deflated one??:D It may make a difference in the thickness:rofl:

Aloha:wave:

PS. Just couldn't pass that one up:thumb:

Guess you'll have to use a 10 spot now days.... :eek:

Toni, the wheel is the last thing I would fool with. try other adjustments first and foremost . The wheels come from the factory aligned and unless something is worn or bent or broke they should never misalign. There are a lot of other directions to go before loosening and removing the wheels. Flat or crowned wheels the adjustments are quite the same, Clean sound tires is a key place to look as well. grit or lumps caused by resin buildup can cause these problems. as well as chunks missing from the tires.

If your saw has a two piece frame, there could be part of the misalignment, especially if you have installed a riser to gain cutting height.

Also Is this with every blade or just started with this new one? Could be the blade.
 
Last edited:
This thread needs pics! :D

Toni, if you can, please take some pics of your saw, of the various areas we are discussing, if, at the very least, so we can get a good look at your exotic European Bandsaw :thumb:
 
You are right Stu.
Here are the pics, and yes! althoug being an European saw (german in fact) it has crowned tires.

Top whel back outside. The two bolts hold the tensioning system plus the wheel. The black handle is to adjust the riding position of the blade on the wheel.
bandsaw1.jpg
Interior top wheel, see the tension spring, and the two bolts holding the whole device together with the wheel, There is a third bolt at the lower end of the device.
bandsaw2.jpgbandsaw3.jpgbandsaw4.jpg

Lower wheel inerior, with the different pulleys to change speeds.
bandsaw5.jpg
Lower wheel shaft and adjusting bolts seen from behind
bandsaw6.jpg
 
Well guys.

Finally, and thanks to all your suggestions plus a bit of patience I've been able to tune my bandsaw and I must say that is running better than new.

As I suspected the main problem was on the lower wheel that was neither vertical nor is the same plane as the top one.
A bit of tweaking on the 12 and 6 o`clock bolts that hold the shaft and there it goes!

What I did was 1st remove the table, second loosen the top and lower blade guides and then concentrate on the aligment of the wheels, and that the blade was running on the center of the crown.
When I had them aligned I checked the verticality of the blade with a level.

Then mounted the table and check that it was at 90º in both axes (North-South and West-east) with respect to the blade. I had to shim it on the back with two thin washers to get it right.

Finally I adjusted the top and lower guides and gave it a try.

Now it runs real smooth, with a lot less noise, without drifting and much better that when I got it new.

And the best of all is that as Tod said I've learnt a lot with the process.
 

Attachments

  • bandsaw7.jpg
    bandsaw7.jpg
    33.9 KB · Views: 17
  • bandsaw8.jpg
    bandsaw8.jpg
    37.7 KB · Views: 15
Congratulations on the Successful Tuneup, AND the new knowledge you've gained about your machine. Now IF something doesn't seem to be Quite Right later on when you're using it, you will know what and How to check it out and put it right again.:thumb: Everything is easier with a Finely Tuned Tool/Machine.:D
 
Top