Bernie Weishapl
Member
- Messages
- 4,834
- Location
- Goodland, Kansas
Well you guys ask and here it is. It is going to fairly long. Not sure if I should post it here or elsewhere so if you mods want to move it fine. Just let'em know where it is at.
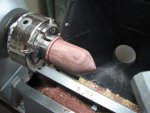
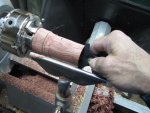
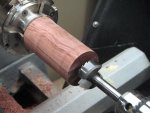
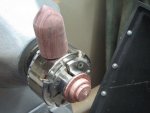
Starting out I use for the body a 2 X 2 sqaure by 4" long. For the top I use 3 X 3 by 3 to 4 inch long piece. Not critical. My birdhouses are from 4" to 5 1/2" long when completed. Anyway mount the body block between centers and turn it to round. I use a 1" roughing gouge for this. Once I get it rounded down to about a 1 5/8" and remember these are not critical measurements. I cut a tenon on the one end to mount in a chuck. When I am in a hurry I use a forstner bit to hollow the body. I do this to make them lighter. I generally hollow to 1 1/2" to 1 3/4" deep. Most time right at 1 5/8" deep. If I have the time and not under the gun to get a lot done I will use my hunter tool and hollow them. Once that is done then I start shaping the bottom. Don't do this before you drill or hollow or well you know. It will break off. Once I have it shaped and down to fairly thin I will part it off with a thin parting tool or if making a cove and bead I just let the spindle gouge turn it off into a point. Out of the piece left in the chuck I make a jam chuck to reverse the body on. I use a calipers and mark the size just slightly smaller. Then with a bedan tool, scraper or skew I sneak up on the size where it is a snug fit and won't come off. I then finish the bottom and sand. The body is done for now.
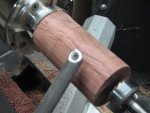
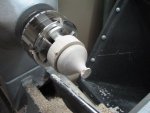
Next comes the top. Put between centers and turn round. Again make a tenon on one end and chuck up. Once there I again take the calipers and get the size of the body. I go 1/16" smaller so I can sneak up on a good fit. I hollow out part of the inside again to take off some weight but you don't need much. I then take a square scraper and start making the ledge or lip for the body to fit against. Again sneaking up on the size so you get a fairly snug fit and about 1/8" deep. If it is a little loose no biggie it is going to be glued anyway but I do like mine snug not tight. Once I get this done I finish forming the top and part off. I again use the piece still in the chuck as a jam chuck. Reverse the top and finish. I sand to 400 grit most times. Now I am at the point where I don't need to revers the top as I have learned to finish it while still turning and don't need to reverse it anymore.
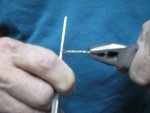
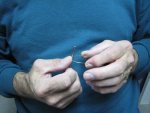
From there I go to the drill press and drill a 1/2" hole with a small forstner bit being careful and slow so as not to rip it apart. Just below it I drill a hole that a 3/16" dowel rod fits in for the perch. Once this is done I then put some Titebond III in the perch hole (medium CA would work) and glue the perch in place. I make the perch about 1 1/4" long. Once that is done I take the top and put glue inside the lid where the body will fit in making sure to get some on the side of the lip and bottom. Fit the body in and press. You don't need clamps. I just sit it upside down in a lid off a spray paint can and let dry. I then take some #20, 21, 22 or 23 gauge gold wire I think I got at wal-mart or one of the hobby stores. I bend a 1 1/2" or so piece over a rod and pinch the ends with a pair of pliers. You have to hold the pliers pretty tight. Pull up and twist the wire. You will get a small eyelet hanger. I make these while watching TV and have gotten about 100 or so and haven't even made a dent in the roll of wire. Drill a hole in the top of the cap just so the twisted wire fits in. Put some medium CA glue on the wire and insert in the hole. Let dry for a few minutes. Get your rattle can Lacquer out and give it 2 to 4 coats or more if you want more shine. I put my coats on every 30 minutes using the Deft lacquer.
Anyway that is how I make'em. Really simple and easy. Kids love'em and so does the wife. My grandkids ask me for one every year so they can have a collection of them different every year. This year will be their 4th house. Enjoy and hope this helps.
Starting out I use for the body a 2 X 2 sqaure by 4" long. For the top I use 3 X 3 by 3 to 4 inch long piece. Not critical. My birdhouses are from 4" to 5 1/2" long when completed. Anyway mount the body block between centers and turn it to round. I use a 1" roughing gouge for this. Once I get it rounded down to about a 1 5/8" and remember these are not critical measurements. I cut a tenon on the one end to mount in a chuck. When I am in a hurry I use a forstner bit to hollow the body. I do this to make them lighter. I generally hollow to 1 1/2" to 1 3/4" deep. Most time right at 1 5/8" deep. If I have the time and not under the gun to get a lot done I will use my hunter tool and hollow them. Once that is done then I start shaping the bottom. Don't do this before you drill or hollow or well you know. It will break off. Once I have it shaped and down to fairly thin I will part it off with a thin parting tool or if making a cove and bead I just let the spindle gouge turn it off into a point. Out of the piece left in the chuck I make a jam chuck to reverse the body on. I use a calipers and mark the size just slightly smaller. Then with a bedan tool, scraper or skew I sneak up on the size where it is a snug fit and won't come off. I then finish the bottom and sand. The body is done for now.
Next comes the top. Put between centers and turn round. Again make a tenon on one end and chuck up. Once there I again take the calipers and get the size of the body. I go 1/16" smaller so I can sneak up on a good fit. I hollow out part of the inside again to take off some weight but you don't need much. I then take a square scraper and start making the ledge or lip for the body to fit against. Again sneaking up on the size so you get a fairly snug fit and about 1/8" deep. If it is a little loose no biggie it is going to be glued anyway but I do like mine snug not tight. Once I get this done I finish forming the top and part off. I again use the piece still in the chuck as a jam chuck. Reverse the top and finish. I sand to 400 grit most times. Now I am at the point where I don't need to revers the top as I have learned to finish it while still turning and don't need to reverse it anymore.
From there I go to the drill press and drill a 1/2" hole with a small forstner bit being careful and slow so as not to rip it apart. Just below it I drill a hole that a 3/16" dowel rod fits in for the perch. Once this is done I then put some Titebond III in the perch hole (medium CA would work) and glue the perch in place. I make the perch about 1 1/4" long. Once that is done I take the top and put glue inside the lid where the body will fit in making sure to get some on the side of the lip and bottom. Fit the body in and press. You don't need clamps. I just sit it upside down in a lid off a spray paint can and let dry. I then take some #20, 21, 22 or 23 gauge gold wire I think I got at wal-mart or one of the hobby stores. I bend a 1 1/2" or so piece over a rod and pinch the ends with a pair of pliers. You have to hold the pliers pretty tight. Pull up and twist the wire. You will get a small eyelet hanger. I make these while watching TV and have gotten about 100 or so and haven't even made a dent in the roll of wire. Drill a hole in the top of the cap just so the twisted wire fits in. Put some medium CA glue on the wire and insert in the hole. Let dry for a few minutes. Get your rattle can Lacquer out and give it 2 to 4 coats or more if you want more shine. I put my coats on every 30 minutes using the Deft lacquer.
Anyway that is how I make'em. Really simple and easy. Kids love'em and so does the wife. My grandkids ask me for one every year so they can have a collection of them different every year. This year will be their 4th house. Enjoy and hope this helps.