Pull Out SCMS Station.....?

...View attachment 27606
The blade on top, the copper colored one, is the one that came with the saw, I do not think it is a chopsaw blade, it will sometimes grab the piece of wood, lifting it violently. You can see the angle of the teeth on the bottom blade, the cutoff saw blade is much different....

I believe that what you want is a 'negative rake' blade. I think the Forrest Chopmaster® has something like a 7° negative rake, and it performs very well on my CF8B.

I sure wish Hitachi would market your saw in the U.S.! I'd buy one in a heartbeat!
 
I believe that what you want is a 'negative rake' blade. I think the Forrest Chopmaster® has something like a 7° negative rake, and it performs very well on my CF8B.

I sure wish Hitachi would market your saw in the U.S.! I'd buy one in a heartbeat!

The blade on the bottom is one from Hitachi made for the saw, so it must have the right rake or whatever it is called. :dunno: I've not tried it out yet, too busy building the stand.

I know that this saw would be a winner in the US, even just for trim carpenters, the 12Kg (26 pound) weight alone would sell it :D

For comparison, the old saw I had, the C8FB is 38.6 pounds, a full 12.6 pounds more, and the larger saws, the 10" (43 lbs) and the 12" (66 lbs) are
a LOT more saw to lug around.

Cheers!
 
I got things well along to finished today :thumb:


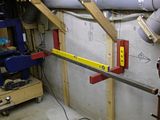
I got one of the brackets mounted where I want it, and then I made sure the other was nice and level too.


This is the first position, there is about 46" on either side of the blade


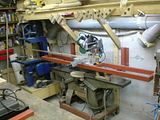
This is position two, in this position I'll have nearly 8' to the left of the blade and still have 46" to the right of the blade.


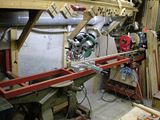
This is position three, in this position, I have nearly 8' to the left of the blade, and well over that to the right of the blade, close to 10'. In the third position, the drawer slides are extended about 3/4 of the way, all the way out, at full extension, the slides are not very solid. I honestly do not think these slides will do, for now, I'll use them, but I think I'll be in the market for some new, heavier duty slides. The slides I have now are rated for 35Kg, or about 75 lbs.


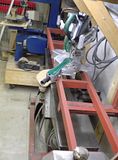
Here the saw is folded up, and the footprint of the saw and station is really compact, the saw and station are within the footprint of the jointer, so I think I've achieved what I set out to do! ;D

I've got to make the torsion box tables for each side, and then figure out some kind of locking device for holding the saw in various positions, from 1 to 3.

I also need to get on the DC tray for this saw, and the surround, I have a few ideas about that too :rolleyes:

I'm getting closer to be able to send for my saw stop :thumb:

Cheers!
 
I must be missing some thing I can only see one rusty ol blade.:thumb:
The blade on top is a copper colored, or coated :huh: blade, it is the one that came with the saw, I'm sure it was designed for a regular circular saw. If you look closely, the new blade is laying under the old copper colored blade, you can only see the carbide teeth of the new blade.

Chuck Thoits said:
I see the Accuride 9301 HD slides are good for 500 lbs per pair.But your looking at well over 100 bucks a pair.:eek:

Yeah, I see that too, plus shipping :rolleyes:

I also see that LV has these slides......


<<Linky Pics

Which are rated to 400 lbs, but they sure do look strong.

They are only $59 for the 18" slide...... :dunno:
 
... and then figure out some kind of locking device for holding the saw in various positions, from 1 to 3.

I was thinking about some plate or angle (with a hole drilled in it) welded to the table that would slide against the strut of your bracket, which would have holes drilling in it at the correct intervals. Using a pin, you would just drop it in at the position you want. It would have some wiggle in it depending on the tolerance of pin and the holes. I am sure you will come up with something better; some type of clamp system.

I enjoy watching you improve the "dungeon", but I one question I have been meaning to ask, what was the original purpose/intent of the "dungeon" when the building was built? What do your neighbors use their's for, if they have one?
 
FYI

FYI and my edification your post from Tokyo hit me where you remember. I spent 47-49 in GHQ FEC; Gen. MacArthur's HQ (Dai Ichi Blg). We lived in the old, then new Finance Ministry blg. Hard to believe it was 60 years ago. Occupation in Japan was a pleasant experience for a 17 year old (I just didn't know it at the time).

Ray Gerdes (former Sgt. US Army)
 
"I enjoy watching you improve the "dungeon", but I have one question I have been meaning to ask, what was the original purpose/intent of the "dungeon" when the building was built? What do your neighbors use their's for, if they have one??"

Stu's Dungeon was built as a shop because he didn't have any other place deep enough in the ground where he could build it. Things are built kinda close together over there. Most woodworkers are real down to earth people. Stu just took it a step further & is a real down in the earth wood worker.:eek::rofl::thumb::wave::wave::):D Hey Stu we must be working toward the same end or something our shops are about the same size mine is 13'5" x 24'5" above ground no windows 1 exterior door. Both our shops stuffed with tools & we are always looking for a way to make more room or better use the room we have.
 
Last edited:
I can understand how and why Stu is using the "dungeon" for a shop space. I was more interested in what the architect intended the use of this space and what his neighbors use this space for if they have something similar . A trap door into a concrete space under a house or retail building here in the States is unusual, unless it was a bomb or tornado shelter. I am just curious if it was built for some type of emergency shelter or just because of limited space in Japan, a monster-inlaw apartment.:)
 
Things are looking great in the dungeon Stu. :thumb: Just curious but will the sawdust get into the glides or will you put a shield over them?

The slides should be out of the line of fire, there will be a pan under the saw that will direct dust to the DC hook up, as well as a surround to help the dust reach the DC hose.

I was thinking about some plate or angle (with a hole drilled in it) welded to the table that would slide against the strut of your bracket, which would have holes drilling in it at the correct intervals. Using a pin, you would just drop it in at the position you want. It would have some wiggle in it depending on the tolerance of pin and the holes. I am sure you will come up with something better; some type of clamp system.
That is pretty much what I'm thinking now too, I thought about a clamp or something, but that would put stress on the slider.

Bill Satko said:
I enjoy watching you improve the "dungeon", but I one question I have been meaning to ask, what was the original purpose/intent of the "dungeon" when the building was built? What do your neighbors use their's for, if they have one?

The original design was a "Trunk Room", yes, storage, but I got hold of the plans and said "Oh that would make a good workshop" :D

We got them to dig it a bit deeper, as it originally had only 7' ceilings. The rules here limit the livable space you can have in a building, so the hatch was the way it had to be, with a ladder down, that made it a storage area, trust me they have all manner so stupid rules here :doh:
 
I ended up putting another set of sliders on the set up, sure made things a LOT better, I don't think I'll be needing any heavy duty slides! :thumb:
dual_sliders.JPG


slider_stop1.JPG slider_stop2.JPG
I also made a stop system, which is just two pins, some "L" brackets and some holes, but it too works well! :D

next up the Tables and then the DC hook ups :rolleyes:
 
Stu, I had been wondering about maybe adding more slides, (which you have now done), and if that still isn't sturdy enough, maybe you could add another "L" bracket at each end of your slide table and put one slider on each one of those which should really make it sturdy. I also wondered about maybe using the next size longer sliders (if they would not be too long in the no 1 position), and with the longer sliders not being "Fully extended" when the table is pulled out to position 3, it might be more steady yet.:dunno: Looking good anyhow.:thumb:
 
Norman, it is good and stout now, even in the third position, one that I'm sure I'll not be using very often at all, it is more than solid enough. Remember, I'll not be cutting up 4" thick slabs of 18" wide maple on this saw, it is not that big, at the full width, of 312mm (12 1/4") it will only cut to a depth of 50mm (1.96") it will but a narrower board at a 265mm (10 3/8") at 60mm (2.36"), so I'm not going to be able to but large, heavy slabs of wood.
 
Norman, it is good and stout now, even in the third position, one that I'm sure I'll not be using very often at all, it is more than solid enough. Remember, I'll not be cutting up 4" thick slabs of 18" wide maple on this saw, it is not that big, at the full width, of 312mm (12 1/4") it will only cut to a depth of 50mm (1.96") it will but a narrower board at a 265mm (10 3/8") at 60mm (2.36"), so I'm not going to be able to but large, heavy slabs of wood.

Hey, that's GREAT that it was that simple to fix.:thumb: I keep forgetting that it is a "LITTLE" version of the saw, (Short Memory, you know).:rofl::rofl::rofl:
Looks like you don't like Much More Work in there before you can get that New TS on it's way.:thumb:
 
I built the Torsion box tables for the saw set up........

torsion_box1.jpg torsion_box2.jpg torsion_box3.jpg
I used the "Halved Joint" to make the grids, that was sure easy to do. I know the plywood I used is on the thick side, at 9mm, but I wanted to have a durable top.

torsion_boxes_in_place.jpg]
I have them just sitting in place, they are just a tick too high, which is what I wanted, as I'll shim the saw up so they are exactly coplanar. I'll also be putting a layer of formica on the top, and cutting a notch in the right table to allow the saw to do a 45 degree cut, the left table will only need a bit on one corner cut off.

pin_detail.jpg pin_detail2.jpg
Here are a couple of more detailed pics of the pin system I'm using to keep the sliding table in place while in use with the various positions, works well, and with the pins in place, everything is rock solid! 5:)5

Cheers!
 
Last edited:
Like Larry says "When in doubt, build it stout" :D

OK, I have a question for you folks, if I transition from my 6" ID DC pipe, to a rectangular pipe, of the same cross section area, will I cause any problems?

I'm thinking it will be a lot easier to fit stuff if I got for a somewhat flat rectangular duct..... :dunno:

If I have a round pipe, with a 6" diameter, I have a cross section, or surface area of 28.6 square inches, if I replaced that with a square duct that was 7" x 4" I'd have an area of 28 square inches, this duct would not be that hard to make, well the transition would be a bit of work, but I've done something similar with my thickness jointer before, so I think I can do it again :)

What say you?

Cheers!
 
Top