Jay, you have done some updating on your site. Looks good. I'm thinking you and Ed should get together and work out a deal on selling his gears for the Busker and the Senior 20. I really like the gears he makes.

I really think I need maybe a little more experience before I tackle a Universal. "One build, an organ builder it does not make", or however that saying goes. Next time my wife turns her back I just may be ordering some stuff for a Busker....... She has been watching me pretty closely after the drill press and band saw buy. Never mind she spends more on material for quilts than I do on tools!

Today I scrolled a design in another panel for the back of my organ. Three tries and I going to just go with this one, Maybe I'm gett'n to old for the scroll saw!
 
Hi all,
I was surfing around the other day, looking for ideas on some parts of the Senior I'm building, and I came across the blog of a guy who has built a John Smith Busker. Perhaps you've seen it -- if not, it is worth a look just to be astonished at the level of care and fussiness that he has put into his organ. Decorated reservoir? metal air pipes instead of plastic tubing? pipe notes labeled on the tracker bar? This guy is amazing:

http://organcrank.blogspot.com/sear...-max=2014-01-01T00:00:00-08:00&max-results=21

OK, back to the shop.
 
Well, in case you need to know, Hut's Crystal Clear Plastic Polished took out the scratch. I tried a test piece first. Put a similar scratch across it and went through the micro mesh grits. It was not satisfactory. I polished it with the Hut's and it took out the fine scratches left by the micro mesh and the scratch on the side I didn't micro mesh. I think if it was a deep scratch the micro mesh would have been necessary. So, I think any good plastic polish would work, probably tooth paste also.
 
Some Update Pictures

Just for the heck of it I decided to post some progress pictures. It if funny, but the part of this build that I thought would be the easiest for me has got me really struggling. That is how and what to do for a case. I want to have a hinged top that I can lift up and I want to have the front panel hinged so I can open it. This is mainly to show people the innards and also to make repairs/adjustment easier. I'm slowly working through it, should have sat down and drawn a plan, but I didn't.

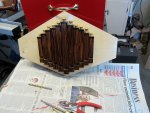
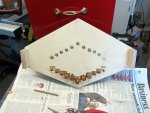
The photos show front and back of my pipes mounted on the "pipe mount board", well what else could you call it?

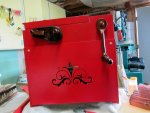
The other picture is the scrolling I did on the back. I found a piece of white almost see through material in one of my wife's material boxes.... many, many material boxes, sitting beside the many, many yarn boxes... I sprayed the material flat black and glued it behind the scroll work. Looks almost like speaker material.

I still have to make the base molding. I have a real nice mahogany board that I think I will make it out of and also the molding that will go around the case.

Did I say my organ is RED
 

Attachments

  • IMG_1309.JPG
    IMG_1309.JPG
    118.4 KB · Views: 30
  • IMG_1310.JPG
    IMG_1310.JPG
    109.3 KB · Views: 31
  • IMG_1304.JPG
    IMG_1304.JPG
    96.1 KB · Views: 31
Looks good Paul. I really like the scroll work on the back. That is a nice touch. I scrolled "music notes" on the back of mine. I think I will steal your idea though and add a piece of dark material to the inside. That really let's the scroll work show well.
 
Paul,

Outstanding work on the Red Beast. I really want to thank you for making it red -- it's so easy to find your posts :thumb:

I'm relating also to your comment about the part that you thought would be easier. I've started to put my pressure box and reservoir assembly together on the side boards, and I'm finding that the space between the air outlet on the reservoir and the air inlet on the bottom of the pressure box is quite small, also, they don't line up. I suppose I should have planned ahead instead of just following the dimensions on the plans, but too late for that now. The net result is that my bicycle tube air passage is scrunched up, which I'm worried will restrict the air flow.
Hose Misalignment.jpg
I notice that there is maybe a quarter inch between the edge of the side boards and my reservoir assembly (front to back). Is it supposed to be mounted so that it aligns exactly with the front edge of the side boards? I haven't started playing with the pipe placement yet, so I don't know what the space situation will be on the front of the organ.

On the other hand, it is starting to look a lot like a Senior 20. I finished the rough work on the handle, and am happy with it.
Crank.jpg

I'm glad to see some recent posts on this thread -- for a minute I thought everyone had jumped ship and gone over to the Topsy thread :D
 
Last edited:
Top