Organ Build

Jay thanks for all the pictures they will be a big help when we get going. You did a good job of explaining the pipe build. It doesn't look like a very hard thing to do just will take some time to get them right.
Toni Thanks for the link to the tuner, that seems like a great price. OR ----We could all make our pipes and send them to the expert teacher for tuning LOL.
Charles
 
now i'm really tempted to send for the plans. i must be falling under the influence of darth jay :rofl::rofl: (i thought the spinny guys were the dark side). but, it will have to take it's place behind the 3 projects for the fair, and the sis in law's 5 poster frames... :(
 
now i'm really tempted to send for the plans. i must be falling under the influence of darth jay :rofl::rofl: (i thought the spinny guys were the dark side). but, it will have to take it's place behind the 3 projects for the fair, and the sis in law's 5 poster frames... :(

Dan if you are going to order do it from John Smith direct thats the best way and welcome aboard ya know your going to get them LOL
Jay
 
Hey, guys, I just ordered the Seiko tuner like Toni's from Amazon for less than $13! I had a book I wanted and was waiting for the total to go over $25 for the free shipping. This did it! Should be here by the end of next week.

WooHoo! :D:thumb::D
 
Thats not bad. There is also some free software packages - so if you have a mic for your pc, you might be able to do it for free.

Dean could you go into more detail with the software your talking about? I've got my old computer set up in the shop and could use that and the software rather than buy a tuner. I do have one but it is for an ukulele:D I think that would be just like a guitar and it seems it was said you can't use that kind of a tuner.:(
 
You can build the pipes out of almost anything but you should alway use hardwood of some type on the front parts. This pipe is build from 3mm (1/8") Baltic Birch ply with a soft maple plug. Even Oak will work if that is all you have BUT its best to use something with a more closed grain.
I also like building the body's of the pipes from pine, Sugar pine would work Great if you can get that up there or basswood.

The easy answer is, its what I had in front of me:rofl:

The tuner I have I got from the local music store just don't get one that is only for guitars

The one Toni shows is a good one and thats a very good price.
Jay
Thanks for the info Jay. I am just waiting to get some extra cash together to get the plans. Looking forward to building it. Thanks for all the posts with the pics. You have done a fantastic job building it and expaining and recording every step. Very helpful.
 
Continued from post #128

I was talking to Peter today and he brought up a good point about sealing the inside of the pipes. I should have shown how I did that and made a bigger point about it as that is a very important step to making a good sounding pipe so here goes.

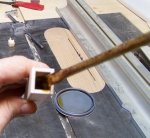
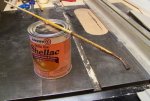
101_1083.JPG101_1084.JPG
This is my high tech applicator!!! yes it is a acid brush with a 1/4" dowel rod stuck in it and bent :thumb:
I use shellac but you can also use diluted glue ( see John's plans for mix) I just like this stuff and I use it to seal everything.

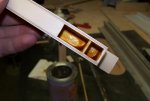
101_1086.JPG
As you can see I get a puddle of shellac inside to make sure it seals then dump out the extra.

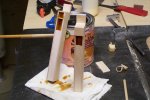
101_1087.JPG
This is my high tech drying rack :rofl:

After it dries I then sand the top flat so I have a clean surface to glue the top and bottom caps to. I finish the outside after I have them voiced
 
Last edited:
Jay, what about the outside of the pipe? If that will be getting any treatment, why not just dip the whole pipe and then let it drip dry? One last thing and this may be obvious to most but I'm going to have a lot of Sapele scraps around the shop soon. Will that work for the front of the pipes?:dunno: I just don't know much about the different mahoganies.
 
Jay, what about the outside of the pipe? If that will be getting any treatment, why not just dip the whole pipe and then let it drip dry? One last thing and this may be obvious to most but I'm going to have a lot of Sapele scraps around the shop soon. Will that work for the front of the pipes?:dunno: I just don't know much about the different mahoganies.

That should work fine and look good too if you look at my videos the front on them are Walnut and I used Bubinga on the front row of pipes on my Universal and it works fine. :thumb:
I don't seal the out side until after the fronts are on and voiced and the inside need to be sealed before voicing. If you dip it then you have sealed your gluing surface. I get them voiced then pull the plug out and spray with Shellac sand and spray again until I'm happy with the finish you can use what ever finish you have or want. My first organ was finished with a catalyzed lacquer because that was what I was spraying at the shop back then. :dunno:
You can also use sanding sealer or just thinned down PVA glue. The main thing is be sure and seal EVERYTHING but the gluing surfaces. :thumb:

Jay
 
Hello from John Smith

Hello all you practical woodworkers I have been looking at this site for a few days regarding the building of my organ. I think the idea of you building as a group is super, You have a good leader with Jay who will clearly keep you all in good order. Unfortunately I am not in a position to spend too much time on websites, my eyes are just not up to it, but I will try and keep a track on progress. I am very impressed with your honesty regarding not copying my plans this is something I really appreciate. Since I had to retire early I have now put 15 years of my life into developing organs for myself and other amateurs to build, the modest income from the plans enabling me to continue doing this. I always thought I was unique in always from the earliest age wanting to understand and build an organ, it turns out the world is full of others just the same. The result of my labours has been that I have remained sane and it would seem made a lot of other like minded people very happy, thats what I call real wealth. When I wanted to find practical information to build a mechanical organ it was virtually unobtainable, it is nice to know that now organs built fom my designs are almost certainly the most numerous in the world. Just a little of my background, Born as W.W.2 started my early life was hard and if I wanted something to play with it had to be made using recycled materials, something I had an aptitude for which has stayed with me. I was very backward at school which was tough, I now realise that I was Dislexic. I have found this is a common problem with a lot of the people who have built my organs. This does sometimes cause problems as people tend to ignore the written instructions and just refer to the drawings and video, I understand this as I would probably do the same. So please read the words for each section of the organ you are about to work on. It is best to not think too much about what comes next as things will come clear as you go along. Peter Shirtcliffe has given you all good advice, stick to the plan, do your own thing on number 2 organ. Regarding which wood to use the answer is simple apart from new soft wood virtually anything will do for pipe bodies the sealing is the important thing. Use of special woods is just one of many organ builders myths, the pipes in the original fair organs would often have quite rough backs and sides with a decent bit of wood for the fronts mainly for apperances. Having said that it is good to choose a wood for the mouth parts of the pipe that can be sanded to a sharp clean edge. As woodworkers, building an organ offers unlimited scope to use various woods to produce something very personalised, interesting to everyone and valuable.
There has been comment that the Senior 20 plans require extra information, but this is not the case. Originally it was a follow on design for builders of the Busker, but I quickly found that people wanted to build it as a first organ so I added all the extra detail needed. I did have a few problems in the production of the extra video when 2 video cameras died on me which is why you will see three different picture qualities, it is also important to watch all three sections of the video before starting work. I have never pushed the Senior 20 for this reason but plenty have been made with very good results.
Someone was asking about tuners, well all you need to ask for is a Chromatic tuner, nothing fancy the cheapest one in the shop will do on ebay from £7.
The crankshaft which for many will be a difficult part does not have to be welded engineering adhesive will work . just get every part totally grease free, Rollcutter sells a really nice ready made one.
Well this will do from me for now. John Smith
 
Top