Marc, The organ looks great. The stand is also very nice. I don't see wheels so I assume it is a stand for the organ in your home. Did you hand paint the picture or is it a print of some kind?

John, the bellows look correct to me. Looks like your well on your way.

Bob, you have a very good list of music there. You have many that I do not have. It is nice to have an assortmant like you said. When out playing for several hours at a time you can get bored if playing the same tune over and over.
 
I found music by Alan Pell to also be good arrangments. Melvyn can and will punch some of his music as well although he does not list this music in his listings. I asked him and he punched a couple rolls for me.
 
My most played rolls are the French Collection, Beer Barrel Polka (and the other two on that roll), Chitty Chitty Bang Bang, Tiroler Holzhacker (and the other two).
Also, it's surprising how impressed people are with the classical tunes. The Light Cavalry Overture is a whole roll that really shows off the different stops on the Universal.
One daughter wanted me to get the Gershwin Medley. It's not my favorite. The ABBA is surprisingly good, and people like it because the recognize it and it's not what they expect to hear.
I keep a check list when I play to help me avoid repeats. I think I have over three hours of music.
I got all four Christmas rolls and I have played at my town's Christmas event for the last 4 years. I also play at the 4th of July event. Nice community park, steam train, vintage houses, craft fair, food, etc.
I've become the "Civic Organ Grinder."

Bob
 
Can't understand this false start stuff, least after the first three or so I decided to tell people I was making prototypes before I did the real thing. Let's see, Jay, how many times did I order bellows cloth from you.....?

Mr. Clayton you are off to a great start. very nice looking work. Did your plans show the tie-downs for the valves like that? I'm wondering if they have upgraded.. Mine are not quite like that. I just laid pieces of card stock over the ends to staple through. Didn't have the extra piece at the end that is the width of the leather flapper. Mighty fine.....

Marc, that is a beautiful organ. I love the pictures on it.
 
Last edited:
I'll have to set up a new shelf in the shop for my prototypes :D

I've actually had pretty good luck with everything so far, with the exception of the bellows cloth. Once I saw how the corner folds were supposed to go, and how the spacing between the stiffeners affected the final fit, the clouds lifted somewhat. You'd think for something that simple, it would be an easy thing to do. To poorly paraphrase somebody famous "we get better at what we persist in doing -- not that the nature of the thing gets easier, but our ability to do it improves". So, hooray for prototypes! Version 3 will be perfect.

Nope -- I imagine my set of plans are pretty much the same as everybody else's. I've seen several ways to do the valve tie-downs. I knew from Jay's posts the new method of doing it, and I saw in his pictures some sort of "thing" over the ends of the valve leather that he had stapled through. I asked him about it, and he said that its basic purpose was to keep the staples from tearing through the leather. I figured by making my little "thingy" I could get a better glue joint and keep the staples where they belonged all in one piece. 'bout the last thing I want to do someday is rip apart the bellows and reservoir to repair a broken valve.

A question for those of you who have gone before -- I was going to use a silicon sealer on the joint between bellows and reservoir, to ensure a good strong seal. But everybody else seems to use a piece of weatherstripping instead. After thinking about it, I conclude that doing it that way must be better if you ever have to separate those two pieces. Using my way, the two are pretty much joined forever. Is that a good conclusion? Are there any other reasons why you would use a strip of gasket there (which is harder to get a good seal with), rather than using a liquid sealer?
 
Leather , rubber, etc. don't last forever. Someday someone will be rebuilding the bellows. Better to have them thank you for not gluing everything together than curse you and your offspring. :D
The weatherstripping works fine.
 
John, only thing we cannot advise you on is which hat you are going to buy...... You are on your own with that! I'm getting close to needing to pick mine out! Yahooooooooooooo!


Well maybe close. Like I said earlier I keep finding things to improve upon. I have new sides cut out and ready to take the organ apart and put it back together using the newer sides. Worked all day yesterday putting some more pizzaz to the pipes that will show, I have 5 more to do. It's slow but makes them look like they are finished off.
 
Last edited:
Your advice, please -- Joining the bellows
I've just about got my two bellows working and ready to join to the reservoir. It is my understanding that the spacer that goes between the two bellows is there to join the units, and provide clearance so the bellows don't rub against each other. The method of attachment is to glue the spacer to the top side boards of each bellows, right over the top of the glued-on bellows fabric, leaving the bottom side boards free to pump.

Does that sound right to you guys?

Thanks.
 
John, sound right on for joining the bellows. Remember once the reservoir is attached and the whole unit is mounted in the organ this becomes very ridged. With just the reservoir on it it's quite ridged as well. The wood strip will glue to the bellow cloth quite well so there shouldn't be any trouble. That's what I did with the busker I'm building and the bellows are near the same.

Looks like you're coming along nicely. These parts come together rather fast. Other parts not so fast. Keep us posted on your progress we all like to see someone else's work.

:lurk::lurk::lurk:
 
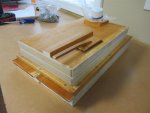
Today I finished gluing the bellows together, sealed the spacer, then screwed on the reservoir. Preliminary tests look good. I still have to find some piano wire so I can finish the spill valve.

I do have one concern -- While doing a pressure test, the end fold of the reservoir blew out -- not damaged, just turned inside out. Has anybody else had that problem? I'm hoping that it is just because I don't have the spill valve hooked up yet, so the reservoir is left to open farther than it is designed to. With it opening the prescribed 40mm or whatever, I'm hoping that it will stay in place.
Complete Wind Box.jpgGusset Blow Out.jpg

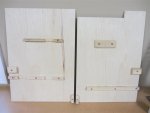
While waiting for glue to dry, I started fitting together the two side panels. It seemed to go OK, and looks like other pix I have seen of the Senior 20. Guess I'll see pretty quick, when it's time to start screwing things together.
Side Mounting Boards.jpg
 
Top