2 small tables-end grain lamp/end table, small storage coffee table

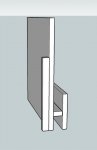
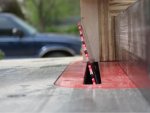
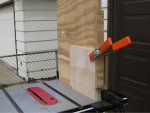
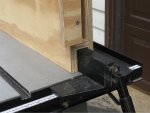
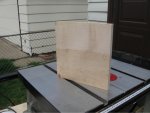
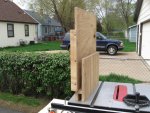
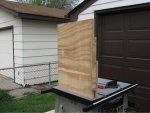
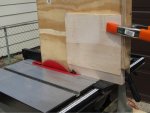
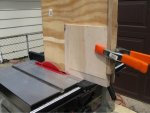
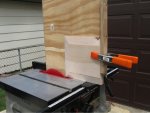
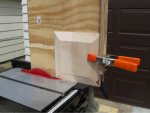
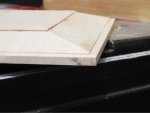
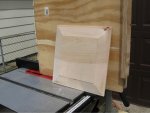
here's that jig. the tall board is the one you clamp your panel to, the smallest board is the stop block, and the other 2 are cut to fit your table saw's rip fence, so measure for a snug fit. just angle the blade to the angle you want, and keep the outer corner of the blade just proud of the board.
 

Attachments

  • raised panel jig.jpg
    raised panel jig.jpg
    21.5 KB · Views: 9
the question to the committee is: should allen spend almost $100 on a raised panel bit for his router, or spend about $10 (or less if he has the plywood laying about), and send the difference to me? :D:thumb::rofl:

2 passes on each side, one to make the angle cut, the other (just about 1/4" high) to insert into the slot in your frame vs the noise, dust and shavings flying about. :dunno:

i'll send you the address where the $90+ is to be sent... :D:thumb:

well allen for your first attemp at a raised panel i agree with dan,, even if he is from the northern states:) and has a donkey as his avatar.. might be a relative ooops:) take your time and you can do a nice raised panel like dan is suggesting and then if you want to make more you can go to the tool store and pay some high dollars for bit to do it and then hope you dont wiggle to much.. there are more chances of having a mishap with the router bit approach. and yu need a strong router to do it. and several passes.. so lets get the first ones done first before we graduate yu to the big league:)
 
dont worry, I only need 4 small panels, maybe 6, but maybe 8 bf total of wood, and I have 250 bf of ash, so Im prepared.(I have to peg the ends first, dont know how large a small task can be for me)
 
well allen for your first attemp at a raised panel i agree with dan,, even if he is from the northern states:) and has a donkey as his avatar.. might be a relative ooops:) take your time and you can do a nice raised panel like dan is suggesting and then if you want to make more you can go to the tool store and pay some high dollars for bit to do it and then hope you dont wiggle to much.. there are more chances of having a mishap with the router bit approach. and yu need a strong router to do it. and several passes.. so lets get the first ones done first before we graduate yu to the big league:)

that's no donkey larry, that's a burro, and an old one at that. :D

when you go to cut your panel allen, remember the width of your dado in the frame. when you set up to cut, mark that at the lower right side of the edge you are cutting. that way, you know that the angle starts in the right area, no matter how shallow or steep the angle of the cut. if its nice out tomorrow morning, i'll take a series of how to pics for you (also, so that larry can follow along too :D:thumb: )
 
I looked up the procedure, but do I use a crosscut blade or ripping blade, or just a combo, like 40-60 teeth?(I wont be attacking this project till sunday,as long as pegging goes easily on the breadboards, its back to work tomorrow, and Im done usually when I get home)
 
Last edited:
which end of the burro do i follow??? what seperates a burro from a donkey? other than a bucket of grain:) will be watchun to se how to do a razed panel i need to step higher when i get over near dans place next year:)
 
I personally dont think anything beats a good mortise and tenon joint, or dovetail joint.

For the drawers in the bed I'm designing I'll use dovetail joints in the front. I've been practicing cutting them by hand and have determined 2 things;

1) My 35 year old hand held miter saw just isn't sharp enough or straight enough to cut dovetails.

2) It's a lot more difficult to get them to look good and be tight than what the videos on the Internet show. ;)

I'm running out of scrap wood to use. I've been reduced to taking some 4x4s I salvaged from pallets and slicing them down to 1" boards on the table saw. Hopefully before I use all the wood in OKC I'll be able to make a decent hand cut dovetail joint. :D
 
terry, it kills me when I practice cause I also have been salvaging any scrap wood I can. I recently went behind my shed, took out all the old pressure treated junk I had laying around, scraps, busted up chairs, old decking I had taken from elsewhere, and have been pulling nails and screws, and slicing off the old dirty surface, down to a new clean straight board. They may be a little damp, but it gives me alot of practice wood.
Even if I need to set a height on a router bit or something, and I want to see how it looks, Ill use an edge on some of the scrap woods, so it goes fast.
Then I slice it down, and reuse the new edge for more work.
 
raised panel cutting on ts with jig part 1

the first 2 pics are of the jig, the third is the board to be cut, the fourth is how the jig rides on the rip fence, the fifth is the board clamped in place, and the sixth is the blade raised and tilted to the desired angle. in this case, 14 degrees.
 

Attachments

  • IMG_0580.JPG
    IMG_0580.JPG
    71 KB · Views: 23
  • IMG_0579.JPG
    IMG_0579.JPG
    90 KB · Views: 23
  • IMG_0578.JPG
    IMG_0578.JPG
    90 KB · Views: 23
  • IMG_0577.JPG
    IMG_0577.JPG
    89.1 KB · Views: 22
  • IMG_0576.JPG
    IMG_0576.JPG
    148.9 KB · Views: 23
  • IMG_0575.JPG
    IMG_0575.JPG
    103.3 KB · Views: 24
raised panel cutting on ts with jig part 2

the first four pics are of the first 4 cuts, pic 5 is after returning the blade to 90 degrees (that's up and down larry :D) and lowering the blade to about a little more than 1/4" or so, and the sixth pic is of the finished panel.

i hope this helps you allen. it took longer to take the pics than to cut the panel.
 

Attachments

  • IMG_0581.JPG
    IMG_0581.JPG
    95.7 KB · Views: 22
  • IMG_0582.JPG
    IMG_0582.JPG
    98.3 KB · Views: 19
  • IMG_0583.JPG
    IMG_0583.JPG
    91.4 KB · Views: 20
  • IMG_0584.JPG
    IMG_0584.JPG
    90.6 KB · Views: 21
  • IMG_0585.JPG
    IMG_0585.JPG
    55.5 KB · Views: 23
  • IMG_0586.JPG
    IMG_0586.JPG
    90.2 KB · Views: 23
I might buy a new blade for the TS, sorry.

how much wider should the panel be than the inside measurements of the rails and stiles frame?(ok, thats backwards, if I wanted a panel 8x10, with a 2 inch wide frame, do I make the panel 8.25 by 10.25? Is 1/4 inch all I need to fit into the 1/4 inch dado cut on the rails and stiles?(figure the dado to be around 3/4 of an inch deep)
 
Last edited:
ok, if you want an over all item that is 8x12, with a 2" wide frame, the visible panel will be 4x8, with the extra 1/4" on each side for the rabbet, it will be 4.5"x8.5". as for the rabbet itself, i usually don't go any deeper than 3/8" or wider than 1/4". as for the angle of the cut, i wouldn't go any higher than 14 degrees, or so. in the example, i went with 1/4" for the edge, and 2" up. i think the marks can be seen in the pic of the blade.

hmm, $50 for the blade, $40 for me, that isn't too bad...:rofl::rofl::rofl:

i usually use a freud 60 tooth blade for this.
 
thanx dan, I was running off to bed, I measured up approx what I want, have no clue what the final table will look like(although the top has that chip, and that ticks me off)
Gonna use maple again for the legs, since I have alot of thick maple, maybe stain it up a bit, and ash for the panels, stained same as maple, light honey stain I think, walnut for the rails and stiles....or at least thats what Im thinking.
 
tell you what, send me the over all dimensions, and i'll run it through sketchup, not half as much fun as making boo-boos with lumber, but then again, it would prevent making boo-boos with lumber. :thumb:
 
Top