Biscuit Joiner

BOY - Do I ever wish we talked more about glue-ups and clamps and panels when you were at my shop the other day.

I did think about it - but I stayed focused on finishing.

We should get together again some time.
 
biscuit jointer

i bought a lamello a long time ago....sold it with the original blade and the first bag of biscuits.
don`t miss it at all.

Tod - my lamello C3 is one of my favoured tools in the shop for quick jointing.
As you mentioned that you never used your biscuit jointer please let us in on your secrets for your preferred method of joints.
 
Dan

For some assistance on the subject of clamping take a look at this thread and this link

http://familywoodworking.org/forums/showthread.php?t=12857&highlight=clamping+cauls

http://www.bowclamp.com/

The difficulty with the forum is that there is a ton of info and its hard to find sometime. But try the search feature. This subject comes up almost daily as do the clamps.

Mark was gluing up a couple of boards of walnut just the other day and everyone with "experience" chimed in and advised him to clamp he joined boards on the surface at the edges then put the boards in clamps to pressure the joint from the side.
http://familywoodworking.org/forums/showthread.php?t=14421

I think one lesson i have learnt is that some of the logic that I used to apply is back to front.:huh:

We talk about jointing and planning a board then glueing together with the logic that if everything is flat and square and we then use biscuits it will all turn out perfect. This stuff called wood is not steel.;)

Then you hear the pros. Just get the boards jointed on the edge and glue them up. Sort out the flatness after with a proper smothing plane or sander. Seems illogical but even the biscuits wont get it totally flat without a lot of fiddle. There seems to be no skiping the step of working the newly joined boards to get them flat. :(:D

Same vain differnt subject my wife keeps reminding me that a project is not finished if I have not applied a finish and finished it off.:rofl::rofl:

Best of luck.:thumb:
 
Last edited:
Leo,
My last gluing up of boards, which happened to be my first :rofl: actually worked out pretty good. I learned allot from that table and I was hopping to make the next time easier. Of course if I wanted easy I would buy the furniture at the store :eek:
One thing I learned was to glue up only two boards at a time, I did three that first time and keeping them lined up was a bear:bang:

Thanks Leo
Dan
 
One thing I learned was to glue up only two boards at a time, I did three that first time and keeping them lined up was a bear:bang:

Thanks Leo
Dan
The way to glue up a panel is to use cauls. Get a 2x4 and cut it to the length of the panels you glue up. Two feet will do a lot of panels - I also have some 4' ones. Joint the sides so they're straight. Then put packing tape on the sides you jointed.

When you're ready to glue up a panel, put one set of cauls down (it's good to put something under them so you can get a clamp on them). Then lay your boards for the panel on top of the cauls (with glue on the edges of those boards). Now lay a caul on top of the panel where each of the lower cauls are. Next, clamp the cauls together, one clamp on each end of the cauls. This will make the boards line up.

Finally, put your regular clamps on to pull the boards together. The boards will slide in the cauls but stay flat.

Once the boards are pulled tight you can remove the cauls, but most people leave them on until the glue is set. That's why you put packing tape on the cauls - to keep them from getting glued to the boards.

Will absolutely give you a flat panel with boards lined up. For a long panel, you may need three or more sets of cauls to keep everything aligned. For short panels, two sets usually work fine.

Also, before you put the final clamps on, you can usually push the boards into alignment on the ends (you may have to loosen the cauls a bit).

Mike
 
Ill just add a tiny bit.
You've received good advice.

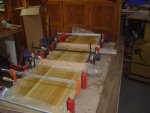
Keep a roll of wax paper in the shop. For glueups.
Cover your clamps, and cauls so nothing sticks. One cheap 99 cent roll lasted me an entire year, and if you want, you can reuse the wax paper over and over again.

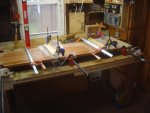
If youre using cauls, which I always do, always lay everything out first, dry run, make sure you have enough small clamps to hold the cauls, and make sure the cauls and clamps have enough room underneath the top to clamp securely.
Better to make sure in advance then realize after you have glue all over the clamp wont fit with the caul underneath.

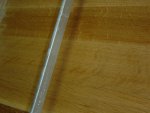
If youre worried about board alignment, take any scraps you have, but middle piece has to be the exact thickness of the top youre making.
Make a bunch of these, or one long one.I make them about 4 inches long, dont forget to line the inside with a touch of wax paper so the glue leaking out doesnt stick to these end cauls.wood stuff 894 (Medium).jpg

It will hold the boards in place and they wont move when you clamp.wood stuff 895 (Medium).jpg

I use plywood that Id otherwise toss in the garbage.
 
Last edited:
Allen, that is a brilliant idea - I bet it would work also if the middle piece was slightly smaller than the boards you're glueing, and instead of a permanent glue job to hold the jig together you used bolts.

For that matter, now you have me thinking about crossing your idea with the vice anti-racking jig and using the anti-racking jig as the middle piece and have the bolts not pass though it, only through the top and bottom pieces.

I'll need to make two anti-racking jigs out of solid wood and once bundled together joint an "edge" of the jig all together so that in addition to your idea for face - face alignment, I can put a long clamp across the glue joint for edge - edge alignment.

Thanks for posting your idea, Allen! :thumb:
 
if you look at the last few of my glueups, I have two long boards attached with bolts with wingnuts. I secure them to the top at one end, and the same thickness on the other side so it doesnt bow outwards. Keeps it all aligned.heres one.Can see it on the right end of this top.
 

Attachments

  • wood stuff 314 (Medium).jpg
    wood stuff 314 (Medium).jpg
    49.7 KB · Views: 21
Last edited:
Ok, Allen, next time, post really informative pics like this with your brilliant ideas before I go ahead and try something I haven't done before. :rofl:

Back on topic, my own personal aesthetics dictate that I would rather use keys or visible dowels to reinforce joints with an accenting wood choice instead of biscuits. But everyone can do their own thing, that's why we're not all the same. :wave:
 
heres a white oak top I glued up today, keeping myself busy, I used my end cauls, this is the first top I didnt use biscuits.
Only problem is this white oak has all these planer marks, flecked and striped all over the place, wasnt sure if I should throw it underneath for base support to hide it all, but I just used it for the top.
 

Attachments

  • wood stuff 897 (Medium).jpg
    wood stuff 897 (Medium).jpg
    57.3 KB · Views: 23
  • wood stuff 898 (Medium).jpg
    wood stuff 898 (Medium).jpg
    54.3 KB · Views: 21
heres a white oak top I glued up today, keeping myself busy, I used my end cauls, this is the first top I didnt use biscuits.
Only problem is this white oak has all these planer marks, flecked and striped all over the place, wasnt sure if I should throw it underneath for base support to hide it all, but I just used it for the top.

you been takun lessons allen that lingo sounds familiar:):thumb: i think yu better hide it too:)
 
it saves me the price of an additional sheet of plywood.
I think its rift sawn, but I really wouldnt know the difference.I started off in the ash pile, then found alot of white oak, so Im going to use it for panels and top for the entertainment box.
 
allen with a E that is some fine rift sawn if it is,, it sure looks qtrd to me..you dont get that much fleck in rift.. and the other alan with a A he is making me a new shelf for the additions i got while on tour from all the fine folks i visited:) thats why he is using oak we need it stout!!!!
 
its warm outside, didnt want to start working in my house when the temps are beautiful, stays light till almost 9, better off playing in the garage during the warm months, leave the house work for colder temps.
gonna build an entertainment unit, around 6 feet long, or at least try.
4 glass doors in a wooden frame, 6 open shelves on top for components and other junk.
I wanted a thicker top, but I had to plane down the oak to get a consistant thickness.
gonna match the side panels with the coffee table and use some raised oak instead of maple.
 
here you go allen, after a couple of days of number crunching, and a couple of hours of sketchup, here it is... :):thumb:
 

Attachments

  • allen cabinet front.jpg
    allen cabinet front.jpg
    68.1 KB · Views: 17
  • allen cabinet back.jpg
    allen cabinet back.jpg
    52 KB · Views: 13
I cant believe you got that close, I mean thats it basically, and from that rough drawing I sent you? wow, even I cant decipher my drawings that well. You got special glasses? Lend them to me please.
I gotta get some lessons, cause it brings a piece so to life.

Thankyou loads dan,, my wife will see this as soon as she gets home.

I think I would add a couple of inches to the doors in height, and take away an inch or two on the open shelves, other than that, that is what Im building.
 
Last edited:
Top