coffee table progress

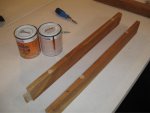
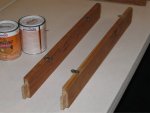
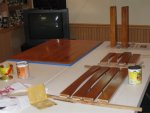
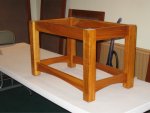
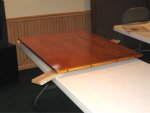
that's gonna be a tough one allen, i figured that after the fair, i would keep the grandfather clock (nice to keep something a little odder than me :rofl:), and sell the foot stool and the coffee table. well kids, i was once again a pretty busy monkey today. i've completely shellaced and waxed all the parts, and assembled the base. once the finish is really solid tomorrow, or the next day, i'll put the top on and give it a really good look.:D

here are the latest pictures...
 

Attachments

  • insets for table irons cut and drilled.JPG
    insets for table irons cut and drilled.JPG
    73.3 KB · Views: 17
  • table irons attached.JPG
    table irons attached.JPG
    73.8 KB · Views: 17
  • all parts shellaced.JPG
    all parts shellaced.JPG
    82.8 KB · Views: 18
  • framework assembled.JPG
    framework assembled.JPG
    76.1 KB · Views: 26
  • finished top.JPG
    finished top.JPG
    71 KB · Views: 24
Rennie....Very carefully!
Dan....Great Job as always, was this your own design as far as size goes? I really like the way you finish all parts before glue up....keeps the finish flawless from glue. How far is Falcan Hights from Bloomington? Would like to stop by some time to visit!

Ron:wave:
 
you can blame nature for the coloring leo, its what was there all along, enhanced by 3 coats of amber, and 2 coats of clear shellac. no dyes or stains were used in the finishing of the table. although several small animals, and at least 4 small children were glared at... :rofl:

on to the breadboard ends. before gluing up the top, i had cut my tenons, as it was easier to do on the table saw, with the tenoning jig that way. then i cut back the ends of the tenons on the outside boards to about 1/4" inside of the planned mortise. then i glued up the top. i cut the breadboards to length, and cut the mortises. i fitted the ends to the top, they fit as good as i expected. i then marked the center lines of each board, and while they were on, transferred the marks to the ends. i used the marks to locate where i would cut the 4 shallow mortises for the screw holes. once the mortises were done, i drilled the pilot holes, and with an inch or two of glue in the center of the mortise, attached the ends with screws, and plugged the holes with 3/8" ebony plugs. i tapped them in flush with the persuader, and a smal bit of board, so they wouldn't go in too deep.
 
Top