Making a Table Top

Jim Mattheiss

Member
Messages
467
Location
Long Hill Township, NJ
Hello:

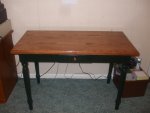
We picked up a 24" x 44" table with a drawer garbage picking. The frame is fine but the top is junk.

I want to make a new oak top but have a few questions . . .

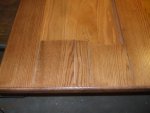
The existing top is 1-1/2" thick with a rounded edge profile. I bought some 3/4" red oak and will glue up a top. On the edges I will double up the oak to get to the desired thickness.

My first question is : which way should I run the doubled up pieces on the endgrain portion of the top? Parallel to the short edge versus parallel to the long end?

I didn't have access to 1" + material to make a solid top so now I need a way to simulate it.

It's will be a laptop desk to LOML and I have to get it done by the June 16th since that's when the new laptop is arriving :type:

Thanks in advance

Jim
 
I have been told that tables typically have the grain oriented in the lengthwise direction of the table. A project for LOYL is probably not the time to experiment with a non-traditional design. :wave:

If you're starting with random width wood, would it be best to pick out the grain you want for the top and glue it up, flatten the top layer and then add to the bottom? I'd imagine that overlapping the wood so that the top layer joints were on top of bottom layer wood would add strength, but doing it this way might give alignment issues. :dunno:

Hopefully someone else will pop in and say if this is one of my crazy monkey ideas or a good one. :rofl:
 
so what youre saying is that you dont want to laminate a 3/4 inch 2foot by 4 foot top to another 3/4 inch 2 foot by 4 foot top, to achieve the 1.5 inch thickness. YOu just want the illusion of the thicker top, but glueing some wood around the entire border of the table top underneath.


IM not sure how just glueing up a few inches of matching boards underneath for end grain, and one long narrow piece glued under lengthwise ends would work out.

I would just make a 1.5 thick breadboard end, and glue up an edge piece of 3/4 inch thickness to underside lengthwise.
 
just had another idea. for the bottom, use either 3/4" plywood or mdf, and glue up 2 sets of long boards (for the long sides larry :rofl:), and enough short cuts to disguise the ends. saves on the cost of lumber :thumb:, you get to keep the lil woman happy :D, until she happens to look under the table one day... :eek:

just a thought...:dunno:
 
Do you specifically WANT a thick top? Just because that's what was there before doesn't mean you have to make the new one the same thickness...
 
Thanks everyone for the replies:

Dan - I'm trying to replicate the thickness of the top because it "looks right" proportionally. I considered using ply with the edges wrapped in solid wood but went with solid oak.

Allen - I considered doing a breadboard end but I've never done one and this is not the project to get hung up figuring thing out and encounter a delay. I over-think some things . . :dunno:

I'm going to go with doubling up the at the ends with the boards offset (like a running bond in a brick wall). If I can squeek out some time this weekend I'll do the glue up and take some pictures.

Have a nice weekend.

Cheers

Jim
 
Leo:

No chance for refinishing - the existing top was particle board with a veneer that had failed.

I purchased some 3/4 x 6 oak and made the new top last week. I have to get the pictures of the entire process uploaded . . . :dunno: I doubled up the perimeter to get the 1 1/2 inch thickness I wanted.

So far I'm being hindered by the cool and humid weather here in NJ - the finish is taking FOREVER to dry.

Cheers

Jim
 
Making a Table Top (Learning as I go) . . .

Well : I finished the table top!

Early in June I went to Dyke's Lumber in Weehawken NJ to buy the materials. I bought some S4S Oak to save time (but not $$$$).

I did the glue up of the top and it came out well. Almost perfectly flat - only a little "crown" of 1/16 of an inch over the 24" width.

I then doubled up the boards along the long edge of the top to give me the 1 1/2" thickness I desired. Once the glue dried I fit some pieces in between the "rails" along both ends to double up along the ends. My mistake was FORCING in the pieces to get a tight fit. After the glue was dry and I removed the clamps and checked the flatness again I saw my mistake - the top was now 1/4" LOW in the middle - the top had cupped UP 1/4 due to me forcing in the wood. I decided to relieve the pressure by cutting kerfs with a circular saw at all the joints in the bottom layer . 24 hours later the top was dead flat again. I filled the kerfs with strips of oak and moved on.

Picture 1 below it a view of the bottom at the end showing the kerfs and the filler material.

I then rounded over the top and bottom edges using a 1/2" round over bit and started finishing.

I used Behr's Wood Stain and Pre-Sealer to reduce blotching. It wasn't clear from the directions whether you let the Pre-Sealer dry or just let it soak in, wipe off and stain - which is what I did. The can might state the directions but my 43 year old eyes couldn't read it and Behr's website doesn't list the product or the directions. :eek:

I topped the stain with 3 coats of Minwax wipe on poly. That might have been mistake #2.

The next mistake was attempting to fill a smally crack with Plastic Wood. When I wiped it into trh crach with my finger, it DISSOLVED the Oply and Stain and I was back to Bare Wood. :doh: I was doing this before I went to work on Wednesday. Kind of a bad way to start the day.

That evening I sanded everything back to bare wood and restained. The Plastic Wood was a perfect match BTW. Anyway I coated it with 4 coats of Minwax Polycrilic Gloss and installed the top on Friday evening. LOML is happy and I now need to learn more about finishing. . .

Picture 2 is the finished product in situ. LOML is happy and this project is done!

Thanks for reading . . .

Jim
 

Attachments

  • 023 (Medium).JPG
    023 (Medium).JPG
    61.7 KB · Views: 28
  • 025 (Medium).JPG
    025 (Medium).JPG
    56.5 KB · Views: 30
Top