Garage/shop rearrangement

recycling old kitchen

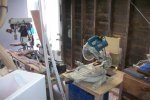
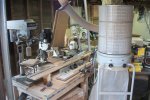
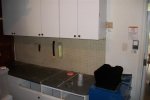
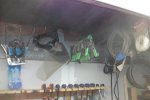
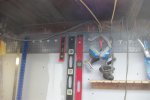
I took most of the old kitchen cabs to my sons home and today I installed them with some pegboard and even used most of the old countertop.
Gave him a nice home work/garage area. He has a ton of tools, and now he can start putting them all in place and away instead of boxes laying around all over the place.
I also cut down 3 of his doors with the plunge saw since he put new laminate in they were tight. Thought hed be nice and give me a little slack........
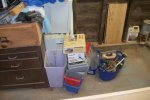
I tried to take back the blue metal parts cabinet, he wouldnt part with it.
We had one cabinet left over, stripping the hardware off it, like I did with the cabinets I kept for the melamine sides.
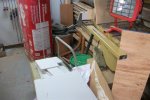
Im going to use some of the sides of the pantry cabinet to make an outfeed table for the TS eventually.
Probably cut the rest down to make shelves.

The white marks on the countertop was where it was stuck to wall and painted over, he has to clean it all up. We didnt worry if it was 100% perfect, hes going to use it to work on computers and stuff.(we didnt put the drawers in yet, I havent emptied any of them at my house)

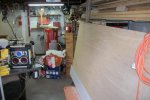
Im still trying to get rid of the old pegboard I took out of my store a year ago.
He asked me if I had some peghooks for him. I told him yeah, but only 3000 or so.
 

Attachments

  • kitchen makeover 054 (Medium).jpg
    kitchen makeover 054 (Medium).jpg
    38.5 KB · Views: 45
Last edited:
He worked on the garage today himself. Im hoping next saturday night when I go there, he has his tools in order.

I got the backwall of my garage sound insulated and sheetrocked today. Finished with wall number 2, well, not over the platform, but that I wont be able to do till my son assists, but the 7 foot high wall is done.

Ill hang some pegboard for hanging odd tools and build a new clamp rack, hopefully tomorrow, so I can get ready to do the overhead door and that wall and have it all done before the 29th, (back on therapy for a few days)

Im having bad problems with water getting in under my garage door even though the rubber seal/piece looks good and closes tight. Seems when we get heavy steady rains my driveway isnt draining it fast enough.
Im not sure how to solve this problem, because the slab under the garage might just have sunk too much over the 50 years its here, and the driveway is only 8 years old, so its a bit higher but has a small higher spot in front of garage opening.
 
Last edited:
I had the same problem with my new shop, they didn't put the right slope in the door. I ended up fixing it myself, because I was going to have to go to court to get it done, and to be honest I just didn't want to wait that long. I had tools and stuff in the shop already and it was flooding when we had a rain with any wind.

I rented a concrete planer to reslope the concrete. I strongly don't recommend that, it was way more work than I expected. If you have to do any re-sloping, just hire it cut out and re-poured.

If you're just getting wind blown rain in, I had to caulk behind the vinyl strips on the sides that overlap the garage door, I was getting rain behind them. They also sell a garage door threshold on amazon that glues to the concrete and seals to the bottom of your door. Another option is just putting filler foam in the bottom seal of your garage door, it can help a little. All of these don't do much for you if there is standing water in front of the door though, gotta re-slope or cut in a drainage trench for that.
 
thanx steve, I dont think a 1/2 inch will be too uncomfortable for me to roll tables over when I need to get something outside, gonna have my son order it with his account tonight.
(10 feet)

when we get a very hard downpour for a couple of hours is when I get a washover into the garage.
Usual rain Im ok Jeb.
I think steves reco will do the trick, and for 32 bucks, it worth a shot.(my slab in the garage was poured in 1952, I have the actual photos of them lifting the garage from a spot near the water and bringing it over here on flatbed truck and dropping it on the slab)
Most of these Levitt capes didnt come with garages, as I was told, most people added them on.
the homes were built in 48 or 49.
 
Last edited:
Allen, easy to do. Just follow the directions. I also caulked the inside and out once it was dry for a little extra help. It might even say that in the directions, I can't remember.
 
Allen Jeb mentioned the foam. This is a piece of semi soft foam extrusion that is very cheap you get it at the HD in the garage door section. It simply slides into the rubber extrusion at the bottom of the garage door and compresses when the door comes down but helps with the seal.

If you have a seal like this


http://www.homedepot.com/h_d1/N-5yc...splay?langId=-1&storeId=10051&catalogId=10053


You push this foam ( i see they call it backer rod its anything but a "rod") in the middle. Sometimes i wonder about their descriptions. I searched for foam extrusion and got batteries....i ask you???? Anyhow.

http://www.homedepot.com/h_d1/N-5yc...splay?langId=-1&storeId=10051&catalogId=10053


If you gonna follow Steves recommendation i would urge you to consider adding Jebs feature between the two you will have a great seal.
 
Last edited:
before I start the overhead door wall, I wanted to move all the clamps and set up for some hanging stuff.
whooooopiieeeeeee, got to use some of the thousands of peghooks Ive been trying to get rid of.
I first put up a 12 foot piece of 6 inch wide peg board so I can hang anything that needs to be hung, and then I built a fast clamp rack, for my (cough,cough), clamp collection. I made plenty of slots for future clamp purchases.
I saw online last night someone using pvc piping for making a pipe clamp rack, so I used the idea. Got alot of pvc just laying around outside, dont know why I never threw it out.
Cut some pieces, took a 2x4 and now my pipe clamps are in their last home in my shop, easy to reach, will not fall on my head.(I need to cut 12 more pieces for the six long pipes I have, next week, I hate the pvc flying all over)

I do get the award for the worst taping/spackling job in history, but theres no paint going on those walls.
IM outta the shop now till next monday.

cant tell ya'all how much pleasure I got from turning on my tablesaw the first time in 3 weeks. Purred like a new kitten.
 

Attachments

  • kitchen makeover 061 (Medium).jpg
    kitchen makeover 061 (Medium).jpg
    63.9 KB · Views: 36
  • kitchen makeover 060 (Medium).jpg
    kitchen makeover 060 (Medium).jpg
    53.8 KB · Views: 37
  • kitchen makeover 059 (Medium).jpg
    kitchen makeover 059 (Medium).jpg
    44.2 KB · Views: 38
  • kitchen makeover 058 (Medium).jpg
    kitchen makeover 058 (Medium).jpg
    43.5 KB · Views: 39
  • kitchen makeover 057 (Medium).jpg
    kitchen makeover 057 (Medium).jpg
    49.2 KB · Views: 39
Last edited:
just got caught back up on your reorganization allen ,, you been one busy fellar:D:thumb: and i will have to look at the door leak fix myslef i too got the wrong end on some concrete aproaches.. looked at jebs fix when i was ther ein the spring and almost took the grinder out but i am gonna try your new idea first after you tell me how well it works for you:)
 
just got caught back up on your reorganization allen ,, you been one busy fellar:D:thumb: and i will have to look at the door leak fix myslef i too got the wrong end on some concrete aproaches.. looked at jebs fix when i was ther ein the spring and almost took the grinder out but i am gonna try your new idea first after you tell me how well it works for you:)

The grinding is not much fun. I had rented a gas powered concrete planer, it was proabably 10hp and it took 2-3 hrs. I did end up taking a lot of concrete out though just to be sure it wouldn't leak. The 4-1/2" grinder with a segmented diamond wheel worked well on the corners, but I'd hate to do the whole thing with one.
 
The strip comes in weds, but I wont be here.
I have to strip off the floor paint first to get good adhesion.
Going to try a wire wheel in my hammer drill.
Then I have to enlist my sons help because I wont move fast enough to get it done right.
Im hoping to have it done within a couple of weeks.
 
Im totally disgusted with all this sheetrocking and climbing ladders all day.
Im in the worst pain right now Ive ever had in my life, including both times I broke my back and went in for surgery.
This sucks.
 
painting is boring, but its not as painful.
as soon as I finish up the front wall of the garage, and then soundproof half the final wall this week, my kitchen should be finished so I get to start painting the reconstructed walls and stain and poly a new wood door.
Im having so much fun.
 
I challenge Glenn Bradley, whos got the more organized cleaner shop now!!!!!!

ok glenn, youre not the only one with a pristine organized shop.
Ha!

I especially love the work bench area these days, a foot high of crap piled on crap.

My shed is worse. I dont know whats going on, seems like the stuff is multiplying overnight.


hey, if anyone can help me for a second if anyone is still looking, I cant move this mess of boxes to sound insulate, so Im going to just stuff some insulation around them and leave small portion of wall open, but the bottom box, I unscrewed it, I cannot move it foward, and Im guessing I have to get someone qualified to add some more wire to bring it foward??? I know nothing about electricity, the switch up on top had slotted screws holding it down, wonder how long its been since someone moved it?kitchen makeover 071 (Medium).jpgkitchen makeover 072 (Medium).jpg
 

Attachments

  • kitchen makeover 070 (Medium).jpg
    kitchen makeover 070 (Medium).jpg
    78 KB · Views: 34
  • kitchen makeover 069 (Medium).jpg
    kitchen makeover 069 (Medium).jpg
    63.5 KB · Views: 33
  • kitchen makeover 068 (Medium).jpg
    kitchen makeover 068 (Medium).jpg
    56.9 KB · Views: 33
  • kitchen makeover 067 (Medium).jpg
    kitchen makeover 067 (Medium).jpg
    61.2 KB · Views: 34
  • kitchen makeover 066 (Medium).jpg
    kitchen makeover 066 (Medium).jpg
    61.1 KB · Views: 36
  • kitchen makeover 065 (Medium).jpg
    kitchen makeover 065 (Medium).jpg
    73.4 KB · Views: 35
  • kitchen makeover 064 (Medium).jpg
    kitchen makeover 064 (Medium).jpg
    64 KB · Views: 34
  • kitchen makeover 063 (Medium).jpg
    kitchen makeover 063 (Medium).jpg
    80.8 KB · Views: 37
Make a box to go around the outlet and put a 2 x 4 across the top and bottom where your panel is at to give the insulation a place to stop and the sheet rock a place to attach to.:thumb:
 
Whoo boy, you have got some piles! I'm finally getting to the point where my piles are getting smaller. This is an inspiration to keep that up! :D :rofl:
 
Top