Jonathan's Shop

lookin good jon,, and yu do realize that the drainage going threw your floor on to the plastic on some occasions can be a bit smelly. unless yu let them dry out outside first... then bring in for the trimming.. even on concrete i need to soak up the run off to keep the odor down in the fall. looks like your shop is coming along fine.. going to be intersting to see how your peir floor works out.. but the added space is gonna be nice..what are yu gonn ause the garge for now that you have cleared it out some:)
 
Norman has you going good on the BLO :thumb:

When I said "Sprayer" I was talking about something like this.........

1.5lt_sprayer.jpg

You probably have a few laying around the farm!

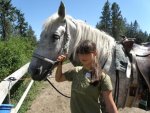
My girls would certainly LOVE to go horse riding......

mizuki_snowball_summer_2008_canada.jpg
My youngest with a new friend in Canada last summer!

Cheers!
 
Incidentally, HOW did MY Wife, LOU ANN get all the way up to your place to go out for supper without ME knowing about it?:huh::huh::dunno: Kinda looks like I "Might" Not have been paying enough Attention to her and her comings 'n goings lately as I should have, huh?:rofl::rofl::rofl::rofl::rofl:

(Hope YOURS isn't Red Headed too).:rolleyes::rofl::rofl::rofl::rofl:


And I thought that "tinge" of red was from painting the fence in her flower garden the other day! :rofl::rofl: No red hair here unless she sticks her head to the fence while dipping her brush :doh:, she is a sloppy painter :p. Brunette, turning to salt and pepper color, not due to being married to me for the past 25 years!! :dunno::huh::rofl::rofl:
 
lookin good jon,, and yu do realize that the drainage going threw your floor on to the plastic on some occasions can be a bit smelly. unless yu let them dry out outside first... then bring in for the trimming.. even on concrete i need to soak up the run off to keep the odor down in the fall. looks like your shop is coming along fine.. going to be intersting to see how your peir floor works out.. but the added space is gonna be nice..what are yu gonn ause the garge for now that you have cleared it out some:)

Larry, any and all skinning will be done over the rubber conveyor belting allowing me to "wash down" the floor when completed. Also will prevent any contents making it down under the pier. Garage, garage? Yard sale storage shed is what it has become as of late. They have taken over that building from stem to stern!
 
jon i have trimmed up a few critters and you will get some juice and the rubber belting has cracks to which can allow some of your rinse to get threw to the piers and then on to the vapor barrie, but it may have enough air in there to dry out ok..
 
I have to agree with Bart, having skinned a few deer in my younger days, it is almost always better to do it outside, or at least where you can really wash the floor well. :dunno:
 
[ATTACH said:
35379[/ATTACH]
Pure pine shavings, nothing to hurt the livestock. Now had I run any cherry or walnut through, burn baby burn that pile of shavings. A handful of dried wild cherry shavings will kill an adult cow or horse. Deader than a mackerel in less than 24 hours.

Hi Jonathan.

I've been following this post,and I can't say anything but admire the humongous amount of work that you're doing and how good it is coming out. But your quoted comment caught my attention, being my knowledge of raising live stock completely nil I wonder why cherry or walnut shavings shavings can kill an animal. Do you mean that they are toxic or poisonous if they eat them, or is it that they can't digest them and causes some sort of intestinal blocking?

BTW I wish I could hold a board pinching it with my fingers as you do:D
 
And I thought that "tinge" of red was from painting the fence in her flower garden the other day! :rofl::rofl: No red hair here unless she sticks her head to the fence while dipping her brush :doh:, she is a sloppy painter :p. Brunette, turning to salt and pepper color, not due to being married to me for the past 25 years!! :dunno::huh::rofl::rofl:

Well, Red Hair or not, they must be somehow related, (ie; their painting habits).:D I WON'T even go into that.:rolleyes::rofl::rofl::rofl::rofl:
 
... BTW I wish I could hold a board pinching it with my fingers as you do:D

I was thinking the same thing. :p

attachment.php


Note to self: Don't ever ask Jon to show me how he does the Vulcan shoulder pinch. :rolleyes: :p
 
Originally Posted by Larry Merlau View Post
Vaughn when you only have one left arm you learn to make do with what you got.

uh, how many left arms do you have?

Their left overs, he just hangs them on the wall & only takes them down when he needs them.:):D:rofl:

Don't ask left overs from what I honestly don't know.:dunno: Probably just wood chips & glue.:eek::eek::eek:
 
Hi Jonathan.

I've been following this post,and I can't say anything but admire the humongous amount of work that you're doing and how good it is coming out. But your quoted comment caught my attention, being my knowledge of raising live stock completely nil I wonder why cherry or walnut shavings shavings can kill an animal. Do you mean that they are toxic or poisonous if they eat them, or is it that they can't digest them and causes some sort of intestinal blocking?

BTW I wish I could hold a board pinching it with my fingers as you do:D

Toni, thanks for the kind words. It is going a little slow at the moment, daughter's fiancee's fuel pump quit in our lane, so yesterday dropped the gas tank and pulled the fuel pump, put in a new one today and got the tank back in place and him back up and running. Plus it has gotten hot here!! Anyway, strength I have always enjoyed the benefits of, guess that is why I am weak between the ears!!!!! :huh::rofl::rofl: Arm wrestling, playing mercy, wrestling, my kind of fun. Used to catch our ponies in the big pasture as a kid by "bulldogging" them. Sliding off of my saddle horse at a run and grab them by their ear and nose and slide them on their sides. Funny thing, after a while, ride alongside any of those ponies and they would just stop and stand!! :dunno::dunno:
Concerning the shavings/wood of wild cherry, once it is dried, even the leaves, the tanic acid rises to a point where a few bites and a full grown adult cow or horse is dead. The walnut shavings if put in a horse's stall and they stand on it especially after it is wet (been urinated on) something in it again probably an acid, soaks through the horses sole (bottom of their hoof) and cripples them. Eventually can lead to death or have to be put down due to pain.
 
Whew!! Been busy and most of it not on the shop! :(
School starts for teachers this coming Monday!!! :eek::eek::(:(:doh::dunno:
I am worse than the kids. I hate to see the end of summer!
Well, the South floor joists are in, the South floor boards have been planed, ship lap cuts completed and screwed to the floor joists! :thumb: Man is that a nice floor!!!!!
North floor joists are in, floor boards planed, ship lap cuts made, all but one (68 1/16th" long) with one side lapped needs finished. Ran second battery down to zero on Makita impact driver so quit for the day, cleaned up, checked water troughs, put dogs away and am going out with my wife and my parents. They have never been to a Rural King farm store so we are going to the closest one (think about fifty miles away one way). Hey, I don't get out much and this is a great outing so no comments!!!:rofl::rofl:


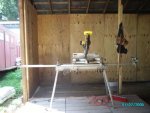
SCMsaw.jpg
I put this photo in to explain the next two photos! :eek::dunno::rofl:
Notice the wheels at the bottom of the two legs on the stand on one end?
Well, they sure make it handier to move around (terrible on grass, dirt, rocks) in the shop. So, in one of my magazines (PW or FH) don't remember which, a version of this was one of the top tips.
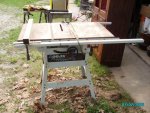


Table saw.jpg
Here it is, your standard table saw, four legs, quite easily bent if pushing across a shop floor. So, see next photo,,,,,,,,,,,,,,,,,,,,,,,,
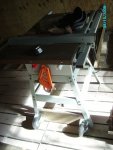

Table saw wheels.jpg
Whalllah!! Wheels, moves quite easily in the shop! I did a few things differently. In the magazine the person added the board to the outside of the legs. I cut the board at the same angle of the legs and drilled the top bolt throught the board and saw leg. Bottom bolt and other two on each wheel only go through the board. In the magazine the person had two boards and four wheels (two different directions). I thought it looked clumsy as well as a tripping hazard. Two things happened by moving the 2x6 inside the saw legs, it moved the wheels farther from me (less chance of tripping) and the saw when lifted, the wheels contact quicker meaning less height you need to lift the saw to move it. Didn't see the need for the other board and wheels as this will spin in its own tracks. I think it was a good addition to my saw and hey, first project completed in the new woodshop!!!!!!!!
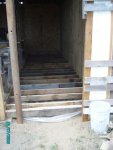
North Floor Joists.jpg
Here is a shot of the floor joists. 12" apart on center.
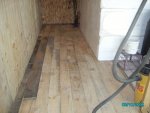
South floor.jpg
Shot of the South floor looking to the West wall.
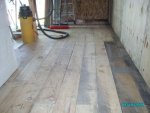
South Floor I.jpg
Shot of the South floor again looking to the East wall. I do like the floors. Time consuming, I knew that going in, but really like the results so far!!!!

Well, tomorrow possibly trading a couple of tractors around, if so, will be gone all day on the road. You all let me know what you think, good or bad!
See you next time around, :type::type::type::wave::wave::wave::wave:
 
Coming along nicely Jonathan. :thumb:

Is that a pile of insulation there in the middle?

Yep! :thumb: Good eyes!
It is what is going on the ceiling. I want to keep some air movement between the roof and insulation so am going to sandwich the insulation between the bottom of the rafters and the 7/16" OSB. Will be using 10" deck screws and bought a box of "fender" washers for peace of mind. Borrowed my drywall hoist from my nephew (he has had it since I bought it, kind of like me, keeps finding things to do on his house which was my maternal grandparent's home). He treats my stuff well and appreciate his skills also. So hopefully will be putting a couple of new 2x4's alongside a couple of questionable rafters and then be insulating and sheeting the ceiling!
 
It sure is looking good Jon. I'm sure glad you changed the subfloor method from your original plan, and even though it took more material and work to put in the floor joists, I know it will be MUCH more solid, level and STAY flat than it would have just laying on the sand connected to 2 x 2's. Sounds like a good plan for the ceiling insulation and OSB paneling too.

Now you need to start keeping your eyes open for a good deal on some (non water based) white primer and paint for your ceiling, (walls too if you want), but the white ceiling will REALLY make the lighting better in there both at night with lights on and in the daytime too. It will save on the electricity bill too and I can assure you that every year you are in that shop you will need a weeeeeee bit more light than the year before.:D (When you're ready, let me know and I'll explain about the non water based stuff and what I went to and a possible alternate).

Have fun on your Tractor Tradin', 'n put tha squeeze on em 'n come home asmilin'.:thumb:


Norman I couldn't agree more. I guess that is why I have been so hesitant to start this project. Something deep down was saying it would cost me more in the long run. So yeah, I am glad also!

Okay, I am ready for the information about NON water based stuff as there is a five gallon pail of water based flat white in there now that I was going to use as a primer and then put water based gloss on top. So, I am all ears on this.

The stars weren't lining up for a tractor trade today so it may happen on another day. Don't like leaving the farm much anyway, and this was turning into a couple hundred mile dash and I don't do that. I like time to load and chain and check my load. So, stayed home. Not like I don't have plenty to do! :rofl::rofl:

I finally figured out Lou Ann must be on the far left of your avatar. I'll have to look for a photo of my Lou Ann. Talk later. :wave::wave::wave:
 
Jon, you're Correct on the Avatar Pic.:thumb: She's like you, a Teacher that has to end her summer Follies and put the Nose back to the Grindstone Monday Morning, (and for the first time in 30 something years I think she would have liked summer to last a little longer).;) The one between Lou Ann and me (that we have kinda scrunched up and on her tippy toes):eek: is our Oldest daughter and the one on my left is our youngest (they are 3 years apart).

Now about the paint, I found that no matter whether brushed, rolled or sprayed, anything that had water in it soaked into the flakes and softened the internal glue and let the flakes partially pop loose and curl up leaving a surface that looked like skin flaking after a severe sunburn. Additional coats just made the thing even worse and the curled up chips would break loose and stick on the roller which was another real pita.

In hope of eliminating the pop up problem, I tried sealing it first with a Dewaxed Shellac and then a water based primer and a latex paint, which turned out to be the best results.

I then found some "Sealcoat" which is also a dewaxed shellac sealer and it was almost as good as the previous dewaxed shellac.

Next, after I "finally" found some BIN primer, (which is a shellac based white primer) I used it to try to eliminate a step in the process and followed with a latex paint, and it did fair, BUT there was still several places where the chips popped loose and curled up, and I don't know why.

The one thing I did not test or try was to use an oil based primer and an oil based paint, which "Might" work without softening the glue. If you have a little oil based primer and paint sitting around, you might try it on a scrap piece, (or the back side of a sheet) to see if it would work, as that would most likely be cheaper than having to use the Shellac based products.

When you do the test, cover at least 4 square feet to give you a good result, because some areas of 2 or 3 sq ft may not have the tendency to pop up, but 2 inches away there may be a whole bunch that do.

My whole process was strictly trial and error and naturally created additional costs, but I got the section finished that I was working on before I got around to testing the oil based products, so that's why I suggest you try that test if you have some oil based leftovers before you spend any money, AND, let me know what it does if you do test it.

I hope my fiasco will save you some time, frustration AND money, but the White ceiling will still be worth it. Let me know if all this doesn't make sense or you have any questions.

PS: One thing I forgot to mention was the reason I needed to use a primer after the shellac sealer, (which you probably won't need to do). These are wall panels, and I had used drywall on about half of the walls before I had the opportunity to pick this up from storage (360 miles away), and I didn't want the contrast of smooth walls and the rough surface of the OSB, so I used a semi skim coat of drywall mud on top of the shellac sealer to smooth it out, and that needed a primer on it before the latex finish coat. My tests of the primers and paint were both with AND without the skim coat to see if the skim coat was the problem, but there was NO difference with or without the skim coat.
 
Last edited:
Top