Help wanted with my first real bowl!

Tom Baugues

Member
Messages
2,794
Location
Lafayette, Indiana
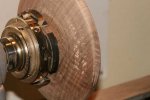
Ok, so I'm trying to turn my first real bowl from some black walnut. I've only made pens and other small projects up to this point. I have it pretty much to the final shape that I want. I've started sanding it and this is where I have questions. I have been sanding on this for about 30-45 minutes. I can't seem to get the end grain to smooth out. I started with 400 grit but I now have gone UP to 80 grit holding sandpaper by hand. I'm sure some of or maybe most of it is my lack of skill turning and maybe I needed to spend more time with a tool but for my limited experience I thought I was ready to start sanding. Anyway...my question is what grit do you all start out with? I will spend some more time on the bottom of the bowl with a tool when I turn it over as it is still rough near the tenon but help me get the inside smooth for now. I'm sure the real answer here is to extract cash from my wallet and purchase some kind of sanding tool :doh: so if you think that will help...then what do you suggest?

Tom
 

Attachments

  • 1924 resized.jpg
    1924 resized.jpg
    53.6 KB · Views: 36
  • 1926 resized.jpg
    1926 resized.jpg
    69.9 KB · Views: 38
  • 1927 resized.jpg
    1927 resized.jpg
    61.3 KB · Views: 38
  • 1928 resized.jpg
    1928 resized.jpg
    54.5 KB · Views: 37
Last edited:
Tom first I never start with 400 grit. If it is pretty bad I always start with 80 grit. Now that my tool control is a lot better I can start sanding at 150 or 180 grit. Make sure that you sharpen your tool for the last cut or two. I use a conventional grind bowl gouge from P & N (1/2" & 3/8") for my final cuts. Some use a scraper but just never got into using one. I spritz with water on the rough spots which raises the grain then take a final cut or two. Sometimes I use mineral oil on the rough spot then take a final cut or two. Now I use a harbour freight 3/8 angle drill and power sand. I got the 3" hook and loop holder and 3" round sanding paper from 80 grit to 320 grit. One thing I caught at a Mike Mahoney demo was he will leave the lathe off and sand the spots that are rough then turn the lathe on and power sand thru the grits. Do not skip any grits and blow off the piece with compressed air before using the next grit. Normally I will not sand a bowl past 320 and maybe at times 400. I think it is a waste of time to go higher than that or micro mesh to 12000 grit myself. I e-mailed Mike and Ernie Conover and both told me the same thing that anything above 320 is a waste of time and money. Hope this helps Tom.
 
many techniques and tricks for solving your problem. One that I like is to apply sanding sealer to the rough area let it dry then the 80 grit power sander to just that area.. You may want to reverse the lathe direction to sand the inside also (after attacking the rough area).

Many other techniques -- other will have their methods to share.
paul
 
Tom,

I dislike "rules of thumb" --- but after saying that the collective wisdom of the turning forums say lower than 500 rpm.. keep it cool and not over heat the sanding surface or the sanding paper...

I try to do this -- but I notice that the speed creeps up and up.. Like I said I have no patiences and it cost me sometimes...

paul
 
Tom, as you gain experience with the cutting tools, the tearout will be less and less of a problem. In the meantime, you can sand it out...you just need patience and lots of 80 grit sandpaper. As has been mentioned, start with the coarse stuff, and work you way to the finer grits. When you're going after tearout, keep sanding with the 80 grit until it is all gone. Then the other grits won't take nearly as much time. Sometimes you might spend 30 minutes (or even more) with the 80 grit, but then only a couple minutes each with the other grits.

And yes, lower speeds are better for sanding, even though it seems counter-productive. For bowls, I generally sand in the 200 to 400 rpm range. Sometimes slower, but seldom faster. The sandpaper will not clog as badly or quickly at lower speeds, and it helps keep the wood from becoming too hot (and cracking as the result). Here again, patience is the key.
 
I use a electric (cheap) variable speed drill with a pad in it for 3" hook and loop sanding disks - I have discs from 60 to 400 and i have wet/dry from 220 up to 600 grit in sheets. Most of the time - I start the lathe in reverse and alternate to forward with every other grit...then sometimes I just powersand in reverse until i get to 220. At 220 I frequently hand sand the rest of the way and ending most of the time at 320. For me it really depends on the way i have decided to finish the bowl that determines where i stop sanding. The reason is this:

Opinon - If you going to apply a film finish to your work then anything after 220 is a waste of time. In addition I find i get better oil saturation/penetration by stopping at 220. If i want to sand more after 220 then its by hand with wet/dry.....besides anything past 220 and you are really polishing the wood... i think more than sanding. I sand to these higher grit level when im going to buff out a pc and not apply varnish or laquer.

If you do not have the above type setup and you want to clean it up by hand start with the 60grit if you have to and then go to 80 and so on thru the grits. Alot of people will not admit to using the 60grit but its a tool like anything else and if you need to use it then by all means use it. Secondly, if you are hand sanding i would not go over 250 in speed and remember if it
gets to hot in your hand when sanding then its to hot for the wood. I have learned the hard way this concept and after you cause your work to crack becasue of the heat and cuss alot it will sink in.....:eek:

Sanding is one of those things that we all may do a bit different from each other. But as mentioned there are things we all do the same - sanding thru the grits - blowing your work off between grits - etc....

hope some of this helps you..........Dan
 
Last edited:
Tom,

I am pretty new at this but I am starting to learn. I am taking some turning classes and the instructors have said that every minute you use a skew or scraper to take out the rough spots will save you five minutes of sanding. I’ve had tool marks less deep than yours and it has taken me an hour of hand sanding with 60 grit to get rid of them. Hand sanding, concentrating on one flawed area, seems to leave deeper scratches than power sanding, so it took quite a while power sanding with 80 grit to get rid of the 60 grit marks. Since then, I have been concentrating on my technique, and have had a few bowls that I can start sanding with 120-150. I sand up to 600 grit, then wet sand with 600 grit and BLO or Tongue Oil, then triple buff with the Bealle system.

I suggest you work on your technique with the skew (outside) and scraper (inside), and use less force with your gouges. Take your time when you get towards the thickness you want and start with your skew/scraper. I have found that rough turning green wood is an excellent way to work on technique. If you concentrate on refining your technique rather than hogging out as much wood in as little time as you can, you can really improve. Just a beginner, but this is what is working for me.

If any of you experianced turners think I'm giving out bum info, please correct me, just trying to help another NuB
 
Last edited:
Thanks to all for your suggestions. After reading all of these I went back out and really looked closer at my bowl and got my scraper back out and did some more turning. It now is clear to me that my work piece was simply not yet truly round and smooth. I worked on it a while and it is much better now. Like I said in my original post...this is my first real attempt at anything of any real size that I hope to keep as a finished piece so yes I need to work on my technique and have more patience. I think I will have to find a way to do some power sanding as well (now where's my catalog). I hope to finish this up this weekend and get started on the next one.

Tom
 
Tom,
You might try a negative rake scraper for finishing cuts on the inside of the bowl. I finally settled on this tool for finishing cuts where my bowl gouge wasn't hacking it. If you google negative rake scraping you will find lots of photos and advise. It sure helped me.
 
Last edited:
Tom, you will find the right solution from all of these suggestions. I use a couple of different scrapers that I made for my final cuts. Sharp tools are the answer, including the scrapers.
 
Top