Maple Craftsman Dining Table Build

I saw that jig demonstrated at Woodcraft some months ago. Rather impressive and probably a good investment for someone who will use it regularly.
We'll see about the regularly part. It was a little pricey, but I already had a couple of grippers laying around so it seemed to make sense. It can do way more than I need to to. I'm just trying to not run the saw blade through it, LOL.
 
How much is "A little pricey...?"

I'm curious how you find it, as that looks good, and it would save me from making a new jig for each taper I have to cut.

Stu, it was 129$ on Amazon (prime, free 2 day shipping for me, I imagine quite a bit more for you).

It really does kind of need to have at least 1 gripper for it. I had an extra one I had bought on sale a while ago, so that was no issue. But if you don't have a gripper pushblock, that would add another 60$.

But the nice thing is that the angles are all accurately marked so you can get very repeatable cuts, or you can freely set whatever angle you want/need.

My only concern is making sure that I don't have a mental laps sometime and cut into the jig, Like I have done on the grippers before, LOL


https://www.amazon.com/MICROJIG-TJ-...id=1478980333&sr=8-1&keywords=micro+jig+taper
 
To Chamfer or not to chamfer and how much?

So, got most of the joinery worked out. Just working on the pins right now for the M&T's. While I've got them knocked together, thought I would think through how much chamfering to do.

Right now I'm leaning to cutting the exposed through tenons down to 1/2" with a 1/4" chamfer on all the 90 degree corners, except for the top stretcher.

Any thoughts?

Still working on all the sanding now in order to get ready for finishing. I thought I would spray the finish on before I do the final assembly and gluing.

chamferornot.jpg
 
So glad you are moving this project along. I'm getting old and I'd really like to se how it turns out.

Seriously, I think it looks great so far.
 
Any thoughts on the chamfering, or does 1/4" sound about right?

If sharon doesn't like it, it will make a great workbench.
 
Good deal. I think I will do that. Was thinking I could just break the edges with a little sanding too. Part of me kind of likes the edges the way they are, but I know they would be a knee killer.
 
Looking good, Brent. :thumb: I agree with Steve...try a few different chamfers on some scrap to see what looks reasonable to your eye. I suspect somewhere in the 1/8" to 3/16" range will be plenty of edge relief. (Take that with a grain of salt, considering how much flatwork I've done.)
 
I'll get some samples milled up a little later. I'm a little leary of doing much with a power tool on these pieces, as it does not take much to get burn marks on this maple.
 
Since the tenons protruding are not functional, you can have them stick out just a little bit. Maybe 1/8" and then have a small chamfer on them, maybe 3/32 or so. I like the subtle look, rather than some big piece sticking out demanding attention. I agree with Vaughn though, make a mockup and see what you like.
 
I'm a little leary of doing much with a power tool on these pieces, as it does not take much to get burn marks on this maple.

A block plane is what I always use. Can't remember getting any burn marks using one. Plus you control the process more and avoid making any big mistakes. Something that is very easy to do with a tailed router.
 
How about a little bit of both. Do a stopped chamfer in the center and lamps tongue transition to slightly chamfered ends.

http://www.leevalley.com/US/newsletters/Woodworking/5/3/article1.htm

A++ that's what I was thinking as well. I might do the transitions around the stretchers (maybe heavier chamfer above and below).

You guys way over estimate my abilities, lol.

Since the tenons protruding are not functional, you can have them stick out just a little bit. Maybe 1/8" and then have a small chamfer on them, maybe 3/32 or so. I like the subtle look, rather than some big piece sticking out demanding attention. I agree with Vaughn though, make a mockup and see what you like.

I do have a pretty big functional through tenon on the stretcher, so this kind of balance that out a little bit. I've knocked them back though from what they are in these pictures.

A block plane is what I always use. Can't remember getting any burn marks using one. Plus you control the process more and avoid making any big mistakes. Something that is very easy to do with a tailed router.

I think this might be the answer. There's not that much to do here and I think I just want to break the sharp corners off. Time to get out the block plane and sharpen it up.
 
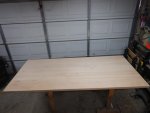
I think I've made the largest heaviest solid maple edge grain cutting board in the world.

So, I'm planning on using target em1000 and em8000 as a finish on it.

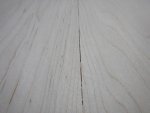
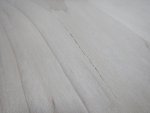
My question is, I do have a few gaps and cracks here and there. What would be the best way to take care of these before I put the finish on?


DSCN1337.jpgDSCN1335.jpgDSCN1334.jpg
 
One thought would be to thin some epoxy with DNA and flow it into the cracks. Put some painters tape on each side of the crack to confine the epoxy so it doesn't stain the surrounding wood and maybe some tape on the bottom of the crack to keep it from flowing through.
 
Top