
Sean Wright
Member
- Messages
- 902
- Location
- WNY, Buffalo Area
First two pictures:
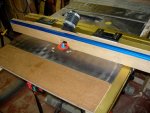
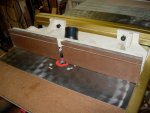
I made the old fence for my router table (located in the wing of my table saw) from a Red Oak 2x4. It mounted to the top of my table saw's fence using steel brackets and T-bolts. It had a piece of T-track attached to its top edge for feather boards & stop blocks. There was a dust collection connection, but it didn't seat tight to the table top, so a lot of dust escaped. Over time the 2x4 developed a slight warp. at that point I decided I was going to build an upgraded fence for the router table.
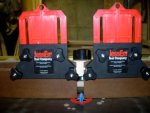
The new fence is constructed of baltic birch, with an adjustable fence made of MDF. The fence has a T-slot for using feather boards or stop blocks. The adjustable fence also opens wider than the largest bit that I have, so if I ever need to use one of the monster panel raising bits, it should work fine. This fence still attaches to the table saw fence, but now it attaches to the T-slot in the side of the fence. The dust collection port now has a better connection to the new fence. In addition the port also points straight up making it easier to connect the shop vac. The JessEm feather boards are new as well. They adjust right down to the top of the table for thin material, and up fairly high to accommodate thicker stock.
I made the old fence for my router table (located in the wing of my table saw) from a Red Oak 2x4. It mounted to the top of my table saw's fence using steel brackets and T-bolts. It had a piece of T-track attached to its top edge for feather boards & stop blocks. There was a dust collection connection, but it didn't seat tight to the table top, so a lot of dust escaped. Over time the 2x4 developed a slight warp. at that point I decided I was going to build an upgraded fence for the router table.
The new fence is constructed of baltic birch, with an adjustable fence made of MDF. The fence has a T-slot for using feather boards or stop blocks. The adjustable fence also opens wider than the largest bit that I have, so if I ever need to use one of the monster panel raising bits, it should work fine. This fence still attaches to the table saw fence, but now it attaches to the T-slot in the side of the fence. The dust collection port now has a better connection to the new fence. In addition the port also points straight up making it easier to connect the shop vac. The JessEm feather boards are new as well. They adjust right down to the top of the table for thin material, and up fairly high to accommodate thicker stock.
Attachments
-
 r_tablefence09.jpg111.8 KB · Views: 204
 -
 r_tablefence10.jpg93.8 KB · Views: 186
 -
 r_tablefence01.jpg94.1 KB · Views: 190
 -
 r_tablefence02.jpg96.2 KB · Views: 178
 -
 r_tablefence03.jpg89.3 KB · Views: 193
 -
 r_tablefence04.jpg83.5 KB · Views: 185
 -
 r_tablefence05.jpg80.5 KB · Views: 155
 -
 r_tablefence06.jpg113.4 KB · Views: 167
 -
 r_tablefence07.jpg73.4 KB · Views: 155
 -
 r_tablefence08.jpg66.3 KB · Views: 140

