Frank Fusco
Member
- Messages
- 12,791
- Location
- Mountain Home, Arkansas
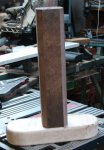
Hey, Ned! Recognize that hunka walnut?
When Rennie came for his tour visit, he brought this nice hunk of walnut that Ned had thoughtfully sent for me. (Thanks, Ned ) I wasn't sure what to do with it and kept until an idea came along that wouldn't require me to cut it into little pieces. My daughter and daughter-in-law had each expressed the need for a bedside lamp. Daughter won first dibbies because, well....she is my daughter.
 ") DIL will get one later.
DIL will get one later.
Of course, the walnut would be turned and as much of the wood as possible saved. That led to my first lesson in lamp making.
See: http://familywoodworking.org/forums/showthread.php?t=16769
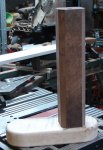
The turning part was pretty straight forward but, I think, the top section looks a little top heavy. If I were to do it again, I would make that a smaller, lighter looking diameter.
The base is maple, with a portion a bit spalted. Originally, the spalt part was to be in the rear out of sight. But, wifey said it complemented the dark walnut. Ain't gonna argue with wifey. Spalt is in front.
Another lesson came in ordering the parts. That is discussed in the first thread. Now I know where to get parts at reasonable prices.
My original design was to center the upright portion on the base and drill large holes on each side to act as places to put things like rings, earrings, coins, used bubble gum...or whatever. I sent pics to my daughter and she preferred the, kinda modernistic, look of having the upright offset to the right and "no holes".
All was good until I tried fastening the lamp to the base. Not as easy a task as I would have thought. I used about a 4" section of lamp type threaded, hollow rod, in the hole I drilled in the bottom of the upright. It was glued in with epoxy and let to set for a day. When I put the base on, the rod pulled right out.
After much cussing, I cut another section of rod about 8" long and put in with Gorilla Glue (see: I hate Gorilla Glue). Now, I double hate it. When I tried tightening the upright to the base with the rod nut, the rod pulled loose immediately. Apparently the screw action of tightening the nut is very powerful and broke the glue seal. Bad news. So, then, I drilled a hole and glued in a 1/8" dowel to secure the two. Didn't work, 1/8" was simply not strong enough. I then drilled another 1/4" hole and glued in a dowel. That worked but it is still a bit wiggly on the base. The way the upright is turned, I don't have a lot of room for more drilling. Had I planned this ahead, the bottom of the upright would be wider and I would secure with two 3/8" dowels. Or, for other model lamps, I would use a full-length threaded rod and secure by tightening the nuts from both ends.
Future lamps, and there will be future lamps, will be pre-designed to avoid this problem. Like the old story goes: the first custom made item costs the customer $500.00, those afterwards are $50.00 each.
All in all, I'm happy with the outcome even if the project tested my patience.
When Rennie came for his tour visit, he brought this nice hunk of walnut that Ned had thoughtfully sent for me. (Thanks, Ned
) I wasn't sure what to do with it and kept until an idea came along that wouldn't require me to cut it into little pieces. My daughter and daughter-in-law had each expressed the need for a bedside lamp. Daughter won first dibbies because, well....she is my daughter. DIL will get one later.Of course, the walnut would be turned and as much of the wood as possible saved. That led to my first lesson in lamp making.
See: http://familywoodworking.org/forums/showthread.php?t=16769
The turning part was pretty straight forward but, I think, the top section looks a little top heavy. If I were to do it again, I would make that a smaller, lighter looking diameter.
The base is maple, with a portion a bit spalted. Originally, the spalt part was to be in the rear out of sight. But, wifey said it complemented the dark walnut. Ain't gonna argue with wifey. Spalt is in front.
Another lesson came in ordering the parts. That is discussed in the first thread. Now I know where to get parts at reasonable prices.
My original design was to center the upright portion on the base and drill large holes on each side to act as places to put things like rings, earrings, coins, used bubble gum...or whatever. I sent pics to my daughter and she preferred the, kinda modernistic, look of having the upright offset to the right and "no holes".
All was good until I tried fastening the lamp to the base. Not as easy a task as I would have thought. I used about a 4" section of lamp type threaded, hollow rod, in the hole I drilled in the bottom of the upright. It was glued in with epoxy and let to set for a day. When I put the base on, the rod pulled right out.
After much cussing, I cut another section of rod about 8" long and put in with Gorilla Glue (see: I hate Gorilla Glue). Now, I double hate it. When I tried tightening the upright to the base with the rod nut, the rod pulled loose immediately.
Apparently the screw action of tightening the nut is very powerful and broke the glue seal. Bad news. So, then, I drilled a hole and glued in a 1/8" dowel to secure the two. Didn't work, 1/8" was simply not strong enough. I then drilled another 1/4" hole and glued in a dowel. That worked but it is still a bit wiggly on the base. The way the upright is turned, I don't have a lot of room for more drilling. Had I planned this ahead, the bottom of the upright would be wider and I would secure with two 3/8" dowels. Or, for other model lamps, I would use a full-length threaded rod and secure by tightening the nuts from both ends.Future lamps, and there will be future lamps, will be pre-designed to avoid this problem. Like the old story goes: the first custom made item costs the customer $500.00, those afterwards are $50.00 each.
All in all, I'm happy with the outcome even if the project tested my patience.