
- Messages
- 7,994
- Location
- falcon heights, minnesota
a little while ago, rob asked me to put this together to show how i made those arched tealight candle holders. so, here we go....
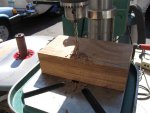
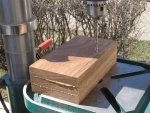
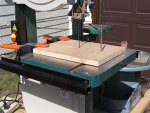
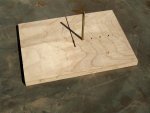
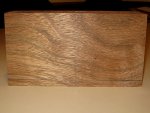
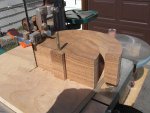
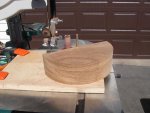
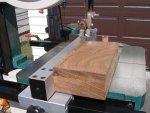
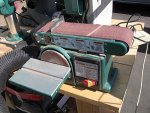
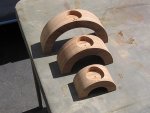
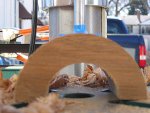
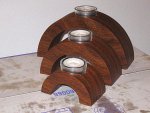
first of all, i would glue up a blank, roughly 9" wide (finished largest arch has an outside radius of 4", or 8" from side to side), about 4.5" to 5" high, so that it covers the 4" radius from side to side, and middle to top, with enough so that the pivot hole is surrounded by enough material. then, after getting it out of the clamps, i would draw a line midway across the long dimension, and another line along the long side, with the intersection being the pivot point, and allowing 4"+. then i drill a pivot hole the same size as my pivot pin. this being 1/4", with a 1/4" pivot pin. the jig i use is basically a square of plywood, sawn part way through on the bandsaw, with a line drawn across it, that is sqare with the kerf cut by the blade. then i measure out along the line, from the inside of the kerf, and mark at 1, 2, 3, and 4 inch lengths. those are the points where i have countersunk, and drilled the holes for the pivot pin. after i have done this, i align it on the bandsaw, and mark around the jig for easy repositioning. once the blank has been drilled for the pivot pin, i set up the fence on the bandsaw, and cut where the bottoms of the arches will be, and then nip off the waste parts. with that done, i insert my pivot pin in the outermost hole, to make the outsided cut of the largest arch. then i reposition the jig on the bandsaw, and slide the blank onto the pivot pin, and make the first cut. after that is done, i move the pivot pin inwards, making the second, third, and fourth cuts. after the fourth cut is done, you will have your three arches. one of the reasons i draw the line all the way up in determining the half way point of the blank in an earlier step, is that it makes it easy now to find the topmost part of the arch. i use a small levelling square to make a line across the tops of each arch, and find the halfway point, and tap a small positioning hole at the center point for drilling the hole for the glass cup. the glass cups that i use are from ikea, and are 3/4" tall, and are perfect fits for a 1 7/8" forstner bit (i bought mine at rockler). i then drill the hole for the cup only as deep as the top of the forstner bit. it works out as a good depth. once all three holes have been drilled, i use my belt sander to make sure the bottoms don't wobble, then use my b.o.s.s. sander to smooth them out. i use the 1 1/2" diameter drum for the inside of the smallest arch, and the 3" diameter drum for the insides and outsides of the other arches. then i go over all surfaces with 220 grit so they are nice and smooth. after that, it's the finish of my choice (or what you choose, if you make them), of boiled linseed oil, followed up by 3 coats of clear shellac. once they are finished, i insert the cups and candles, and they are ready to go. now for all the pics....

first of all, i would glue up a blank, roughly 9" wide (finished largest arch has an outside radius of 4", or 8" from side to side), about 4.5" to 5" high, so that it covers the 4" radius from side to side, and middle to top, with enough so that the pivot hole is surrounded by enough material. then, after getting it out of the clamps, i would draw a line midway across the long dimension, and another line along the long side, with the intersection being the pivot point, and allowing 4"+. then i drill a pivot hole the same size as my pivot pin. this being 1/4", with a 1/4" pivot pin. the jig i use is basically a square of plywood, sawn part way through on the bandsaw, with a line drawn across it, that is sqare with the kerf cut by the blade. then i measure out along the line, from the inside of the kerf, and mark at 1, 2, 3, and 4 inch lengths. those are the points where i have countersunk, and drilled the holes for the pivot pin. after i have done this, i align it on the bandsaw, and mark around the jig for easy repositioning. once the blank has been drilled for the pivot pin, i set up the fence on the bandsaw, and cut where the bottoms of the arches will be, and then nip off the waste parts. with that done, i insert my pivot pin in the outermost hole, to make the outsided cut of the largest arch. then i reposition the jig on the bandsaw, and slide the blank onto the pivot pin, and make the first cut. after that is done, i move the pivot pin inwards, making the second, third, and fourth cuts. after the fourth cut is done, you will have your three arches. one of the reasons i draw the line all the way up in determining the half way point of the blank in an earlier step, is that it makes it easy now to find the topmost part of the arch. i use a small levelling square to make a line across the tops of each arch, and find the halfway point, and tap a small positioning hole at the center point for drilling the hole for the glass cup. the glass cups that i use are from ikea, and are 3/4" tall, and are perfect fits for a 1 7/8" forstner bit (i bought mine at rockler). i then drill the hole for the cup only as deep as the top of the forstner bit. it works out as a good depth. once all three holes have been drilled, i use my belt sander to make sure the bottoms don't wobble, then use my b.o.s.s. sander to smooth them out. i use the 1 1/2" diameter drum for the inside of the smallest arch, and the 3" diameter drum for the insides and outsides of the other arches. then i go over all surfaces with 220 grit so they are nice and smooth. after that, it's the finish of my choice (or what you choose, if you make them), of boiled linseed oil, followed up by 3 coats of clear shellac. once they are finished, i insert the cups and candles, and they are ready to go. now for all the pics....
Attachments
-
 01 blank in clamps.JPG86.8 KB · Views: 39
 -
 10 blank drilled.JPG87.1 KB · Views: 41
 -
 09 blank ready to be drilled.JPG110.1 KB · Views: 38
 -
 08 blank with locator.JPG62.1 KB · Views: 37
 -
 07 cutting jig in place.JPG89.8 KB · Views: 39
 -
 06 cutting jig bottom.JPG67.1 KB · Views: 35
 -
 05 cutting jig.JPG78.8 KB · Views: 35
 -
 04 jig location layout.JPG98.4 KB · Views: 31
 -
 03 marking drill point.JPG83.5 KB · Views: 30
 -
 02 blank glued up.JPG77 KB · Views: 33
Last edited:


 Thats if you can still read flat?