Foyer/hall/telephone table/desk

Allen, unless I am not understanding your pictures correctly (photo's 1 & 2) you have the tails on the front. Normally you would put them on the side so that you have the the mechanical locking of the joint working for you. In other words you can't pull the front off the drawer.

i missed that too on the first look. i don't think you'll be hiding the lead bricks in there allen, so it should hold up. the joints look like they are good and tight. after a while with the jig, you'll be itching to cut them by hand. :D:thumb:
 
Allen, unless I am not understanding your pictures correctly (photo's 1 & 2) you have the tails on the front. Normally you would put them on the side so that you have the the mechanical locking of the joint working for you. In other words you can't pull the front off the drawer.

I am a woodworking dummy. You could have said that Bill, hey dummy, look at your joint!!!! Its reversed!!!!!!
eh, its been a long frustrating day, but my son just yelled upstairs, my woodcraft order just arrived!
(aint gonna make me a better woodworker)

Thanx Bill. If someone didnt correct me the next one would have probably been wrong also.
I was so wrapped up with the jig and the instructions to get it right, I never thought about which sides to place the tails and pins.
 
And yet, a question You could ask the rest of us is "How many dovetailed drawers have you made?" :D

I'll admit I've made a few dovetails with my Incra Jig, but I have yet to make an actual dovetailed drawer... Lots of box joints, dovetails, not so much...
 
and after all the aggrevation today and misses with the cracking maple, I thought I finally graduated to some kind of secret woodworking position,some place thats recognized as reaching the next level . A place of honor and pride amongst woodworkers all over the planet. I made a dovetailed drawer:but Im wearing the dunce cap.
 
Last edited:
inlaying is not for me.

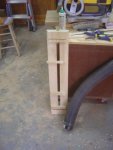
I patiently made a jig to use my router and a bushing, and a 3/4 inch dado bit.
I practiced on white oak, to get a feel how it would be, then I carefully place and clamped the jig down onto the better side of the table top(first mistake, should have used the second side),used the plunge base and only went down 1/16th or so, and my lengthwise cuts were great, but when I went to connect them, the groove was off just a bit, but a bit meant I had to take out a chisel and do it by hand.
I was about to go up and get out my 3m paper to hone a chisel so Id have a nice sharp one, the marples are due for sharpening. They cut well, but I know its time.
I took one of the Ashley Isles chisels Ive never used, and it tapped right into the white oak easily.
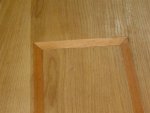
I carefully clamped down a straight edge to square off the ends and bring up the channel to size(now the ends are a bit larger than the long channels, but I wasnt concerned about that)
I cleaned it all up, and it looked ok. I got picky, I carefully used the chisel the last time, and chipped off a tiny, maybe 1/16 or less of the edge.
So thats that. What I needed to clean up the channel is something Ken showed me at the show. A router plane, would be perfect for inlay channel cleanup.
Anyway, not that pleased and about to abandon the entire inlay attempt, I said what the hoot, might as well. I should not have. This isnt easy for me.
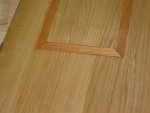
Kudos to all you guys that inlay and all that stuff. PUtting in a stripe of mahogany turned out to be 20 times harder than I had expected.
I botched the entire job. I was so careful sizing up the pieces, fitting end to ends, cutting with sharp razor and straight edges. eh.......I dont have the hands, the eyes, or the main thing, the talent and experience to do this.
Ill flip the table top and use the second side. This was an experiment, so I wont lose sleep over it.
I put some wax paper over the inlay strip, put a particle board over the entire surface, and put my planer on it to weigh it down.
Wont be no pics of that mess, but Ill get to see just how crappy my inlay work is.
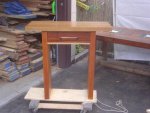
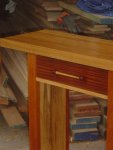
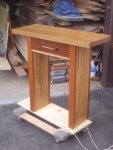
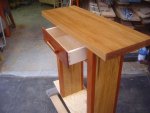
I spun a handle on my lathe. I dont use the lathe anymore, so besides a pen or two every couple months, I figured might as well use it for something.
Took some scrap white oak and mahogany, this is what I came up with, wife said ok, so its ok with me.

Im not 100% lately, my therapy cant come soon enough tomorrow. Im off for the week.

btw, originally, I was going to cut 2 squares of mahogany and lay them into the top, and I believe that would have been much easier with a template of the squares. I should have stuck to that plan.
 

Attachments

  • bed 243 (Medium).jpg
    bed 243 (Medium).jpg
    37.7 KB · Views: 24
  • bed 244 (Medium).jpg
    bed 244 (Medium).jpg
    70.6 KB · Views: 23
  • bed 245 (Medium).jpg
    bed 245 (Medium).jpg
    50.5 KB · Views: 29
  • bed 246 (Medium).jpg
    bed 246 (Medium).jpg
    58.1 KB · Views: 28
Last edited:
You are doing great Allen. That handle looks excellent. When you wrote that you decided to turn a handle, I was thinking like for a tool or something....
 
Last edited:
No shame.

heres some pics of the top lightly oiled so all the mistakes are very, very clear.
The long pieces came out fine, the cross grain ones are a disaster.
I think Ill chisel them out and try one more time, being alot more careful.
No laughing please. I have feelings(nah, laugh all ya want, its pretty funny)

I just wanted to break up all the white oak, the last pic shows what I was going for.

I know if I get it closer, a tiny gap or two will not be very noticable once I apply more oil and poly, as it will darken and amber up nicely.

and not to try to avoid all the blame for the bad job, I believe there are routers better suited for as in easier to handle and better bits. (my bit selection was poor. I used an old ryobi bit that I purchased on sale for 6 dollars 2 years ago. Its seen alot of use, so maybe it was a little more on the tearing side than I would have liked, I really need to buy some router bits.)
 

Attachments

  • bed 254 (Medium).jpg
    bed 254 (Medium).jpg
    58.5 KB · Views: 28
  • bed 253 (Medium).jpg
    bed 253 (Medium).jpg
    64 KB · Views: 30
  • bed 251 (Medium).jpg
    bed 251 (Medium).jpg
    55.3 KB · Views: 33
  • bed 249 (Medium).jpg
    bed 249 (Medium).jpg
    57.4 KB · Views: 30
  • bed 248 (Medium).jpg
    bed 248 (Medium).jpg
    50.7 KB · Views: 34
Last edited:
not sure what you used to cut your reliefs, but a trim router is easier to control on the light stuff. i think i would leave it plain rather than put in a inlay. that inlay you got going there to me looks like to much sugar for a dime.. let the wood do its thing allen,, and your design as whole..dont try to make the table great by adding in some wood of another type.. this is just my thoughts.. not wrote in stone anywhere:D:D
 
although I chiseled out the cross strips, I decided to abandon the idea due to lack of skill.
I already ruined the perfectly flat side, and had to flip it.
I worked on the bottom, now the top, all morning. My nurse couldnt come till 1 pm today, so I knew Id have 5 or so hours to work on sanding.
I oiled it down earlier, then gave it another light rubdown just now.
Ill put 6 coats of rubon poly on the top, and maybe 3-4 rub on poly on the sides, cause thats how my wife likes it.
This is what I got in the end.(took a few extra pics since I never know if my eyes are focusing or not)
IM a little suprised the striped mahogany(I believe its called African striped mahogany) I used for the drawer front, came out so dark after oiled down as compared to the honduran mahogany I used for the front and back of pedestal legs.
 

Attachments

  • bed 255 (Medium).jpg
    bed 255 (Medium).jpg
    63.8 KB · Views: 28
  • bed 257 (Medium).jpg
    bed 257 (Medium).jpg
    33.7 KB · Views: 26
  • bed 258 (Medium).jpg
    bed 258 (Medium).jpg
    42.4 KB · Views: 29
  • bed 260 (Medium).jpg
    bed 260 (Medium).jpg
    42.4 KB · Views: 31
  • bed 263 (Medium).jpg
    bed 263 (Medium).jpg
    63.7 KB · Views: 30
  • bed 264 (Medium).jpg
    bed 264 (Medium).jpg
    40.7 KB · Views: 29
Last edited:
You amaze me Allen. You get it done alright. That came out looking really great. I also prefer the top with no inlay. The wood colors make the piece too imho. The draw pull is very nice and what were you complaining about in the dovetails. They look fine to me. So you got the tails on the side i would like to know who outside of woodworkers would even know.;):):thumb:

But you sure have one heck of a stash of wood waiting there. You competing with Larry for he who has the biggest stash?:D
 
Top