white oak dining table-COMPLETED

allen levine

Member
Messages
12,363
Location
new york city burbs
Im stumbling along, and I mean stumbling along.
Ive had to wax the beds of the jointer and planer twice in 2 days.
I changed the blades on the jointer last night.
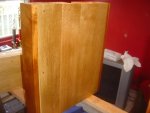
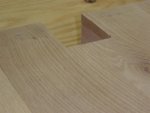
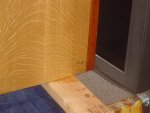
This white oak and hard maple are a bit difficult for me to work with such large heavy pieces.
I did not match up all the rift saw, quartersawn, and light or dark white oak,( sorry, the camera batteries went dead, I wanted to show before I apply any oil the different shades.)
I love the contrast and beauty of this, so I wouldnt bother using matching boards all over.
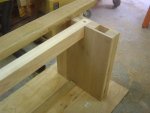
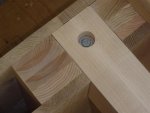
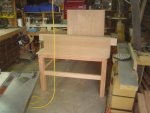
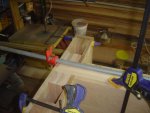
Its all white oak exterior, ash and maple interior parts.The center stretcher is around 12 inches wide, with a 3 inch x 4 inch laminated piece of hard maple on top, a 3inch by 1.5 inch on bottom with white oak outsides.IM thinking bout glueing the top boards to the top support and using screws for the bottom support so the wood has room to move. The center stretcher will be glued in top in between posts, not in between walls.
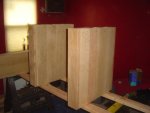
Pics explain it, show it, and its just so tempting to just glue it all together and not worry about wood movement. But Im afraid a 22 inch 28 inch high panel would love to jump around on me and eventually start to crack.
IF anyone who looks at this thinks I could get away with just glue, please voice an opinion. Otherwise, Im going to use screws with oversized holes to attach everything and then cover with plugs. Glue only the middle board of each piece.
My muscles, what little I have left, are sore and I have no energy left to start to plane and cut a top until I completely assemble and move this base unit.
I could not clamp it all so perfect since nothing is being held together and the parts are very heavy., but wanted to give an idea of what the base will look like.
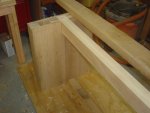
Its 53 inches long, for an approx 72-74 inch length table top,and it goes 24 inches wide with the mahogany endcaps, for a table width of approx 40-41 inches.
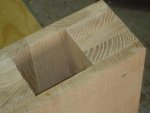
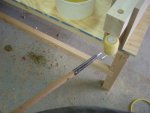
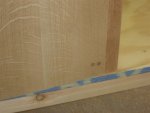
I had to cut out the support beam slot on the inner walls and decided to rough cut with a jigsaw, then I put in a 2 inch flush bit with a bearing.
Ofcourse, while cutting, I dont know how, I let the entire thing shift and had a drop off cut from the bit. It wont show, its hidden by the oak on the center stretcher. My bit is so rusted, but it did the job.
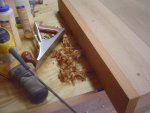
I used the plunge saw and rail to trim up and square off all the panels, the ran a tiny bit off on the table saw to get all parts equal height.
Im waiting on some screws and a 3/4 plug cutter so I can start attaching all parts with screws, and sort of let each panel "float" on the inner support columns.
I hope my design isnt too flawed.
A big part of my enjoyment, is to make my own plans and follow them through.
 

Attachments

  • bed 322 (Medium).jpg
    bed 322 (Medium).jpg
    47.3 KB · Views: 93
  • bed 327 (Medium).jpg
    bed 327 (Medium).jpg
    55.3 KB · Views: 81
  • bed 326 (Medium).jpg
    bed 326 (Medium).jpg
    64.3 KB · Views: 96
  • bed 324 (Medium).jpg
    bed 324 (Medium).jpg
    67.8 KB · Views: 90
  • bed 325 (Medium).jpg
    bed 325 (Medium).jpg
    47.8 KB · Views: 81
  • bed 323 (Medium).jpg
    bed 323 (Medium).jpg
    50.1 KB · Views: 81
Last edited:
Sounds like a project, Your lucky my son is not on here he would be giving you the what for using screws instead of dowels. The boy is the most annal guy I have ever had working and he will take screws out and replace with dowel when ever he can.
 
Well now, that is one stout looking pair of legs! I doubt that is going to have any problem holding up the table top and at least two disco dancers!
 
allen, once assembled will that base be all one piece. if so that is going to be one heavy base. is it too late in the design to make the center divider detach from the two towers?

chris
 
not too late at all, and I was thinking of predrilling a 6 inch lag bolt through the top into the center post of the base just for this reason, so it can be dissembled and moved easier.
The base is heavy, but I can lift one piece of it myself, not easy to handle, but able to move it from table to table, so Im sure 2 able bodies could move the entire base without much trouble.
Im sure, maybe not? a 3/8th lag bolt would secure that base together.

the center stretcher is a 3x4 inch piece of hard maple that rests on a 3x3 piece of maple/or ash,with a 3x3 post of maple/ash on each side of it.
The oak only goes up to the inner wall of the pedestal base, the 3x4 maple center stretcher goes 3 inches further on each end. Drilling 6 inches of hard maple is not going to be an easy task for me, as I will have a hard time getting that sucker onto the drill press table and I dont know if my makitas can bore through it.
 
Last edited:
thankyou, Ill take that confidence into the shop tomorrow as I was dicouraged by all the heavy lifting today and my worn out body.
Im still flipping the idea of stain and poly or applying some type of oil and popping the grains and then add poly or laquer.
 
allen,

if you decide to drill for the lag, do yourself a favor and go down to your local borg and get a drill bit that has the auger/screw on the end, i forget what they are called, we used one to drill holes in the 2x4's for electrical in my house. you don't have to apply much pressure, just let the drill do the work, set it on 1 for more torque and that makita should easily handle it. the bits usually are at least 8-10" long.

chris
 
I used 5/16th lag bolts, 5 inches. I first used a 1 inch spade bit, went down about an inch, so I could tighten and washer. Then drilled with a 1/4 inch speed bore bit, basically a spade bit, but it went through with ease.
Then I took out a 5/16th bit, a regular bit and drilled the length of the shaft of the lag screw so I wouldnt have any problems, only drilled an inch in with 5/16th.
When I attached the screws, and just the top piece(3x4 maple), it was sturdy, but had a tiny bit of movement. When I attached the bottom stretcher(1.5x3 maple) and the white oak outer layer, it didnt have any movement.
The 12 inch stretcher now stiffened the sides up.
My eyes and I guess my skills are not top notch.
Its evident by the gap I ended up with between stretcher and pedestal, I slid paper in 2 of the 4 joint areas.One of the posts is around 1/16 off, guess Im going to have to sand down. Cant figure it out, so I have to leave it, with a top on, Im not sure it will be so noticable when all oiled and poly'd.
I gave up trying to match face plugs, eh......like I said, Im in a bit over my head and my arms didnt have the strength just now to use the flush saw and cut the rest of the plugs off.(long day,)
Gonna go back into the garage shortly, just taking a rest, maybe just clean up.
I have to build an assembly table to accomodate the top.(I dont have a table large enough and I need table space with all the jointing,planing and glue ups I am about to start)
I will put together a 2x4 and plywood work table this week, stopped by the borg a little while ago.
 

Attachments

  • bed 339 (Medium).jpg
    bed 339 (Medium).jpg
    50.5 KB · Views: 31
  • bed 337 (Medium).jpg
    bed 337 (Medium).jpg
    63.9 KB · Views: 33
  • bed 336 (Medium).jpg
    bed 336 (Medium).jpg
    43.7 KB · Views: 34
  • bed 335 (Medium).jpg
    bed 335 (Medium).jpg
    47.5 KB · Views: 35
  • bed 334 (Medium).jpg
    bed 334 (Medium).jpg
    49.1 KB · Views: 34
  • bed 332 (Medium).jpg
    bed 332 (Medium).jpg
    53.1 KB · Views: 38
  • bed 331 (Medium).jpg
    bed 331 (Medium).jpg
    47.9 KB · Views: 34
  • bed 329 (Medium).jpg
    bed 329 (Medium).jpg
    49 KB · Views: 34
first, I apologize for all those that just want to see some woodworking. This build thread is more like a journal of my activities, sorry if some are dissapointed.
Again today, no motivation to get out of bed. I forced myself out at 8:30, I just have so much to do in so little time.
My plan of attack today: cut off plugs on unit and sand a bit with 80 grit, and smoother plane to get edges of mahogany exact.
Build a table, not this table, another work surface table.
Unfortunately, I cannot keep lifting these heavy pieces of oak without it taking its toll on my body.
The best way I can handle it, is to do it in small sections at first, but I need table top area to work, and store all pieces as Im moving along.
So build a quick work table, then I have a doctors appt today at 4, cause I dont have enough health problems, another one is taxing me now.
Get home and continue touch ups on moldings and paint job. My wife is having a group of women over tomorrow night and I promised her Id at least touch up all the bad spots in the front room where they will be hanging out.

So where IM at-got all the plugs cut off, sanded down only one pedestal to smooth with 80grit, used the hand plane to shave down the sides of the mahogany till even with white oak, a pleasure, saves me an enormous amount to time sanding it even.
Built the work table, and took a nice injury building it.
I had some 2x4s, had to buy 6 more, and I wanted to trim off the curved over sides of all of them and work with nice edged 3 inch width.
So I trimmed off a bit on one side, then measured the 3 inches, and ran the other side through, all pieces at one time.(all pieces were cut down to size for table already)
I had some small 12 inch pieces, and the thin slice that came off some, would stand against blade, and I had to carefully remove them with my push stick. I got lazy, started using the piece of wood I had in my hand, the 12 inch part, and the blade caught it. It shot up(Yes, I am a moron, this is about the third time this year I got hit with a kickback)and took a chunk, yes, a nice chunk out of my left breast, right below the nipple part. It hurt like all heck. It stings now, but with all my hair, no bandage. I asked my wife to take a picture, she asked me if I was brain damaged, and why on earth would anyone take a picture of that disgusting injury .
I said to show my buddies, she said youre all sickos.
Ok, moving on.
I will begin sorting through heavy, heavy, really heavy oak boards tomorrow in an attempt to cut some down to workable size for myself, or just spend the day sanding tomorrow.
 
Ouch!

And yet, through all your trials, you are still getting it done!

I know some folks say stand to the side of the blade, but with my saw, I have yet to figure out how to do that.

I was ripping some 1"x3/4" cleats of poplar last night. I used my board buddies to keep the keeper piece from kicking back, and a push stick to shove it through the blade. Since my fence is on the right side of the blade, I have no idea how I could possible stand out of the way of the kick back. I just try and make sure that I'm using as much as I can in the way of BB, Featherboards, etc to limit my chance of it happening in the first place...
 
feh.

IF a board is marked white oak, in someone elses handwriting, eh.

In the garage, and with my poor vision, unless IM shining a spotlight on something, alot of woods look alike to me.
I see the flecking, and I know white oak has different shades.
so one pedestal Im going to call the multi grain, like multi grain cherios, because it looks like rift sawn white oak, quarter sawn white oak, QS red oak, and even a piece of rift or qs ash?
Not sure, I moved it all into my new finish room. AC is on so its a pleasure to work in there.
Rubbed on some oil.
I attached a small roller and rolled oil into the pedestals insides, not sure it coating exposed areas on inside would mean much, but didnt want to take any chances of any moisture causing more problems than the problems I can make myself.
A few errors along the way. The mis route, wont be seen.
The worst error, on the outside of a pedestal, I wont disuss how stupid I am and why I have 2 plugs.(small shop doesnt help)
It is what it is.
Thought Id get to wood selection and first size cuts on top today, not gonna happen.
Some shots, and thats the table I built yesterday to work with table top pieces.
 

Attachments

  • bed 352 (Medium).jpg
    bed 352 (Medium).jpg
    49.9 KB · Views: 41
  • bed 351 (Medium).jpg
    bed 351 (Medium).jpg
    40.2 KB · Views: 41
  • bed 348 (Medium).jpg
    bed 348 (Medium).jpg
    59.3 KB · Views: 33
  • bed 347 (Medium).jpg
    bed 347 (Medium).jpg
    40.7 KB · Views: 36
  • bed 346 (Medium).jpg
    bed 346 (Medium).jpg
    57.2 KB · Views: 39
  • bed 345 (Medium).jpg
    bed 345 (Medium).jpg
    55.3 KB · Views: 40
  • bed 343 (Medium).jpg
    bed 343 (Medium).jpg
    44.1 KB · Views: 36
  • bed 340 (Medium).jpg
    bed 340 (Medium).jpg
    62.7 KB · Views: 36
  • bed 353 (Medium).jpg
    bed 353 (Medium).jpg
    53.2 KB · Views: 38
Last edited:
some of the 2x4s are from the lumber rack I had before, and all the screws are from that old lumber rack. I had to buy some 2x4s(my contractor neighbor didnt have any scraps laying around), and a sheet of ply, but when I get caught up the ply will be part of a new work bench, so it didnt run me much to make the table.
 
I always enjoy following along on your projects, Allen. It's not a forum thread, it's an adventure. :D

Despite a few mis-steps, bobbles and projectiles, things are looking good. The pedestal you show with the finish on it...is that the mis-matched one? Whichever one it is, it sure looks good from where I'm sitting. :thumb:

And I agree with Garry...your assembly table looks great. And a lot of us would have taken two or three days to cut and assemble it. ;) I could sure use something like that if I had the room.
 
Top