Concrete Counter Top

Coming along very nicely Brent.:thumb: Just curious but what holds this kind of top in place? You got some embedded nuts under it? or is it just fit and weight thats gonna hold it on top of the cabinet or do you anticipate drilling into it?
 
Thanks Guys!

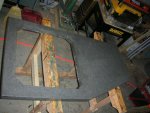
how did yu get those neat stripes on it? that looks like a straightened out zebra skin..

Just the shade from the trees! :D

Coming along very nicely Brent.:thumb: Just curious but what holds this kind of top in place? You got some embedded nuts under it? or is it just fit and weight thats gonna hold it on top of the cabinet or do you anticipate drilling into it?

Construction adhesive will keep it down on the cabinet and the cleats on the wall.
 
Well, started sanding on it a bit.

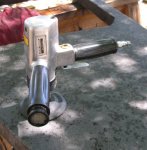
Used my DA Ingersoll Rand Air sander thingy. Bought over 10 years ago when I got my compressor. Never used it. Just the ticket for wet sanding. Put a velcro sanding disk holder on it and started going through the sanding disks.

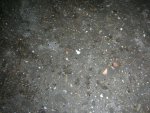
Looks like I'll need another coat of 'slurry'. The big holes are filled, but there are a bunch of tiny ones that need some work. So I'll do another slurry coat, wait a while, then start the actual finishing process.

In all honesty, the holes are small enought I feel like the sealer and finish could take care of them, but I'd rather try another coat of slurry.

It's looking pretty good though, but will take a lot of sanding/polishing to get it where I want it...
 
So made a little more progress. Used a DA sander and ran about 10 100 grit disks over the surface and front side. Ground a 'chamfer' along the front edge.

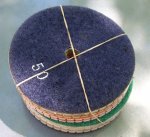
The sandpaper worked ok, but really didn't make much progress. That's when I switched over to the diamond disks I got from Fleabay. WOW What a difference that made. I used just a little air powered 'polisher' from HF. Had sharon hold the hose and I ran the diamond disks over the surface. It was an immediate improvement. The disks got from a '50' to a '3000' whatever that means. The 50 generated a lot of slurry and actually seemd to grind some of the aggregate down so that you could see a lot of variations to the color. Unfortunately, it also exposed some more holes from bubbles. Oh well, I'm not too worried about those.

I put a coat of penetrating sealer on and will work on filling in the holes with some epoxy. Then I'll sand it some more, and probably put some kind of glossy finish on it.

So far, I'm still happy with the way it looks. Just not going to take this whole thing too seriously...

counter_08.jpg

counter_09.jpg

counter_10.jpg

counter_11.jpg

counter_12.jpg
 
Jarrah Counter tops? That sounds pretty sweet, would like to see those sometime! :thumb:

Doing a concrete counter top much bigger than this would be pretty difficult, as it weighs a ton!

I decided to put a polyurethane finish on it. It seems to be filling in the holes pretty well. So I'll let this coat dry, sand it down real good, and repeat until the holes are filled... Then I'll put a gloss coat on top when I'm done...
 
Finally Installed

Finally got the counter installed yesterday. Ended up putting several coats of gloss poly on it. I kept having problems rubbing it out to look good, but Dave's little tutorial helped.

Basically I got some wet/dry sandpaper and used a little mineral oil. Started at 320 and worked my way up to 600. Then I used some good old turtle wax polishing compound and my pneumatic polisher.

Then a little wax with a different bonnet and I called it done.

I do have a little problem with the sink, as the clips they provided aren't long enough for the thickness of the counter top. I think I can come up with some kind of fix though. Just need to take a trip to the hardware store.

Then, some paint and a tile backsplash and me and the cats will have a nice little counter and sink.. :rofl: :rolleyes:

attachment.php
 

Attachments

  • counter_13.jpg
    counter_13.jpg
    73.1 KB · Views: 68
Top