Saturday - Hollowing Tool Making & Finish

Dan Mosley

Member
Messages
1,169
Location
Palm Springs, Ca
Had today free to finish up a turning project and finish making my hollowing tool handles. Started by cutting up (2) 3/4" boring bars and (2) 1" boring bars.

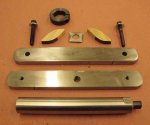
What I ended up with is (1 )-3/4" with a swivel type tip that i made days ago - (1 )-3/4" straight boring bar and (1 )-3/4" bar that holds a 45' type cutting tip.

Then I made (1)-1" straight boring bar and (1)-1" bar that will hold the same 45' angle cutting tip.

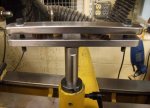
Total cost of cold rolled for the 4 bars was about $18.00 as long as I paid in cash...............figure that..............Total cost is somewhere under $100.00 and that includes the making of a new tool rest out of 1" stock - How does it cut now ? beautifully!!! The rig is made much more rugged than the others I have seen on the market but I chose the materials for that reason anyway to make one stout. The laser is dead on accurate but its a little bigger one than on my monster rig which I think is 3mw and the ones i used on this rig are 5mw - which is no big deal, the laser dot is a bit bigger but nice and bright. It is a bit more trouble to set the laser (2 securing points for vertical adjustment and 2 for horizontal) but consider the cutting ease ill live with it.......... ;)

I went out and bought different bolts - flat on top and made out of SS - much stronger and do not stick up like in the pictures - .40ea.......


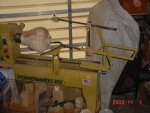
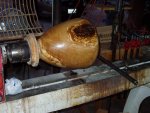
Picture 1 - is the project covered in plastic bags and sprayed once a day while I had to work the last 4 days. Did not crack and I was glad because I wanted to try the boring bars on this pc. It is 12 1/2 wide and 15 1/2 deep.
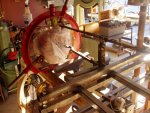
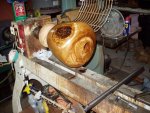
Picture 2-3 are the vessel finish turned and hollowed
Picture 4- 1" bar with 45' tool tip in it - and I made another 3/4 to hold the same cutter
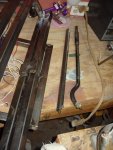
Picture 5 - 3/4 straight and swivel tip tool
Picture 6 - swivel tip cutter in 3/4" bar
Picture 7 - 3 older vessels with finish coats drying

Its not a hard project but is time consuming - I would say well worth the work.........................thanks
 

Attachments

  • Sunday-3.jpg
    Sunday-3.jpg
    86 KB · Views: 115
  • Saturday-1.jpg
    Saturday-1.jpg
    80.9 KB · Views: 97
  • Tip-1.jpg
    Tip-1.jpg
    63.7 KB · Views: 89
  • Saturday-6.jpg
    Saturday-6.jpg
    94.3 KB · Views: 100
  • Saturday-5.jpg
    Saturday-5.jpg
    70.4 KB · Views: 95
  • Saturday-3.jpg
    Saturday-3.jpg
    74 KB · Views: 95
  • Saturday-2.jpg
    Saturday-2.jpg
    97 KB · Views: 99
Last edited:
Jim and anybody else making one just yell if you want to talk about aspects of it. Im all for making tools if you can do it - cheaper and alot of times better made.
Do not let not having a welder slow you down - I did not have a good one when I started (bought one cheap during the process though) and I found someone that would have welded the rig pc's for me for $40.00 - $50.00 if I would have needed to.

The steel is not expensive if you ask about cut offs at a supplier - They let me go thru there cut off piles and pick out what I wanted and sold it to cheaply - most of the rig was made from cut offs.

Below are pictures of hollowing tools - all homemade - some by Jamison - some by Jordan - some by others and mine - but they will give you some ideas on how you may want to make them.

I working on a new design of one and ill post pics when im done.....
 

Attachments

  • im000889[1].jpg
    im000889[1].jpg
    77.8 KB · Views: 36
  • Tip-1.jpg
    Tip-1.jpg
    63.7 KB · Views: 32
  • Saturday-6.jpg
    Saturday-6.jpg
    94.3 KB · Views: 40
  • Saturday-5.jpg
    Saturday-5.jpg
    70.4 KB · Views: 41
  • Jordan-style-tools[1].jpg
    Jordan-style-tools[1].jpg
    33.3 KB · Views: 49
  • Jamieson-tool[1].jpg
    Jamieson-tool[1].jpg
    29.2 KB · Views: 41
  • Hunter-bent[1].jpg
    Hunter-bent[1].jpg
    47.8 KB · Views: 41
  • hollowing Tip.jpg
    hollowing Tip.jpg
    77.3 KB · Views: 41
  • im000894[1] (600 x 237).jpg
    im000894[1] (600 x 237).jpg
    36.6 KB · Views: 31
  • im000890[1] (600 x 453).jpg
    im000890[1] (600 x 453).jpg
    76.8 KB · Views: 32
Last edited:
Very impressive!

Good job there, Dan! I've got to admit I can't do anything with metal and have never tried. I took 1 high school shop class in wood and somehow managed to pass that despite it generally being a timeout hour for misfits:wave:
This whole turning ordeal is like being a kid all over again in a candy shop. Just when I'm really for reals sure of what I want and where to go, I see some other aspect that a lot of you folks are willing to share with the novice turner. I think Im going to stay with the small stuff, at least for the next 5 yrs. as I have a lot to learn about just the basic forms, and I'm quickly realizing that carving, airbrushing, and Godforbidsegmented stuff looms eerily in my future if I want to take the SW stuff where I "think" I want to.
So thanks for taking the time to share this stuff. I for one appreciate it!
Michael
 
Mike..............I think you would be suprised what you can make and do if you give it a whirl.........if you have a drill press and a angle grinder your on your way to making your own hollowing tools........I held off trying to make my own for quit awhile thinking I would not be able to make them........since then I have made my own D-arm hollowing rig and hollowing tools - and it works extremely well and exceeded what i expected. And I was able to build it the way I wanted and alot more stout than anything on the market.
The materials are cheap and with everybodys help on here..........walla you have some better hollowing tools then you can buy.........give it at try
 
Monster Rig v. D-Arm - Roger's email

Wayne........I had alot of fun making the Darm and learned alot while doing it. For hollowing larger diameter or deeper things it works very well.

To answer a email sent to me on the subject of making a hollowing tool V. buying a hollowing rig for someone just getting into making vessels- I sent a email back refering to this posting because the sender will get more out of it from others as well as my comment- im no expert but there are plenty people here that are very helpful.

However, I have to say like today - when im making vessels under say 10" give or take - my "Go-To tool" is my Monster hollowing rig. This is one tool I have never regreted owning, support is great and you can talk directly to Randy the maker of the tool - you get alot of extra things with the rig also - I can go on and on but there are others in the forum that own the rig also and you can post questions here if you like - better yet you can call Monster and talk directly with Randy if you want........as for the forum..... joining up its easy -

Thompson Tools is another great source for lathe tools
Don Pencil is a great source for tools and buffing wheels
Enco is a good place to get HSS or HSS with Cobolt for cutting tips

There are of course many other good vendors out there but these are a few that I would do buss with over and over.

Opinion: If anyone is just getting into hollowing the Monster hollowing rig is what I personally would advise getting - learning curve is not bad and alot of fun.

Roger - I know this is brief but your question is one that the conversation can be volumes........post your questions and join up......we will help you out ....
 
Last edited:
Dan, this has all been very helpful. I've been gathering material to make mine and I think I'm getting close to having everything. Now I just need to determine overall dimensions and start cutting and weld it all together. I'm sure I will have questions soon.

Tom
 
Tom - ask whatever you want and ill tell you what I can about how I made mine and post pic's to show you - I have a Jet 1642evs with 16' swing - the project is fun to make and works fantastic - I do have to refine some of the cutting tips/tools but I currently have 1/2 and 1" bars with 3/16 cutters for tips - bars are::: straight - 45' - swivel tip - swan neck in 3/4
On the to do list is to make a scapper from an old planner blade but im in no hurry because what I have made so far is doing the work fine......
Let me know ................Dan
 
I've only made 2 tools so far, but really enjoyed doing it and plan on more. I'm curious, Dan, how you made such a nice fit for the round insert in you second picture. And, what is your source for carbide inserts and bits? I use some 3/16" bits. Is that a good size or it 1/4" better? One thing I'm a little disappointed it is how quickly mine dull. Maybe it's the angle I use(?).
 
The second pic is not mine - its a sample pic that i copied online to show others that hollowing tools can be made in different configurations. However, I have a friend at work who's husband has a machine shop and the cost to make and machine my adapter was $20 - tool rest and goose neck made by a local welding shop $40.00 but I did my own drilling and tapping.

Source-----for my Ci1 - carbide cutters - Dehart Tooling

for 3 /16" HSS bits and HSS with cobolt - Enco

Personally I mainly only use 3/16" but I have some bigger just dont use them much anymore - I favor the ease of cutting/control of the 3/16
 
Dan, I would be intrested in any photos of your backrest base. How it attaches to your rails. Also, how far to offset the backrest rails on the base mount. I don't think the base is mounted directly in the center. I hope this makes sense. I'm looking to build mine kind of like this.

Tom
 

Attachments

  • Backrestforweb-maintoolpage.jpg
    Backrestforweb-maintoolpage.jpg
    24.4 KB · Views: 11
...Source-----for my Ci1 - carbide cutters - Dehart Tooling...

For the record, the carbide cutters from Dehart are NOT the same as the ones sold with the Ci1. They look the same and have the same dimensions, but they don't cut as cleanly or hold an edge as long as the cutters from Easy Wood Tools. I don't know exactly what he has done to them, but Craig's cutters are not your standard carbide planer inserts. The Dehart cutters are indeed less expensive, but they don't perform as well as the EWT cutters, in my opinion.
 
Tom - below are some pictures of stuart's rig which is the basic plan for how I made mine - also i posted are other pictures of something like what I think your trying to make which is different then mine.
The rig I made is alot like stu's......The backrest attaches in the same manner - a pc of plate steel with a bolt going thru as a top plate - bolted welded to a bottom plate underneat and when tighten up secures to the ways of the lathe....... If the picture is not clear enough let me know and ill photo mine and post it........
On mine the bolt is mounted in the center and i can pivot and turn the entire rig side to side and back and forth if necessary duing hollowing.......

Picture #5 and #9 are of a torque rest that you may or may not be able to use but I included it so you can see how easy it would be to make ....I have thought about it because it is easy enough but so far I have not run into a need - the rig is plenty sturdy as it is.......good luck and keep asking the questions


Vaughn - The Ci1 cutters from Dehart are not the same as the ones you can buy from Craig - His cutters are imported from Germany "I think" and have a sharper edge and I agree they last "a little" longer than the Dehart cutters............However, Craigs price is $14.00 each - Deharts are $4.00 each..... I use them for rough turning and then switch over to other tools.....doing the math I feel im way ahead in the way I use it.........so, they last me plently long before I have to change to another side...........The I use them makes it more cost beneficial to buy them from Dehart............I have nothing against Craigs tools or anything like that.....I own a couple of his tools ..... but personally speaking when it comes to buying the cutters....I think the cost is ridiculous.......just my opinion
 

Attachments

  • Sunday-1.jpg
    Sunday-1.jpg
    97 KB · Views: 17
  • Torque.jpg
    Torque.jpg
    92.3 KB · Views: 18
  • hf_finished2[1].jpg
    hf_finished2[1].jpg
    80.2 KB · Views: 18
  • hf_finished1[1].jpg
    hf_finished1[1].jpg
    80.3 KB · Views: 19
  • hf_captured_d_handle[1].jpg
    hf_captured_d_handle[1].jpg
    70.9 KB · Views: 18
  • DSCN2595[1].jpg
    DSCN2595[1].jpg
    32.9 KB · Views: 19
  • D-Handle-1.jpg
    D-Handle-1.jpg
    73.3 KB · Views: 18
  • D-Handle-3.jpg
    D-Handle-3.jpg
    62 KB · Views: 18
  • Torque-Materal.jpg
    Torque-Materal.jpg
    62.1 KB · Views: 18
Last edited:
Tom ----------- The bracket is 37" long and square steel the vertical part was made to be adjustable but the vertical posts are 4" and the upper part slips down into it.
The D-arm itself is 20" long on the longest part 18" on the other side - the part that sticks out longer is where you would put the hollowing tool into and secure it....... and 8" in between

Rob -----------Although I have not made a torque support yet but, from what I have read the hollowing tool would fit into the 2 plates and the spacers would welded into place on the bottom plate, and the spacers are just thick enough to give it a slight clearance for the tool to slide around.
Sounds like a very good idea and is simple enough to make - I just have not had the need or motivation to make one yet......
 
Dan, one more question......the coupling that is on the end of the D-arm......I assume you welded that to the D-arm side and it then is drilled to 3/4" on the other end for the tools to fit into with a bolt to tighten the tool in place....does this sound right?

Tom
 
Top