Wrapping Organizer - Done

Four years is waay too soon to 'get back to working' on a project. It's gotta take at least an "I'm just going to go buy one" to make it to the top of the list:rofl::D:rofl:
 
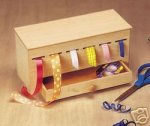
I finally got some maple planed down tonight for this project. However after a trip to the craft store today I found that most of the wrapping papers come on rolls that are 40" wide, so I've changed the design from 32" to 42" wide, same height. I also don't have quite enough maple to do the drawers and extra dividers right now, so I'm building the basic frame and only having one divider right now, on one side of the divider it will be sized to accommodate my wife's ribbon storage box, which is somewhat like the one below. I figure she'll let me know what she needs to place on the shelves and we'll build another insert for that half for what ever it needs.

lcribboncaddy_001.jpg
 
I liked your suggestion Glenn, so going with the forstner bit.

Tonight I cut all the dados, routed the dados/slots for the dowels and got a dry assembly done.
2014-12-06 21.09.46.jpg 2014-12-06 21.56.57.jpg 2014-12-06 21.59.14.jpg

I'm not quite sticking to my sketchup drawing. I sized the left side for her ribbon box, the other side will have a insert added later once we know what she's going to store on that side instead of the fixed cubby and drawer.
2014-12-06 21.59.38.jpg
 
Man that organization is going to make wrapping presents way too easy :)

What about a blade at bottom of rolls to tear/cut wrapping on.

Sent from my SGH-I337M using Tapatalk
 
And always listen to that little voice telling you to quit for the night.
2014-12-06 22.33.22.jpg

Drilled with the forstner on the wrong side of the slot. :doh:

I'm out of maple, but have some scraps and I think I can fix this so it's not too noticeable.
 
Working under the weather can sure slow down the progress....hope you don't have that 'Tableitis' that Brent caught...:D


Once it's loaded with ribbon it'll be...how's that saying go? Oh yeah, 'Outta site outta mind' :D :wave:

Too true. Forcing through "one last thing" leads to more accidents than saying "this can wait". Of course I am sometimes reminded of this after the fact :eek:.

It could be worse, at least they are a common shape. Cut out some circles that fit, glue them in and re-drill on the correct side. The position of the repair will be disguised by the roll of wrap.
 
Last edited:
I've still got the bit setup for cutting the dados on the router table. I'm going to simply route out from the shelf to the base that entire area and glue in a 5/16" filler and redo that entire area. I had the clamp slip slightly on one of the dados anyway and would look better if I just re cut them all.
 
Well, my patch didn't quite work out, luckily the orange borg had some maple in stock. A coworker suggested I add another notch in the slots so I could have two rolls on each slot, so took that suggestion.

I also used Glenn's suggestion to make the notches. Just used a chisel to clean and open up the grooves.
2014-12-10 21.21.23.jpg 2014-12-10 21.21.33.jpg 2014-12-10 21.26.01.jpg

Here's the final product, it's maple, so hopefully she doesn't decide to paint it. :)
2014-12-10 21.59.28.jpg 2014-12-10 21.59.48.jpg
 
Top