My new old drill press

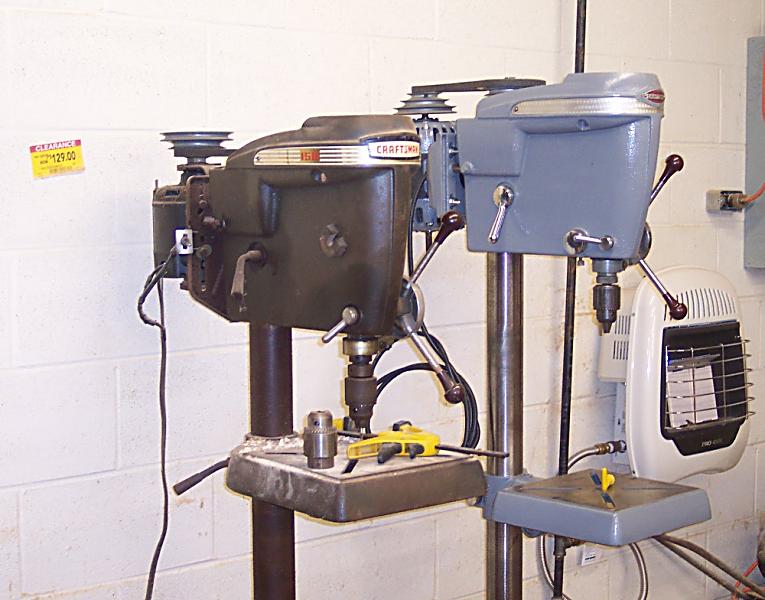
Thanks to your help the motor is back together and running. I didn't want to start on the head unit until this was done. Too many parts to keep track of.

I know some of you can refurb one of these in a weekend but these things always take me a while. I had a time getting it back together - the wires kept hitting the rotating mechanism inside the case. Finally got it right. And I still don't know how it ran before because the way I wired it (as suggested) is not the way it was when I got it.

The band isn't really great, lots of pitting, but I think it looks better than it did painted. Kind of makes the motor looks old (which it is) even with the new paint. Paint is 1 coat of Krylon primer followed by 2 coats of Hammered gray. I waited the full 48 drying time before continuing, and glad I did with all the messing around I had to do.

Next question - What kind of lubrication should I use when putting the head unit back together? Anything I need to be carefull about or otherwise aware of?

Thanks,

Carl


I use wheel bearing grease on a lot of that assembly stuff Carl
 
I wish my motor band looked like yours! I had to paint mine as it was total rust. There was nothing left of the polished metal to be saved. I love those old Craftsman motors!

Like Steve said, I just used some grease in mine. Just don't gob it on so that it cakes up and grabs sawdust. It does that enough without big gobs. :)

I found mine pretty straight forward to put back together. There were a couple of :huh: those moments but it's pretty simple really. As I have said before. Take lots of photos!! You never know which one is the one you want to refer back too.

Here a (sort of) before and after to inspire you.

after1.jpg


Craftsman Drill Press restoration

I need to do the other one now and BTW, I didn't do mine in one weekend!!

Jeff
 
Thanks again. I am working on the base and table now, almost got them ready for paint then on to the main unit.

Jeff - if you remember yours is what inspired me to do this in the first place. It is fun and I can see why you do it, but it's a lot of work, so I can see why people don't do it, too :)
 
Last edited:
Hey Carl,
I just got one of these old Craftsman drill presses from my neighbor and your and Jeff's have inspired me to restore mine. Is that the original color of yours? Mine is some sort of gold color. Can't wait to see an update of yours.
John
 
John, somewhere along the line Craftsman tools were gold colored. I am not well versed in their colors but I know some who are. I would bet that yours were originally gold, I have just never seen one before. But the easy way to tell is sand/scrap off some paint and see what is under the gold. When you take it apart look under things, like the handles and motor. People who repaint rarely take them apart so there are usually some original paint along the way.
 
If & when I get in a bigger shop I would love to have one of this style Craftsman drill-press. I will be bringing almost all of my Dad's tools home with me in the near future but will have to store them. I already have a 1950's 12" Gold Craftsman band-saw I will be bringing home a 10" Gold table-saw & 6" gold Jointer so you see why I would want one. I also have the Gray Craftsman lathe & will have the later model 60's gray Craftsman 10" RAS. I don't necessarily want to repaint the Gray tools but it sure would look great if they were all the same color.
 
John - great to hear about your DP, it looks really nice and should serve you well. Sorry for the late reply - I started a new job a while back and the commute leaves me no time during the week and my weekends have been full. I also can't post from work as they block all 'hobby' related sites.

Anyway, I haven't made much progress on mine since my last post. To answer your question I am not painting it the original color. I couldn't find one that was close that I liked, so I decided to not bother trying. I like the Hammered Gray and it seems to be pretty tough, too. As I am finally catching up on things I should be back at it soon and will post the pictures as I get something done.

Carl
 
Hey Carl, I can't wait to some updated pictures of yours. I have started restoring mine. I had the base and table beadblasted and have repainted them. I'll have pictures up tomorrow.
John
 
here's some updated pics. I made some progress today (finally)!
 

Attachments

  • DSC01450 (600 x 450).jpg
    DSC01450 (600 x 450).jpg
    54.8 KB · Views: 40
  • DSC01458 (600 x 450).jpg
    DSC01458 (600 x 450).jpg
    59.4 KB · Views: 34
  • DSC01467 (450 x 600).jpg
    DSC01467 (450 x 600).jpg
    39 KB · Views: 42
Looks really good. Nice color on there. Column looks good.

Now, a little nit to pick. :D on the base the machined part was originally ground just like the table, not painted. Of course you can do what ever you want, it's your DP. ;)

Jeff
 
Interesting. I looked at the photo again and it does look rough. :huh: Never see one that wasn't machined. Never knew why a floor model was machined but.....

Here is mine, your's being gold is probably newer. But my base was machined and I 'assumed' all of them were. Now you got me to wondering.

painting2.jpg


Jeff
 
Time is a funny thing - no matter how I plan I never have enough. So I am finally back to working on my drill press after I don't want to know how long. Every time I thought I had a weekend free something or someone captured it!

So here is the base, finally painted. Like John's it is not machined, just rough casting. I've also got the table and support painted but didn't get a picture.


I have the head apart except for the main shaft - not sure how to get it out. Anybody have a hint? I can see an allen screw way down inside but don't know if I need to take that out. Not sure I can get a wrench on it, anyway. And how does the chuck come off?

Thanks and sorry for the long delay!

 
Carl

Very late in the game I came across this post of yours from way back. I have the same drill press, although it is yet in need of cleaning and a new motor. Except for the table lacking a rack & pinion to raise and lower it, the drill press worked great... until the original motor bit the dust. It puts my Delta bench top drill press to shame. No vibrations or noises at all on the Craftsman. I wonder if this was made by Atlas or another company?

Gary
 
Hey Carl; I agree with the minimum of 14ga. (rated @ 15 max. amps ) I would prefer 12ga. (rated @ 20 max. amps ) I prefer the 12ga. because your breaker size is probably going to be 20amp max. for shop receptacle. If you use smaller ga. the wire will overheat. Hope that helps. (Your local Electrician) Brad
 
.......It puts my Delta bench top drill press to shame. No vibrations or noises at all on the Craftsman.

.......I wonder if this was made by Atlas or another company?

I have two of these in my shop. One restored and other just being used as is. Great drill presses. After using one for the first time because my Delta kept flexing, I promptly restored it and sold the Delta! No comparison in the two!

These were made by King Seely BTW. I forget the number but if you look on the tags of Sears tools. The first (I think) 3 numbers are the manufacturers code.

OWWM has a little information on King Seely at

http://www.owwm.com/MfgIndex/detail.asp?ID=497

All I need for mine is a strong right arm to lift the platten.

Gary
 
Top