
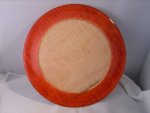
I am still working on the finish for this. Some curly maple from a member of another forum. 10x8/4 stock that I started with 5 of and now have 3. Fun stuff to turn. I wanted a burn line or a bead to separate the rim from the plate but it didn't happen. See new tools to facilitate this in a post later. Rim is dyed black, sanded down, orange, sanded down and red x 2 coats. Finish is Minwax Gloss WoP that Les Elm has made famous on pens. As soon as we unpack...I'll try it on a pen. 8 1/2 x 1/8 with a beaded bottom. Bottom foto is w/o finish. Little glossy for me, but I hope to knock it down with some o4 steel wool. And pic from my new photo tent!! C & C welcomed!
You are using an out of date browser. It may not display this or other websites correctly.
You should upgrade or use an alternative browser.
You should upgrade or use an alternative browser.
I did manage this plate
- Thread starter Jim Burr
- Start date

Bob Gibson
Member
- Messages
- 11,481
- Location
- Merrimack, New Hampshire
Sure looks nice. I like the color 
Kerry Burton
Member
- Messages
- 1,163
- Location
- Orem, Utah
Love the grain! Intriguing application of color!
But ... for once I'm actually going to be serious about the "banana test". With a foot that narrow, it seems like a banana (or similar item) placed near the rim will tip the plate over. I think there's a "rule of thumb" out there, for the ideal ratio between foot and rim diameters for plates, bowls, hollow forms, etc. I don't know the numbers, but this piece looks close to the borderline.
Congrats on the photo tent too! Now that the light on the piece is smoothed out by the tent, all you have to do is hide any evidence that the piece is actually IN a tent.
Maybe this will help you arrive at "shadow-less / background-less photography" nirvana?

This was whipped up for folks who wanted to take quick pics for eBay auctions, etc. You'll have to add the photo tent in your mind's eye....
Keep 'em coming Jim!
But ... for once I'm actually going to be serious about the "banana test". With a foot that narrow, it seems like a banana (or similar item) placed near the rim will tip the plate over. I think there's a "rule of thumb" out there, for the ideal ratio between foot and rim diameters for plates, bowls, hollow forms, etc. I don't know the numbers, but this piece looks close to the borderline.
Congrats on the photo tent too! Now that the light on the piece is smoothed out by the tent, all you have to do is hide any evidence that the piece is actually IN a tent.
Maybe this will help you arrive at "shadow-less / background-less photography" nirvana?
This was whipped up for folks who wanted to take quick pics for eBay auctions, etc. You'll have to add the photo tent in your mind's eye....
Keep 'em coming Jim!
Thanks for the pointers bud!!! The last one I did the focus was on the total deal, top, bottom, nice curve...so on. This time I worked on the top and really did forget about the bottom. To be critical, I should have added about an inch to the bottom bead for the diameter of the plate.
The photo tent I just opened out of the box and didin't have time to iron the white base. It's back in the box for the move, but I really am happier with the quality of the pic's. Wait till next time!!
The last one I did the focus was on the total deal, top, bottom, nice curve...so on. This time I worked on the top and really did forget about the bottom. To be critical, I should have added about an inch to the bottom bead for the diameter of the plate. The photo tent I just opened out of the box and didin't have time to iron the white base. It's back in the box for the move, but I really am happier with the quality of the pic's
. Wait till next time!!- Messages
- 36,120
- Location
- ABQ NM
Looking good, Jim. I kinda like the small foot, but then again I'm not thinking much about usability. The color on the rim looks good, too. 
I'll second Kerry's suggestion for a continuous backdrop that wraps from the bottom of the cube up the back. My tent came with four or five different backdrops, but none of them are big enough to cover both the bottom and the back. Plus no matter how hard you try, they will still have wrinkles or peaks and valleys. You can get the roll-up plastic ones like these...
http://www.phototechinc.com/graduate.htm
Or if you have a Kinko's nearby, you might be able to just print your own gradient background on paper using their large format printers. Here's a large gradient image file if anyone wants it...
http://workingwoods.com/misc%20images/Gradient%20Background.jpg
I kinda like the small foot, but then again I'm not thinking much about usability. The color on the rim looks good, too. I'll second Kerry's suggestion for a continuous backdrop that wraps from the bottom of the cube up the back. My tent came with four or five different backdrops, but none of them are big enough to cover both the bottom and the back. Plus no matter how hard you try, they will still have wrinkles or peaks and valleys. You can get the roll-up plastic ones like these...
http://www.phototechinc.com/graduate.htm
Or if you have a Kinko's nearby, you might be able to just print your own gradient background on paper using their large format printers. Here's a large gradient image file if anyone wants it...
http://workingwoods.com/misc%20images/Gradient%20Background.jpg
Les Elm
Member
- Messages
- 1,435
- Location
- Red Deer, Alberta, Canada
Looks great from here Jim.
I like the contrasting color sure makes the curly maple stand out.
Your finish looks great!
Well done.
Les
I like the contrasting color sure makes the curly maple stand out.
Your finish looks great!
Well done.
Les