Wood carving?

BTW

How many of you are familiar with different sculpting techniques? I mention this because many people think that the usual way to work is direct sculpting, (carving directly from the final material) which is the hardest and more difficult one.

Most famous sculptors in any material, even Michelangelo used the points transfer method using either dividers or a point transferring tool.

If anyone is interested I can share my little knowledge of those, or maybe get some more from any of you.

Your comments are interesting, especially the one about "most famous" really caught my attention. I have a good friend, who happens to live near me, who is a masters-master at woodcarving. He is so skilled that years ago he stopped entering competitions because he always won and took the fun out of the 'competing' part. He has been a judge and teacher for many years. He travels the country doing this. Good guy too.
I called to ask him how he creates a new carving. He answered that only "sometimes" does he do a pre-sculpting model with transfer points, dividers and etc. But usually he will copy with only visual references. However, he understands that he is unusually blessed with visual abilities that are above what most of us have. He can create from a block of wood without any model although he does use them for inspiration.
His name is Len Dillon. Here is his web site: http://www.diamondd.org/index.html
 
Hi Frank.

Yes, many skilled sculptors can do it, but understanding and a good perception of volumes is crucial to do it, i.e. a part of a figure seems to be small than it should or is it because the surrounding ones are too big? Being able to discern this is not easy, especially for a beginner.

Sketching ( just placing proportions not details) something first in clay or plasticine may help to reduce waste of good material and frustration because one can put and take off material, and at the same time becomes familiar with the figure is modeling.

Transferring it to the final material by points or by eye, is a matter of choice and knowledge I would say.

However, the transfer points method becomes very helpful when making something that has to be 2, 5 or 10 times bigger.

Don't get me wrong I'm neither defending nor attacking any technique, in a way what I'm trying ot say is that there are many ways to skin a cat as we say here;). I know the technique, and I only used it once to do exactly what I said, enlarge a figure. I haven't done much sculpting though.

With the transfer point method the creative part of the job is done when modeling (mainly) transferring points is rather mechanical. But this would be the start of another thread, wouldn't it:) .

Thanks for your input, it enriches me.
 
Hi Toni
Yes, Len did say he has exceptional abilities to visually transfer view images to carved wood. And he understands not everyone can do this. He teaches using dividers and measuring critical areas, especially eyes.
His carving days are slowing down, sadly. But last time I was in his shop he had a wolf's head on the stand that I wouldn't get too close to for fear it would bite me. ;) Slower maybe, but still awe inspiring, knock-out exceptionally talented. Nice person too, I'm proud to call him friend. But I digress from topic.
Carving is a marvelous avocation for those with more patience and visual skills than I have.
 
Hi Frank.

I've visited the link of your friend, and I understand very well your feelings, the master carver and friend of mine as that I mentioned in my first post, is getting old as well, he's now 78 and his eyesight has diminished a lot.

He's not carving anymore and he's given me most of his tools from which I feel honoured, but I feel even more honoured for the things he's taught me.

But here I'm wandering off topic as well.
 
Hi Toni -

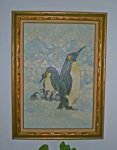
Did the picture in National Geographic look anything like this? (Please pardon the poor snapshot.)

CIMG0607 T 600.jpg

This is an oil painting my mother-in-law did years ago, using a National Geographic picture as a model. I wonder if it was the same picture that inspired your beautiful carving. :rolleyes:

Thanks to both you and Richard for the insight, and I hope to see more carvings from both of you. :thumb:
 
Hi Vaughn.

Wow! this is like travelling backwards in time, I'm almost sure it must be the same article, unfortunately I didn't keep the pictures, or maybe I did but don't know were they are. I'll look for them.

There have been so many documentarys around about penguins that it is hard to tell .

You must have very good memory indeed!!:eek: :)
 
Getting started

After seeing the great carving shown by Mike and by Toni, I should be ashamed :eek: to show an example my very primitive carving, but I will.

Am doing this to show how easy it is to get started. And, believe me, I am only getting started. I found that a good place to start is the relief carving of signs. What I do to make a sign is to

1) Trace out an outline, some letters, and some figures in pencil on a pine board

2) Cut out the outline with a bandsaw

3) Cut around the perimeter of the letters and the figures with a knife shown on the top of the following picture:

Carving tools.JPG

4) Chisel down the material that is not part of a letter or a figure using the rounded chisel shown on the bottom of the above picture.

Here is a sign that I started to carve last week and it is currently part finished: :eek:

Saunamokki sign -on day of carving -small.JPG

The long word means Sauna Cottage in Finish.

I am not artistic so if I can do this sort of thing, anyone can.

And yes, the tools should be very sharp. That, I can do well.
 
Awesome, Frank!

In fact, in some respects I find carvings with letters to be harder for me than without them. Your letters are all very proportional. Nicely done on a nice design.

Take care, Mike
That's very kind of you Mike. The letters are simply some of a font that I found somewhere on the internet (I forget where :eek: ) then expanded, printed, and traced onto the wood following a simple arc that I had drawn in advance. Nothing to it, really.
 
Last edited:
This is where we are allowed to brag? ;)
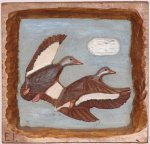
The carving shown below is about 8" sq. It is a sorta copy from a duck stamp. I wanted the frame and carving to be one solid piece. Big misteak. :eek:
With the raised frame, laying the tools down for shallow cuts was impossible. It doesn't show because of the flattening effect of the photo but the ducks are raised from the background. I had to make bent and angled tools to remove wood behind the ducks and the wings. Never again. The hardest part was carving a cloud that looked like a cloud. The more I tried, the smaller it got. Finally, I gave up and just painted what was left. The birds are lacking the detail a master would have put in but I'm happy with the final result.
 

Attachments

  • duck carving.jpg
    duck carving.jpg
    106.5 KB · Views: 13
This is where we are allowed to brag? ;)
The carving shown below is about 8" sq. It is a sorta copy from a duck stamp. I wanted the frame and carving to be one solid piece. Big misteak. :eek:
With the raised frame, laying the tools down for shallow cuts was impossible. It doesn't show because of the flattening effect of the photo but the ducks are raised from the background. I had to make bent and angled tools to remove wood behind the ducks and the wings. Never again. The hardest part was carving a cloud that looked like a cloud. The more I tried, the smaller it got. Finally, I gave up and just painted what was left. The birds are lacking the detail a master would have put in but I'm happy with the final result.
Heck Frank, if I could carve like that, I would brag.

My post above was certainly not meant to be bragging -it was meant to encourage people to start carving.
 
Last edited:
After seeing the great carving shown by Mike and by Toni, I should be ashamed :eek: to show an example my very primitive carving, but I will.

Hey! There is a very definite place for primitive in woodcarving. I met a guy whose whole thing is carving native american, south sea, etc. talismans and totems and such. Others like to do primitive appalacian carvings.

I want to stress again as long as you have a sharp tool and carve with the grain, your fine. The design you are doing is strickedly up to you. It's your vision.

I really like the Finish sign!
 
Last edited:
Hi there.
To Frank Pellow. Good job with the sauna sign carving that sort of things is a good way to start.

To Frank Fusco. Great carving indeed!, I understand the problem you had when carving those ducks, a trick that you could have used ( although some purist may not approve it) is to trace the ducks silouette on a piece of wood of the right thickness, cut it on the bandsaw, glue them to another flat piece and the carve them, inthis way they would be raised automatically, and you would obtain a completely flat background.

Sometimes it is helpful to do it this way, specially if there are details on the background that need to be carved without the main shapes obtrusing the path of the tools.

If this trick doesn't fancy you , curved stem gouges are a must, or get rid of the frame, and apply it afterwards, following the same technique.
 
Hi there.
To Frank Pellow. Good job with the sauna sign carving that sort of things is a good way to start.

To Frank Fusco. Great carving indeed!, I understand the problem you had when carving those ducks, a trick that you could have used ( although some purist may not approve it) is to trace the ducks silouette on a piece of wood of the right thickness, cut it on the bandsaw, glue them to another flat piece and the carve them, in this way they would be raised automatically, and you would obtain a completely flat background.

Sometimes it is helpful to do it this way, specially if there are details on the background that need to be carved without the main shapes obtrusing the path of the tools.

If this trick doesn't fancy you , curved stem gouges are a must, or get rid of the frame, and apply it afterwards, following the same technique.


Thanks Toni. This thread has got me to thinking about doing some more carving. A relief of my son's lake cabin with the grandchildren playing outside has come to mind. And, yes, the techniques you mention will be used. I'll cut the figures and fix to the background. And I, definitely, will get rid of the frame.
The tools I used for undercutting were made from old screwdrivers. I heated, pounded, bent and filed to get desired shape. Then I sharpened and reheated and quenched for hardness. I used to make tools that way for inletting parts onto guns.
 
Toni,

That is some nice work. Penguins are awesome animals.

Woodcarving is what I have the most interest in, in woodworking, but it is also what I know the least about. I'm just so busy all the time, that I don't have the time to try to learn it yet.
 
Thanks Allen.

I feel overwhelmed and gratefull with all your positive comments, I do not consider myself a good woodcarver/woodworker, but a mid range one.
I've seen the quality of the jobs done by people in this forum and I'm by no means at their level (but working hard to reach it:) ).

On the other hand I'm glad that my comments are of any help to any of you, it is the only way I have to give back all that I'm getting/learnig from all of you.

This is a great woodworking family indeed:thumb:
 
Sign will be painted

I was debating whether or not to paint the letters on my sign. I like the subtle look of unpainted letters. But from 25 metres away they became very hard to read. This was true no matter how deep I carved the area around the letters –I experimented with this on a piece of scrap wood.

The sign will be placed on my sauna building near the edge of the lake at Pellow’s Camp and we want people up to 100 metres away on the lake to be able to read the sign.

So, I decided to paint the letters. Here they are with one coat of paint:

Saunamokki sign -with paint on the letters -small.JPG

There will be another coat of paint followed by three coats of spar urethane front and back.
 
Hi Frank.

The sign looks great! I like the green contrast against the light colour of the background.

However, have you had a thought about how it will look at dark? Will it be illuminated? If so at what angle? Be aware of the different effects one can achieve by adecuate lightning, remember that reliefs cast shadows, and sometimes those shadows can have a positive or negative effect on the perception of the sign.

:eek: I may be overdoing it, I think this is in part professional deformation but the more things you have into account when making anything, the better it will come out at the end.

I'm looking forward to see the final result
 
More about signs.

Hi Frank.

Just one more thing, we all tend to think that signs in capital letters are best readable from the distance. Well... in reality it works the other way around.

When looking at a sign from a distance we can make out what is written on it by identifying the shape of the word, helped by the different shapes of the consonants that are on it. While if the sign is written only in capital letters, when we reach that critical distance we only perceive the word as a strap and we can't make out what is saying.

You can see it by yourself with a simple trial. Have someone print two different words of the same number of letters, one in capital ones and the other in small letters on two A4 paper sheets. Make this person place them really far away from you ( you shouldn't know wich words are) and start walking towards them.
You'll notice that you'll be able to know what is written on the one that is in small letters before that the one that is in capitals.

:eek: Sorry I think I got carried away. But I'm passionate about perception issues.
 
Top