first project of 2011!!!

Dan Noren

Moderator
Staff member
Messages
7,985
Location
falcon heights, minnesota
let the fun begin! this is a project for a coworker of mine. still a bit under wraps, but the wood is hickory, and the parts are the vertical face, and horizontal base. the part on the left is the sample of the hickory with the intended finish.
 

Attachments

  • first pic.JPG
    first pic.JPG
    88.7 KB · Views: 86
ok gang, no one guessed correctly what this one is going to be....:rofl::rofl:
i know it's been a while since i posted on this one, but there was a good reason for it. right after those pics were taken, i had sent the larger, upright board down to our friend, and fellow family member, pete simmons, for some laser engraving, and inlay work. :D:thumb: got the box back from pete today, and the reality is much better than the pics can show. :thumb: pete, you da man!:D as the pics show, we have the board as it came back from pete, then i glued the base to it, and gave it it's light coat of boiled linseed oil. you were right pete, everything really did pop! tomorrow, it will get it's coat of sanding sealer, and later on, the first coat of minwax's water borne ploycrylic, absolutely clear finish. i also did some other stuff today while the sun was shining, but that's in another area....

before i forget, ol pete sent a surprise along with the plaque. for lack of a better term, i've decided to call them shop coins, and one will be included when the plaque is delivered. thanks pete!
 
for some reason, the pics didn't upload....
 

Attachments

  • shop coins.jpg
    shop coins.jpg
    131.2 KB · Views: 70
  • oiled.jpg
    oiled.jpg
    84.8 KB · Views: 69
  • assembled side view.jpg
    assembled side view.jpg
    65.3 KB · Views: 62
  • fully assembled.jpg
    fully assembled.jpg
    89.2 KB · Views: 61
  • base glued on.jpg
    base glued on.jpg
    71.8 KB · Views: 59
  • plaque first view after engraving.jpg
    plaque first view after engraving.jpg
    90.6 KB · Views: 68
Very cool, Dan. You're right...Pete's THE man. I highly recommend him for any laserization one may need. (Although I heard that "laser tattoo removal" special he had last month didn't work out so well.) :D Your plaque and base look nice, but I think you'll agree Pete's addition is what made it special.

And I'll echo Jim. What goes into the two holes?
 
ok kids, settle down, here come some answers....

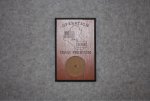
first of all, this is for the husband of a co-worker of mine. he wound up going to iraq a few days after they were married, and was gone for a couple of years. a ways back, for him, she asked me if i could enlarge the inset in the plaque that he had gotten in iraq, for his coin. well, the coin was 2 inches in diameter, and the inset was considerably less. after looking at how much needed to be removed, i told her that i would do it, but i was worried about either ruining the engraving, or the routing on the edge. the original plaque is only roughly a quarter inch thick. a couple hours later, while at lunch, i came up with "the idea", and showed her the quick sketch i had done. at first, it was only the unit coin, but i figured for balance, to ad the army coin as well. that was back when i asked about laser engraving for an upcoming project. mind you now, he knows absolutely nothing about this, and we keep delaying. with my brother working on his truck in pop's garage, and the weather, plus work, these were working pretty good. it was towards the end, to buy some time for the finishing, i told him that his coin wasn't 2 inches, that it was metric, it was a touch bigger, and i had to order a metric forstner bit for it. needless to say, we had to wet the reel with that one, we weren't getting the leader back. this brings us to the present, i hope to have it finished, to spring it on him this thursday, when he brings in her dinner. now for the answers we've all been waiting for....

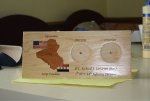
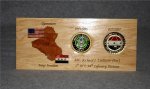
the 2 dates are his deployment and return dates, so this plaque is a bit more personal than the original (see included pics)

the 2 insets are for the coins (see included pics) the army coin is a bit of a loose fit, and will be secured with silicone adhesive, and the unit coin is a good press fit, and once in, ain't comming back out again. the coins in the pic are the same way they will be added to the plaque. army to the left, unit coin to the right.
 

Attachments

  • original plaque.jpg
    original plaque.jpg
    113.6 KB · Views: 51
  • coins.jpg
    coins.jpg
    132.7 KB · Views: 56
That's fantastic Dan. The engraving is beautiful.:thumb::thumb::thumb:

I'm just finishing up a flag and display case for my son I think that something like that would be a great addition to my project. I'll probably have a couple of questions for you.
 
wound up gluing in the army coin a little earlier than expected. the adhesive needed 16 hrs to fully cure. here is a pic with the army coin in place. i tried to fit the unit coin, but it turns out it's a little bigger, by a cat hair, than the inset, here's where the fun begins. i'm going to use a sanding sleeve from my spindle sander to take away the little bit needed for it to fit. just have to wait until tomorrow.
 

Attachments

  • army coin in place.jpg
    army coin in place.jpg
    99.9 KB · Views: 28
Inlays

Nice work Dan. I am sure He will love it.

The inlays are interesting to do. I guess I have been lasering about 8 years and it still amazes me.

When you have a scroll saw with a 0.003 dia "blade" that is completley cnc type computer controlled, accurate wood cuts are not that difficult to do.

There is some give and take that needs to be factored in based on the burn rate of the wood. I may have a 0.003 blade but that does not mean I get a 0.003 kerf every time.

To cut out small parts like the stars often they just burn up.

So, for the small pieces like the stars I make a wood "rubber stamp", push the stamp into the engraved out area of the wood, glue in place and sand.

The very first inlay I did with a laser many years ago was the letter "A" for use in the name Al.

After I cut it out I thought I would test it for fit prior to gluing. When I pushed it into position I heard/felt it click into place. It is still there without the use of glue.

Right then I knew I was on to something special. These parts do not fit good. They fit perfect.
 
last but not least, here's a pic of the lucky guy, and your's truly (the ooglier guy on the right):rofl:. it went off without a hitch. fessed up to not being able to fix his original plaque. handed him back the original, and he said the line word for word that i had predicted, "where's my coin?:huh:". i said that it must have fallen out of the bag (as i had opened the bag the original was in before he got there). i reached into my much bigger bag, saying, here it is, and handed him the plaque.:D

i'll admit that i set up the idea, cut, sanded, and finished the hickory, and put the coins in place, but it was pete that did the work that made it all look good. jan and rich both send a big thank you to you too young man.
 

Attachments

  • rich and me.jpg
    rich and me.jpg
    122.1 KB · Views: 15
Last edited:
Top