
Ok guys...The end of the road. Couple of things; this is not a production piece, I started with the grain going the wrong way and since it was for a demo, there was no sanding or finish work at all. Next, Parts of this project are dangerous!! Please...challenge yourself, but do not endanger yourself. If you are not comfortable with any part of this project, get help!! Have another turner come by; go to your local club, whatever. Coring/hollowing to perpendicular sides with a bowl gouge isn't easy...use another method if you’re not comfortable. Enough of that crap...let's make something!
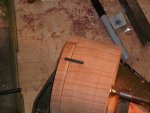
Pic #1) Measure your pin so the majority is in the base and 2/3 is in the lid
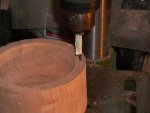
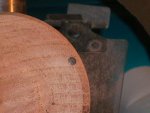
Pic #2 Use tape or a sharpie to assure your drill depth
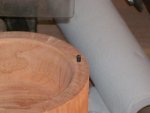
Pic #3) Give the pin a good smack with a rubber mallet to assure depth
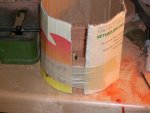
Pic #4 here is the start of the fun. Get some cardboard or construction paper and wrap it around the base tightly and tape. I leave a gap at the pin site.
Pic #5 add the top into the tube and make sure your grain is lined up…last chance! Give it a little smack with the rubber mallet and....
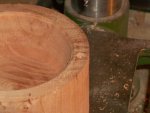
Pic #6 Use dimple as a drill guide. Make sure you don't drill to deep!!!!
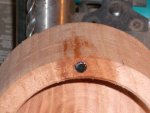
Pic #7) Come 180 opposite the pin...doesn't have to be exact, and drill your hole the same size as the magnet...mine are 1/4 x 1/16. You want the magnet just proud of the rim.
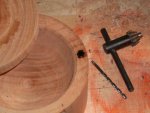
Pic #8) Add CA and a good amt of accelerator.
Pic #9) Now attach the lid...rotate until the magnet is just visible. Coat the magnet with sharpie like crazy...rotate the lid into alignment and press the lid down on the base magnet...move quickly!!!
Pic #10) If you did it right, this is what you get. Drill, glue and accelerate as done in the base. Viola!!! it lines up!!
NOW...not so fast. Make sure you give the CA plenty of time to cure. The mags will pull themselves out. AND...make sure you align the mags to attract...not oppose...DAMHIKT!
And that's really all there is guys. Total time is 90 I think. I use Formby’s Tung oil finish or Wipe on poly fast dry stuff. Please!!!! Ask if something doesn't make sense or you have a different idea or whatever. PM or call me and I'll do what I can for you. Stay safe and stay blessed!! Good luck!
Pic #1) Measure your pin so the majority is in the base and 2/3 is in the lid
Pic #2 Use tape or a sharpie to assure your drill depth
Pic #3) Give the pin a good smack with a rubber mallet to assure depth
Pic #4 here is the start of the fun. Get some cardboard or construction paper and wrap it around the base tightly and tape. I leave a gap at the pin site.
Pic #5 add the top into the tube and make sure your grain is lined up…last chance! Give it a little smack with the rubber mallet and....
Pic #6 Use dimple as a drill guide. Make sure you don't drill to deep!!!!
Pic #7) Come 180 opposite the pin...doesn't have to be exact, and drill your hole the same size as the magnet...mine are 1/4 x 1/16. You want the magnet just proud of the rim.
Pic #8) Add CA and a good amt of accelerator.
Pic #9) Now attach the lid...rotate until the magnet is just visible. Coat the magnet with sharpie like crazy...rotate the lid into alignment and press the lid down on the base magnet...move quickly!!!
Pic #10) If you did it right, this is what you get. Drill, glue and accelerate as done in the base. Viola!!! it lines up!!
NOW...not so fast. Make sure you give the CA plenty of time to cure. The mags will pull themselves out. AND...make sure you align the mags to attract...not oppose...DAMHIKT!
And that's really all there is guys. Total time is 90 I think. I use Formby’s Tung oil finish or Wipe on poly fast dry stuff. Please!!!! Ask if something doesn't make sense or you have a different idea or whatever. PM or call me and I'll do what I can for you. Stay safe and stay blessed!! Good luck!
Attachments
-
 pin 1.jpg80.1 KB · Views: 71
 -
 drill 2.jpg64.6 KB · Views: 71
 -
 pin insert3.jpg51.1 KB · Views: 69
 -
 tube 4.jpg71.4 KB · Views: 70
 -
 tube top5.jpg40.2 KB · Views: 70
 -
 dimple 6.jpg66.7 KB · Views: 68
 -
 drill mag 7.jpg69.1 KB · Views: 64
 -
 glue mag 8.jpg75.4 KB · Views: 68
 -
 sharpie 9.jpg74 KB · Views: 65
 -
 ink mark 10.jpg69.4 KB · Views: 65
Last edited:


