Stair Tread Caps - phase 2

Darren Wright

Administrator
Staff member
Messages
20,157
Location
Springfield, Missouri
A while back as some may recall I purchased a bunch of oak to help out a friend that was needing it gone. My wife was wondering what I was going to build with this wood since the budget is tight and there are house projects that need to be done. Well, here's what I came up with....stair tread caps. Would have spent about twice as much for pre-made treads, so was a good move.
attachment.php
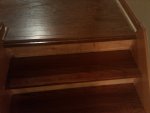
There was originally carpet on the stairs and had been planning to pickup hardwood treads and remove the existing treads. After looking at the layout of the steps I realized the bottom step was shorter than the rest and the top step was taller than the rest. To correct this I figured it would be best to just cap over the existing treads.
attachment.php
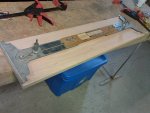
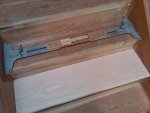
For those that haven't done stair treads before, there is a layout tool that can help get almost perfect fitting treads. This one belongs to my dad. You loosen the two large knobs on the end, then adjust it for length with the 4 wing nuts in the middle. When you tighten the two larger knobs, they press the guides against the trim on each side. You then take the tool and lay it on your tread marking your lines for the cuts, which are at the perfect length and angles.
attachment.php
attachment.php
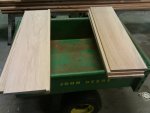
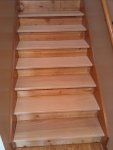
Here they are all cut for length and test fitted. I'm pre-finishing them before installing. Will be using tile for the kick boards, so will get some 1/2" concrete backer board under the old treads to fill in the gap and tile over both to fill it in.
attachment.php
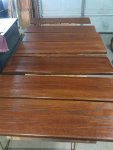
Got their stain and drying.
attachment.php
P.S. A big thanks to Larry on the tip of removing the excess glue with a chisel, was a big time and sanding belt saver. :wave:
 

Attachments

  • tn_IMG_20110501_174208.jpg
    tn_IMG_20110501_174208.jpg
    110.9 KB · Views: 253
  • tn_IMG_20110501_174416.jpg
    tn_IMG_20110501_174416.jpg
    107.4 KB · Views: 253
  • tn_IMG_20110501_174228.jpg
    tn_IMG_20110501_174228.jpg
    125.8 KB · Views: 249
  • tn_IMG_20110501_174503.jpg
    tn_IMG_20110501_174503.jpg
    101.7 KB · Views: 247
  • tn_IMG_20110501_181911.jpg
    tn_IMG_20110501_181911.jpg
    92 KB · Views: 257
  • tn_IMG_20110501_200206.jpg
    tn_IMG_20110501_200206.jpg
    119.2 KB · Views: 246
Last edited:
Brilliant! :thumb::thumb:

I'm thinking a tool like that could be used for other situations as well. Great idea.... :thumb:
 
I had a similar problem with my stairway... after the carpet was up, the top and bottom step were 3/4 inch off from the rest... (designed assuming 3/4 inch of carpet) so I had to build all the steps up 3/4 inch. But the existing tread was 2x12 lumber, so I sure didn't want to take that out and start over.

My solution was to glue on a 1 1/2 inch oak lip below the front edge of 3/4 inch oak tread, to hide the 2x12. The 4/4 oak cost me about $100, compared to over $500 for "official" oak treads.

I resawed the risers, and used 3/8" thick oak for the riser, on top of the original (mostly flakeboard).
 
Well, got the treads installed today. Just used some construction adhesive and a few finish nails to set them in place.
attachment.php


The finish is just about a match, the laminate is a little more brown, but close enough. Still need to move the transition piece at the top of the stairs I added a piece of oak to give it a bit of a bull nose to match the rest of the treads.
attachment.php


My wife also mentioned that she's thinking about using some of the left over bead board for the kick boards instead of tile now. That's fine with me, just about the same amount of work.
 

Attachments

  • tn_IMG_20110508_212522.jpg
    tn_IMG_20110508_212522.jpg
    122 KB · Views: 142
  • tn_IMG_20110508_212505.jpg
    tn_IMG_20110508_212505.jpg
    136.7 KB · Views: 142
Those steps look slick! :thumb:
Actually, my family and I run around in socks, those steps look slippery!:eek:
Are they? How does one not make them like "ice" yet retain the sheen you have achieved?:huh:
 
Well, I've returned to do some more updates to the stairs. Finally got around to cutting the kickers from bead board and will be painting all the trim (not the treads) the same cream color of the beadboard in the dinning area and using some of the distressed black finish we used on the kitchen cabinets...more to come in the next few weeks.
IMAG0775.jpg IMAG0773.jpg
 
Great thread. I've got a similar project on my todo list for our basement stairs. I bought a similar layout tool over on Woodnet when they had their Christmas auction.

How did you end up spacing out the kicks? I know that's an issue I'll have to deal with.
 
Great thread. I've got a similar project on my todo list for our basement stairs. I bought a similar layout tool over on Woodnet when they had their Christmas auction.

How did you end up spacing out the kicks? I know that's an issue I'll have to deal with.

Matt, I cut each for height, just measuring with a tape measure, then used the same stair tool for the measuring the width and laying out the cut lines/angles on the tread. I cut mine on the radial arm and after a couple of test fits and extra cuts they fit perfect, just work your way to it. I'm caulking and painting, so really didn't have to be that perfect. ;)

BTW...I did put a coat of paint on before I actually installed them. I'll do the same with the quarter round when I get it picked up for the bottom side, then all I have to do is touch up where I caulked and filled nail holes.
 
I'll be painting too. I'll probably use MDF based on reading. In the only direction it will see abuse (the face) its quite strong. Mines an almost identical project in fact--want to come over and help. :D

I have to make or buy about a 3' square of flooring too to deal with a landing.
 
Phase two of this project has began. After removing the carpet to the downstairs we've been just walking on the 2x10 pine steps. I measured the step heights I found that I'd have to keep the overlays on this part to only 1/2" in order for the steps to be even. Last week I cut/glue/planed the flat part of the steps, I glued on the noses this week and spend most of today sanding and got them started staining. Looking back at this thread, I have 3 more coats of stain to do to match them to the upstairs. :doh:

2014-11-23 18.07.44.jpg 2014-11-23 18.08.06.jpg 2014-11-23 18.21.07.jpg

The bead board risers we've found to be a bad idea as they show every bit of dirt and scuff from shoes, or maybe it's the light colored paint.;) Anyway, they will be removed and I'll be doing tile on all the step risers, upstairs and down.
 
I got the treads installed yesterday, added a few screws to the original steps to removed some squeaks, then attached these using construction adhesive and 16 gauge nails. Will finish up the kickers next week possibly. I also need to fill nail holes and do a final coat of poly.

2014-12-14 17.43.55.jpg
 
Top