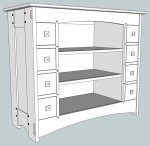
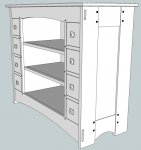
Under TV Cabinet design - Getting back to the roots

Moving backwards?

OK Gang, time to rip me a new one?

The constraints
1. wood choice - it must be built from QSWO because that's what I have
2. the style has to complement the rest of the room/house, ergo, A&C
3. I don't have a month to build this, only a week or so.

Given those constraints I went back to all of my reference material on Stickley and A&C furniture and discovered that about half of Stickley's case goods (dressers, book cases, etc.), did not even have legs. They simply extended the side stiles to the floor and used slightly thicker material. Given my problems with the legs in the other design that came as a bit of a relief.:D I also found a Roycroft apothecary cabinet that I was able glean some ideas from including the flush drawer faces rather than half overlay.

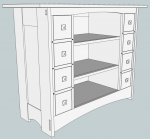
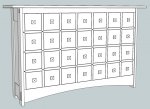
So, here is the first crack at getting back to a more Stickley influenced design. I'm kinda happy with the sides overall. Don't know if I should go with both plugs and through tenons - maybe one or the other?:huh:

Also, not sure about the top rail. Seems too heavy.

OK - let me have it! :eek::eek: :chair:
Stickly Style TV Cab 9-1a.jpgStickly Style TV Cab 9-1b.jpg
 
The constraints
1. wood choice - it must be built from QSWO because that's what I have

You could paint the QWSO to look like mahogany. :rofl:


2. the style has to complement the rest of the room/house, ergo, A&C

Well, that lets you off the hook with the paint.


3. I don't have a month to build this, only a week or so.

I'm thinking you'd better stop asking the committee and get out to the shop. :D

I do agree with you on the top rail being too wide and I would skip the square plugs on the sides.
 
also skip the pegs on the dividers between drawers the top apron looks ok but the every divider doesnt. also if you keep the pegs on the sides the bottom ones need to be spaced further apart so they look like the top one more.
 
I do agree with you on the top rail being too wide and I would skip the square plugs on the sides.

also skip the pegs on the dividers between drawers the top apron looks ok but the every divider doesnt. also if you keep the pegs on the sides the bottom ones need to be spaced further apart so they look like the top one more.

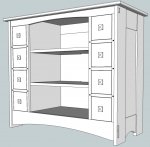
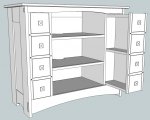
OK - here's the latest. Removed the plugs on the ends. It just looked too busy. I made the top rail a bit thinner and kept the same height of the case by making the drawer faces larger to fill the space left by the shrunken rail.

Larry - for now I'm leaving the plugs in the stiles next to the drawers. They are one of the things I copied from the original Roycroft design. They might not stay, I'm still noodling over it.:huh:

Stickly Style TV Cab 9-1d.jpgStickly Style TV Cab 9-1c.jpg
 
Matching Cabinet

After enlarging the top just a little
Stickly Style TV Cab 9-1e.jpg

I cloned the TV cabinet over to another drawing. This is the mate to the TV cabinet that will go into the same room, different wall.

Stickly Style Storage Cab 1.jpg
 
Wow you got a lot of little things to store:D

I like the new design very much. The recessed doors on the draws make a big difference and the details all ad a nice touch. Dont change anything get cracking and making cause i am sure you will make changes along he way. :) Fun project. You got a sled for all the cross cutting?
 
I sketched out what I was going to write in my post. However, most of it was already covered by others.

I like the through tenons showing on the ends.

With the shallow arc along the bottom you will have to consider emptying the cabinet every now and then. Then move it to vacuum where the cabinet resided. Otherwise you are going to have "dust bunny" heaven under there.

I was going to make a drawing of what I did in three different sight/sound cabinets. However, you beat me to it. That was to make a recess in the back of the shelf so the air could move up from section to section. The ones I did were shallower (front to back) than your drawing. However they were much wider to spread out the air flow---to reduce stagnant air in the back corners.

Any ceramist, especially those who work in High-Fire, is very aware that the temperatures in the kiln are not uniform. If you have a kiln where the interior is 24 x 24 x 24 inches for example and you are firing at 2,400 degrees Fahrenheit you will place your pieces in different parts of the kiln depending on the results you want. Glaze "a" will work beautifully on the bottom shelf near the front right corner, but will run into a puddle on the second shelf in the center.

You would think in a box that size at a temperature that high for ten hours the temp would be uniform---far from it. The point is that you want to distribute your air flow as much as you can so all the parts can keep their cool.

Enjoy,
Jim
 
Wow you got a lot of little things to store:D

You got a sled for all the cross cutting?
Actually, the storage cabinet is broken up into two storage areas behind doors and a selection of two sizes of drawers. Most of the drawer faces are fake.

I do have a sled that I made from corian. It needs a little fine tuning, but it will be getting a workout.

With the shallow arc along the bottom you will have to consider emptying the cabinet every now and then. Then move it to vacuum where the cabinet resided. Otherwise you are going to have "dust bunny" heaven under there.
Jim

Especially with a dog and a cat! Actually, I hope to just move it out from time to time without emptying it. I'll also look at other ways to get the heat out. I remember seeing cabinet shelves (back in the stone age of vacuum tubes) where an 8" +/- square was cut out of the center of the shelf, sometimes with a screen of some kind. The component covered the hole from view and the hole allowed unrestricted airflow from below the component.

carry your threw tenons on the back as well rennie.

I may, but they would probably be fakes attached to the outside in a shallow mortice. Let's see how frustrated I get with the ones in front.:rofl:
 
rennie, if you are going to keep the rails and stiles that wide, it may be better to go with blind tenons, rather than through tenons, if they are going to be that far off center. for some reason, that far off center doesn't look right.
 
Top