My new Maple flooring

New guy here first post I'm really enjoying all of your projects and suggestions.
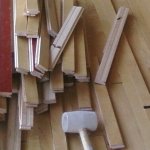
The gym at the brand new middle school in my neighborhood had a flood that covered about 60 square feet. Over the summer contractors removed the old floor all 8000 square feet of perfect northern hard rock maple and threw in a dumpster. I was fortunate enough to dive for about 1000 feet for my downstairs. I have been cutting off the nails with my angle grinder, which is much easier than trying to remove them. I have about 450 sq ft stacked so far. I'm not sure if I should plane it or install it and then finish it with a drum sander.
Any ideas are welcome thanks Keith.
 

Attachments

  • PIC-0297.jpg
    PIC-0297.jpg
    66.4 KB · Views: 41
Welcome Keith! What a find!!! Can you tell where the nails go in? Is it through a tongue? If through the surface, I'd be afraid that a planer or a sander is going to hit the heads, and if that happens, you know the next issue. If through the tongue, then I think I'd install it, then sand, just like you would do if you were refinishing a solid wood floor. Now, take this with a grain of salt...I've never been in this position to actually do it either way, so I have no real world experience to base my thoughts on other than what sounds right to me. Jim.
 
Welcome Keith!

I would install then sand. you will get a much better final product that way. And no worries about hitting a nail with your planer. Especially if one of them wiggles loose and comes off inside.... not pretty....:eek:
 
Thanks for the quick replies. Jim it's tongue and groove and there is no way to hit any nails. My only hesitation with drum sanders is they require a delicate touch and I am reluctant to learn on my own. Another alternative is a Werkmaster floor grinder/polisher/sander to finish sand once installed. I use one almost everyday and I have a good feel for it plus I have a 400 cfm vac that will reduce the dust. I have enough material that I may mock up a couple of test areas first to see which works best. I will keep you posted with pics too.
 
Keith, another thought. Have you considered one of the random orbit floor sanders? I have never used one myself but they look as though they would be a lot easier to use than a drum or orbital (are you referring to one of the floor buffers when you mention the Werkmaster?)
 
Welcome to the family Keith!!! What a dumpster dive find!!!! One of our janitors years back used to refurbish wood floors as a side job as he had plenty of experience with redoing the gym floors in our school system. Might talk to one of the experienced janitors, rent the equipment and they might for a fee, come and sand it for you. Just a thought.
 
The other device to consider in the sanding arena is one of the large vibratory pad sanders home depot rent out. I used one to do my deck a few years back and it was fantastic. You control how agressive it is with the grit size. My deck surface is cedar which is pretty soft but it treated it gently i was quite amazed at the finish.
They have three grit sizes available at our hd 40, 60, 80.
I was initially concerned about scratching so biased myself to 60 tben more 80 grit. But i soon found myself off to the store to get some 40 grit. :)
My final finish was quiet smooth. Dont know about dust though. It does have a collection bag but i was outside so not really taking note of dust.

Best of luck. Let us know what you end up with and how it turns out. Btw welcome to the family and if you aint worked it out yet yes we all like lots of pictures. :)

Sent from my MB860 using Tapatalk
 
welcome tot he forum and i agree with rich on the install and sand afterwards,, that is the most common method.. and if you havnt sanded a floor before you should ask someone that has its not as easy as one thinks to get a nice flat floor..:D
 
I'd recommend installing then sanding also, was going to suggest the vibrating sander. If using an oil based varnish (will be an amber finish), you can do the initial sanding, save the sanding dust (you'll have plenty), build it up in a mound and pour some varnish in it to make a perfect matching filler for cracks and gaps. Let it dry, sand it smooth to finish with stain or clear.

If doing water based, you'll want to use a water based filler also, don't use the sanding dust. Water based will give a clearer finish, no amber effect.

P.S. Welcome to the family! :wave:
 
Top