Bernie Weishapl
Member
- Messages
- 4,834
- Location
- Goodland, Kansas
[From the original thread here - VM]
Jonathan here is how I make my birdhouses. I hope this helps. I am sorry for some of the pictures being out of focus. I don't have a setup to do this so I am trying to show things with one hand and take a picture with the other. I think I am going to order a tripod and hopefully that will help. Anyway here goes.
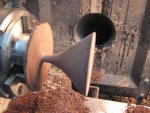
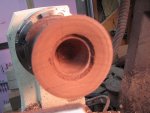
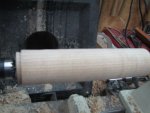
As I stated I start with 2 x 2 x 5 block of whatever wood. I use lightwood so I can color them. I use COPIC pens from hobby lobby and they do work well. I also use transtint dye. This block is rounded to 1/8” or slightly more. I use a 1 3/8” forestner bit to take care of the inside. Before drilling the inside out I drill a ½” hole for the bird opening and 3/16” hole for the perch. I just use 3/16” dowel rod. You could turn them but I just don’t. Once the body is turning, holes drilled and the inside drilled I cut off the body about ½” above the bird opening.
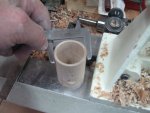
Next I measure the bottom outside diameter and outside diameter. I use a parting tool to get these two measurements transferred to the bottom piece. I leave about 1 ¼” below this to turn the acorn or whatever embellishment you might want. Once turned and sanded I part off the bottom. You may have to sand the tenon to get it to slip into the body.
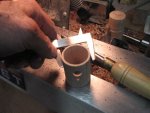
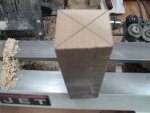
Next comes the roof. I round out a blank that starts as 3 x 3 x 4. Then I begin to form the roof. I measure the outside of the top and transfer that measurement to the roof. I then cut the recess slowly and in tiny increments until the body fits fairly snuggly. I then hollow the inside out somewhat to lighten the top. From there I turn the outside to whatever form I desire. I try to make the thickness from inside to outside about 1/8” to no more than 3/16”. Don’t hollow to deeply maybe 1” or so and you have to be careful because as you thin the outside it can tend to want to chatter. I bring up the tailstock and livecenter to kind of combat this.
Once they have all been turned you can embellish it most any way you want. Once that is complete you can then glue the bottom, the perch and the top. Finish with whatever you want. I use lacquer which is fairly fast drying so can apply a lot of thin coats in a short period of time. Hope this helps and will help with those that would like to try these. My granddad always said a picture is worth a thousand words.
Jonathan here is how I make my birdhouses. I hope this helps. I am sorry for some of the pictures being out of focus. I don't have a setup to do this so I am trying to show things with one hand and take a picture with the other. I think I am going to order a tripod and hopefully that will help. Anyway here goes.
As I stated I start with 2 x 2 x 5 block of whatever wood. I use lightwood so I can color them. I use COPIC pens from hobby lobby and they do work well. I also use transtint dye. This block is rounded to 1/8” or slightly more. I use a 1 3/8” forestner bit to take care of the inside. Before drilling the inside out I drill a ½” hole for the bird opening and 3/16” hole for the perch. I just use 3/16” dowel rod. You could turn them but I just don’t. Once the body is turning, holes drilled and the inside drilled I cut off the body about ½” above the bird opening.
Next I measure the bottom outside diameter and outside diameter. I use a parting tool to get these two measurements transferred to the bottom piece. I leave about 1 ¼” below this to turn the acorn or whatever embellishment you might want. Once turned and sanded I part off the bottom. You may have to sand the tenon to get it to slip into the body.
Next comes the roof. I round out a blank that starts as 3 x 3 x 4. Then I begin to form the roof. I measure the outside of the top and transfer that measurement to the roof. I then cut the recess slowly and in tiny increments until the body fits fairly snuggly. I then hollow the inside out somewhat to lighten the top. From there I turn the outside to whatever form I desire. I try to make the thickness from inside to outside about 1/8” to no more than 3/16”. Don’t hollow to deeply maybe 1” or so and you have to be careful because as you thin the outside it can tend to want to chatter. I bring up the tailstock and livecenter to kind of combat this.
Once they have all been turned you can embellish it most any way you want. Once that is complete you can then glue the bottom, the perch and the top. Finish with whatever you want. I use lacquer which is fairly fast drying so can apply a lot of thin coats in a short period of time. Hope this helps and will help with those that would like to try these. My granddad always said a picture is worth a thousand words.
Attachments
-
 Birdhouse Tutorial 1.jpg64.6 KB · Views: 94
 -
 Birdhouse Tutorial 10.jpg43.6 KB · Views: 98
 -
 Birdhouse Tutorial 9.jpg55.9 KB · Views: 94
 -
 Birdhouse Tutorial 8.jpg55.6 KB · Views: 95
 -
 Birdhouse Tutorial 7.jpg52 KB · Views: 94
 -
 Birdhouse Tutorial 6.jpg63.9 KB · Views: 97
 -
 Birdhouse Tutorial 5.jpg70 KB · Views: 100
 -
 Birdhouse Tutorial 4.jpg67 KB · Views: 96
 -
 Birdhouse Tutorial 3.jpg49.6 KB · Views: 91
 -
 Birdhouse Tutorial 2.jpg61.4 KB · Views: 87