Aquarium Stand .. build thread

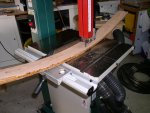
My plan calls for an oak skeleton/structure bow tank skeleton_1.jpgwith a walnut/curly maple veneer skinbow tank and s_1.jpg. The skeleton is planed to 3/4" and all pieces cut to length/width. The form for the front bent wood laminations is made PB090225.JPGand the laminations completed, 3 pcs of 1/4" each to make up the 3/4" thicknessPB110228.JPG. Did get some spring back but can pull it out during assembly. I will reduce the thickness to 3/32" or 1/16" when doing the walnut skin. Have a few more half laps to cutPB130238.JPG , the bottom shelves to cut and the top to cut, then final dry fit and assemble the skeleton. More to come as I progress. PB140241.JPG
 

Attachments

  • PB110231.JPG
    PB110231.JPG
    71.3 KB · Views: 35
  • PB120236.JPG
    PB120236.JPG
    68.7 KB · Views: 34
progress update #2

made the top PB180257.JPG and the bottom fixed shelves PB180259.JPG and assembled the skeleton/structure PB210284.JPG . Moved onto the walnut skin PB200277.JPG PB200278.JPG Made the bent wood fronts PB210281.JPG . Dry fit the side stiles/rails/panels ...but have not yet put the veneer on the panel PB220289.JPG . Put the hinge mortises in the doors PB230292.JPG PB250303.JPG . Pocket holes in all the rails PB250298.JPG . Dry fit the doors ... more in the next post
 
progress update #3

continuing on ... dry fit the door frames PB260310.JPG . Then cut the slots for the panels .. PB260316.JPG PB260318.JPG . Then onto the door panels .. two pieces of 1/8" plywood .. slid into slots and curved just great. Dry fit the door assemblies .. PB270331.JPG PB270333.JPG . Now onto the veneering of all the panel fronts, finish sanding ... more to come ..
 
looks like you made some head way this wknd for sure,, could you back up and let us see that jig setup you have for the mortising the hinges.. looks like a pretty good setup..thanks
 
Now that's a looker for sure. Nice design, good solid stance and some beautiful material to boot. I love going along on these build threads.
 
Thanks to all for the kind comments. It has been a fun project so far. Veneer work starts tonight.

As for how the ends attach to the sides. For the walnut skin, both the side and the front face have vertical members that meet at the corner. There is a 21.? degree bevel cut on the side piece as well as the front face piece. I made a quick glue up fixture ... PB150244.JPG PB150245.JPG . The front bow rails (top and bottom) then butt to the front end vertical and are pocket hole jointed to it (no pic). The center front stile is also pocket hole joined to the top and bottom front bowed rails.

For the oak skeleton/structure, again the sides and the front ends have verticals. Used the same fixture to glue them together. However, the front verticals use half lap joints to bond with the front bowed rails (top and bottom) .. PB160251.JPG

Hope this answers the question. Thanks for asking.
 
Robert a great looking project- I'll keep watching your progress , wish I had room to build these large projects and kin-folk that had room for them . All well I just watch your progress and stick with my small projects ............MB
 
Here is some skinny on the loose tenon mortise jig I use ... homemade ...

Here is the setup for the hinge mortise ... PB230291.JPG .
Here are some additional shots of the jig itself .. P1011420.JPG P1011432.JPG .. It has a removable front top .. so new ones for angled mortises can be made to suit ... P1011415.JPG P1011418.JPG .. so I made a bunch of them to have on hand .. P1011419.JPG . Has extension wings as well .. for the longer boards .. P1011431.JPG .. I have a sketchup file of the entire jig but it is too big to attach ... have to figure out how to zip??

If there are more questions, just let me know. Hope this helps explain it. Works like a charm.
 
Top