A SketchUp Warm-Up Exercise

Gary,

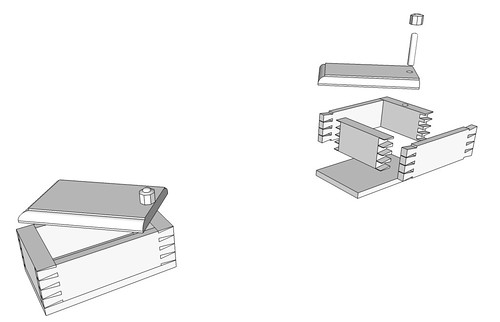
I'm sure I did not say that you should draw it complete instead of as separate components. You should indeed make separate components of each piece that you make in wood but you should draw those pieces in situ (in their final resting place, so to speak.) as I demonstrated in the video. This eliminates the need to assemble the model after drawing the components. It also makes things easier because you don't need to have all the dimensions for every part because you can reference off what you've already done. Look at how I drew the rectangle for the end of the box. I didn't need any dimensions for that rectangle because I drew it to fit between the two sides.

Ok you said I should draw it as it looks rather than a the pieces laid out.... To me more or less the same statement but I see what you mean..


[/QUOTE]
As to reusing components, you absolutely can reuse them and it is one of the key reasons for making components.
[/QUOTE]
I thought so..

"Almost impossible to move components into place" it's actually quite simple to move components into place if you grab them at logical points. Although the Move tool will let you grab a component anywhere, you should grab it by a point that can be referenced to a point on the neighboring component. Notice when I copied the side using the Move tool, I grabbed the side component at a corner that ended up coinciding with a corner on the bottom component.

It would seem that Copy and Paste would be the way to make copies of components but in the Paste operation you rarely end up having hold of the component at a point that makes sense. It's much smarter and easier to use the Copy function of the Move tool because you can grab the component at a sensible point and you can move it in a desired direction to a desired distance.

So with your drawing, it looks like you just made the pieces as if they were spread out on the bench with the intent to assemble them after all the pieces were complete. While this is a possible way to work, it is a whole lot more work and could lead to errors.

Does any of that make sense? We have to get a live session scheduled soon.[/QUOTE]

Yes it makes some sense but I still have the same problem. I can make the bottom, make it a component...

Make the left side in place and make it a component..

Copy the left side but can't get is to set exactly in place on the right side....reasonable sure it has something to do withe the inference point/lines..

Going to have to find some more tutorials I guess...

It seems as of it is the copy function of the move tool that I am missing....will have to dig it up..

I can draw the right side in place, but if I could place the copy I could build up from components or do it this way... What I am missing in both cases is I can align one edge but not 2 or 3 as required...

Garry
 
Little late to the party. Here's my version.

Took 18 minutes! Reminds me of the final exams I gave in PageMaker and InDesign. Some students had no problems, some sweating bullets.

I'm still in the latter group w/ SU! :)

test box.jpg
 
Gary, my guess is that you didn't open the lid component for editing before drawing the circle for the hole. Either right click on it and choose edit component or double click on it with the Select tool to open it. Then draw the circle and use Push/Pull to push through to make the hole.
 
Bill, I'd be interested to know how you find the process doing it as I did by building it all in place and creating the exploded view afterward. ...

Dave,

It was a little faster to build in place. The main difference was drilling the holes and fitting the rod. I had to review your video a couple of times but I made my way through the process and everything fits just right now. I had one issue when I was finished. I had pulled the rod to a point 1/4" above the top, then keyed off the center of it to make the nut. When I was finished, it was as if the top of the nut and top of the rod were blended. I saw this when I colored the rod red so I could check the fit in x-ray mode. I cleaned it up by drawing a circle on the face of the nut and deleting it.
 
Gary, I had a look at your model. It's pretty good other than the "hole". One thing you'll want to work on is precise placement of the parts when you copy them. the end under the "hole" isn't quite lined up at the end. You can see that as slightly heavier lines and, if you zoom in close, the misalignment shows even more. Practice is the key here.

Bill,

Good work. As to the nut, if you watch my video, I draw the hexagon and then draw a circle centered on the top of the dowel. I select the face of the circle and delete it which leaves a hexagon with a hole in the middle. If you you made the nut 3D and then drew the circle on the top and deleted the center, you would end up leaving the face on the bottom with no hole in it. Instead of deleting the face in the circle, use Push/Pull to push a hole in it just like you made the hole in the lid.
 
... Bill,

Good work. As to the nut, if you watch my video, I draw the hexagon and then draw a circle centered on the top of the dowel. I select the face of the circle and delete it which leaves a hexagon with a hole in the middle. If you you made the nut 3D and then drew the circle on the top and deleted the center, you would end up leaving the face on the bottom with no hole in it. Instead of deleting the face in the circle, use Push/Pull to push a hole in it just like you made the hole in the lid.

Thanks, Dave. I rebuilt the nut as you showed and it looks fine now.

This was a good exercise. I'm looking forward to the next one.
 
Last edited:
OK, I know Dave is already a very busy fellow, but might I make a suggestion on schedule? How about Dave publishes a challenge on the first and third Tuesday of each month. We have till next Sunday midnight to post our responses (5 full days). Beginning the Monday following we can indulge in a week long critique of our work followed by the next challenge.
 
That really helps!

Thanks

Was having a bad time with the circles. Had finally figured out to make unique. Would have making the bottom and ende each a group worked also?

Garry

Finally got it where it looks right but still not really there as the end, pin, and nut are tied together...

friendshipbox.jpg

Last Edit....
I think I finally got it right.. 10 minutes plus a few hours.. Never was able to do the holes like you did Dave even after watching....

friendshipbox.jpg
 
Last edited:
Here is a issue i would like to know how to solve. Its easy when we have rectangles and squares but how do we deal with intersecting two circle shapes or in this case a half circle and a circle


sketchup issue.jpg

I was playing around and expect the push pull to push the half circle i added to the side of component through to cut out into the bigger circle.

I tried all sorts can anyone throw some light on this?
 
Garry,

What difficulty are you having with circles?

As to make groups instead of components for the bottom, ends and top, yes, you could do that and skip the Make Unique steps. However, you then lose all the other benefits of components such as being able to reuse them in other models and the ability to edit all other copies when one is edited. Here's my original version of this box we've been working on. Before making the shots for the first part of this thread I made a copy of the entire box and moved it to one side. I used that copy to make the exploded view much like you did. In the image, below, you can see both copies of the box after I added some additional details. If the ends were groups instead of components, I would have had to deal with all four end components to put the dovetail pins on them. I'd have also had to do the same with the tops. I didn't, though, so the work was much less.


We'll have to work on the holes and circles stuff. I think the live demo thing will allow me to answer a lot of questions more easily.

Rob, Push/Pull will normally stop when it contacts the edge of a curve. The trick is to hit Ctrl before starting to push the half circle. Then you can extrude beyond the wall of the hole. Then select all of the geometry, right click on it and choose Intersect Faces>With Selection. Finally, delete the waste and correct any reversed faces. With the pro version you can do this more quickly with the Solid tools.

 
Last edited:
Here is a issue i would like to know how to solve. Its easy when we have rectangles and squares but how do we deal with intersecting two circle shapes or in this case a half circle and a circle


View attachment 64729

I was playing around and expect the push pull to push the half circle i added to the side of component through to cut out into the bigger circle.

I tried all sorts can anyone throw some light on this?

Thanks Rob. I enjoyed this one!

RRob's Puzzel.jpg
 
Top