Next Homework Exercise?

OK, let's try this one:

Octagon2_DR.jpg


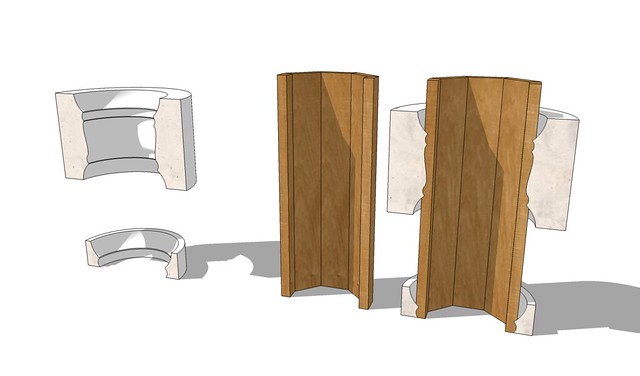
I'm not sure I follow the "half octagon" part but the rest sounds good. I used Follow Me for the turning but I only used one stave component which was then copied in a radial array to form the rest.

For my first attempt, I was using an extruded half circle and four staves of the octagon to build the parts. That's the way I've done other parts - build half, then put them together. On my second go-round with this today, I was using a circle as the path for the pattern to cut through a "half octagon". It worked, except that I had a line kinda outta whack so it produced some extraneous junk. When I read that you had built the entire pattern on one stave, I re-cycled some brain cells and went that route. That's what you see in the image attached here.

By the way, I enlarged the entities by a factor of 100 as I saw you and Tim doing on some D-C-B videos. I was getting some of those little blank triangles when working small. The large size eliminated them.

I saved a monochrome version of the pedestal on my website: Pedestal
 
Very good, Bill. the scaling thing is key to making this work. When I can get to the image showing how I did it, I'll post it.

Is anyone working on the drawer? If not, chop, chop.
 
... When I can get to the image showing how I did it, I'll post it. ...

My first step was importing a copy of the image you posted. I used a combination of bezier curves and arcs to approximate your layout. On my first pass, I used the curves to trace the layout onto extruded circles. Then, I aligned those to the octagon until the curves intersected them, exploded the components and performed the "Intersect Faces" function. After a lot of cleanup, I had my first posting.

On the second pass (after you mentioned working one stave), I used the a copy of the set of curves applied to a stave edge that I had aligned to the red axis. I copied a section (1/8) of a circle of the same radius as the octagon and placed the arc in the same plane as the face of the stave and a little below it. Here's a look at that setup:

DR_Ex3_Prep.jpg

After running FollowMe on both sets of curves, I did some clean up and did a radial array copy. Scaling up by 100 and back down after the FollowMe made all the difference.
 
Shhhh.... I think Larry dozed off. Don't anyone make a lot of noise.

Larry, if you wake up, close your eyes and don't look.


:D

Here's a section view showing the shapes I used to cut the stave. I surely didn't need to do the full round turn of the cutting shapes but it was faster than setting up the arc I would have used.


One thing you can see in the "cutters" is that there are curves at the end of the profile that run off away from the stave. They create the pommels and my thought process for them is thinking about turning this sort of thing on a lathe. I would run the tool toward the end and out and sort of pull the tool away from the work in a smooth movement. Use the same method to turn the pommels on a square table leg, too. You just have to make sure the curve for the pommel ends so that it'll cut the corners correctly.
 
Where's the dunce hat? After an all-niter, this was what I ended up with :eek:
The knob looks like it came off an old radio :rofl: but I did get to play around with the arc tool & the follow me{*do not follow me if you value time :doh:}
Not sure about the screw, so I used pin nails...you won't see them, I filled them :p
all in all, it's all fun :thumb: well, maybe not the 'sweeping up the hair', but still...:D
DrawerHomework.jpg

my SU file was too big {again} to load...may have to slip the admin's a few smackaroos to see if they can up the default setting :dunno:


Edit: I just checked Image Shack & Photo Bucket...no such luck with SU files there :(
 
Last edited:
Hey, that's pretty good, Ken. You really shouldn't be spending all night working on this stuff, though. ;)

From what I can see in your model, you need to erase the seam lines between the tails and the rest of the side at the front and there's one at the back. It looks like you made your drawer with the back as deep as the sides so the bottom would be trapped and you wouldn't need a screw or pin nails to hold it in. The knob does need some work but it was extra credit anyway. Maybe we'll do the knob as another assignment.

If you want to share your SKP files, you can upload them to the 3D Warehouse via the Google toolbar (look under View>Toolbars).

Keep up the good work.
 
Thanks Dave, here's a shot of the back...I messed with it quite a bit, trying to get something similar to the lesson, making it shorter in height after creating the dovetails, was ton's of fun :rolleyes:...I stayed up all night,and didn't snore once...I knew it was the wife making all that racket :D
DrawerHomework1A rearview.jpg
 
My wife blames me, too.

So if you go back to my example, you see how there's a half socket for the half pin? And it falls at the top edge of the groove for the bottom panel. Looking at your dovetails makes me realize that you can't do that half socket with a router-based dovetail jig. You would have to at least hand cut that socket or I suppose use a bandsaw. I never thought of that before.

So what was your approach to the edge detail on the bottom?
 
I used guide lines with measurements taken from the dado-ed slots{opposite of how I would actually do it}. I put the tab dimensions in on three sides, then drew a angled line from the bottom of the tab to the actual bottom, made that section a profile{if that's the correct terminology} and used follow me to take it around the 3 sides...this was a nightmare hackjob, and there is a few 'extra' lines, but I'm gaining :rofl::thumb:
 
Dave,

After looking at your drawing of the way you created the pedestal, I have a couple of questions. In an earlier post, you mentioned cutting the pattern on one stave, then copying it to a radial array. In your drawing, you show four staves (half-octagon) being used and cutting them with a circular pattern. Am I confused? My second approach was similar to your drawing except that I placed the curve pattern on the end of a group of four staves and used a half circle for FollowMe. After your post about using one stave, I looked at how that could be done and found it much easier and simpler. Did you see my post about my setup?

Thanks for taking the time to give us these challenges. :huh:
 
Hi Bill,

I did see your previous post. Sorry I didn't get to comment.

Yes, my illustration shows four staves but that's because I put a section plane through the completed model. When I made the cut, though, I had only one stave inside the cutting shape. The staves are instances of a component so there's no need to cut half of them.

So after the stave was cut I made a radial array of them. Notice I also flipped one of them along the lateral axis so the two you can see most clearly have book matched grain.
 
well i quess i have fallen to the back of the class ken took and passed me in the night.. so i will just use up my tank of gas and save my money, this racing is to hard on the budget:)
 
Top