some more updates, pictures for those still looking.
long, long day. Didnt get as much done as I wanted, but like I figured, when you deal with 40 year old walls, you uncover problems. I wouldnt want to do this for a living, but I guess the talented contractors get paid handsomely so it makes it all good stuff in the end.
My main problems were with the soffits. They arent plum, they arent straight, as in deeper or shallower at different points along a run, and they run different depths from the top at the ceiling down the 12 inches of soffit wall.
Off as much as a 1/4- almost 1/2 at one end.(I left that end for next week)
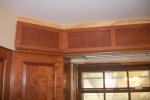
Where the soffit panels meet left of the window, the degree of cut from top was different then the degree of cut at the bottom. Off almost 2 degrees. With a rigid panel, I really didnt know how to solve this problem, so I split the difference and just cut at approx 23.5 degrees. Close enough, I dont give a discount if the molding is perfect.
Thats another cruddy thing about bringing all this stuff to another place to install. If something is off when I build a cabinet or table, I just recut another piece. I brought just enough moldings and exact panels, so one mistake will really set me back, alot.
I understand for alot here, this is childs play, but not for me. I understand all the basics, but hands on experience is what woodworking is all about.
my daughter took a few minutes away from her first day off(shes a teacher, yesterday was her last day, but she starts teaching summer session in a week) and we let her stand at the sink wondering why she wasnt getting water to rinse her cup. We decided to let her know the sink wasnt connected, but it was fun watching her trying to turn off and on each faucet and do it a few times.
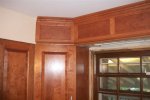
the last two pics, there was a space between the new pantry and the wall cabinets, so I cut a piece of molding and I think it will fill in fine.
on the third panel from the right, that arrow looking is just the grain, the spot on the forth panel is just a bad pic, there is no spot.
the soffit panels have no poly applied, so they dont look as finished. I wanted to get all the molding in place, then stain up any cuts or dings, then apply the poly. Much longer process, but safer for me.
new window is going in on the 10th, and Im going to picture frame it out with cherry, and under it eventually we will tile in a backsplash.
Im starting to draw up the fridge wall and were going to take down the wall between the kitchen and dining area and Im going to put in a pseudo island. look somewhat like an island, but more like cabs with a countertop and open up alot of space and make the area look much larger.
after my son cleans up all the outlets and switches above the counter, he scrapped all the old cement off the wall, Im going to skin it with 1/4 inch sheetrock, something I didnt even knew they made. then tile it all over.
last, the one picture of the base cabinets, thats where I took out the cabinets, and needed to make a space for the dishwashwer. In order to support the counter, being it was close to the stove, I make a 1.5 inch frame, attached it to the back wall and used a tapcon cement screw and secured it into the floor. Best I could think of, attaching the counter to it will keep it secure and give enough support to counter end.
one more thing, sorry. dont want to leave any of my amateur ways out maybe someone will learn from my mistakes.
In the picture where the soffit panels meet, due to the difference of degrees of wall at top and bottm, I left the middle panel straight on the edge, then cut a 45 degree edge on the right panel, and it sit on it nice so the panels fit in nicely. What I didnt do exactly right, is cut each stile of each panel exactly the same width since I cut them all a bit over and sized them when I put them up, forgetting when I put up the center one I might have to trim off the side panel. Oh well, I never claimed to know what I was doing, and if noone tells anyone, few will notice, if any.
and one more thing I remember that bothered me alot today.
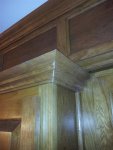
Above the cabinets, the soffit overhung approx 1 to 1 and 1/8 inch. All uneven ofcourse.
I didnt know how to address this, so I cut cherry ply wider than the overhang, then tediously by hand, used a block plane to plane it down flush with the wall. I didnt have a vise on hand, so I had to hold the piece in one hand and plane with the other. Took me a very, long, long time to plane down all the pieces so the bottom crown could sit properly. Didnt know or couldnt figure out any other way to do it.


") it must be that dark hair that does it
it must be that dark hair that does it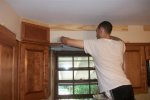


.jpg")