
You are using an out of date browser. It may not display this or other websites correctly.
You should upgrade or use an alternative browser.
You should upgrade or use an alternative browser.
The Phoenix.............
- Thread starter Stuart Ablett
- Start date
Marty Walsh
Member
- Messages
- 1,396
- Location
- Southern Georgia
Thank Norman.............
Marty, got that camera handy?
Stu,
I'm headed out to the shop right now to get you more shots...before I start my day.
And as Norman correctly pointed out, that's Baltic Birch that fits in that (dust diverter) slot. I'll take a close up or three of that setup, since it seems to work fairly well...

Be right back...
- Marty -
Marty Walsh
Member
- Messages
- 1,396
- Location
- Southern Georgia
Ok Stu,
Here's a few shots that hopefully show you more of what you wanted to see:


Let me know if you need any more, or if I missed what you were looking for...it's early and I'm still on cup #1
- Marty -
Here's a few shots that hopefully show you more of what you wanted to see:
Let me know if you need any more, or if I missed what you were looking for...it's early and I'm still on cup #1
- Marty -
Stuart Ablett
Member
- Messages
- 15,917
- Location
- Tokyo Japan
Thanks Marty, that is great, I see that the support for the table is not an "L" but more of a "U", or an upside down "U", or maybe two "U's" one right side up and other upside down........... whoops, I just confused myself.......
Anyway, two more shot, maybe three......... pretty please
One from the front of the saw, meaning looking right up the DC hose connection, well looking above the DC hose connection right into the under part of the table and trunnion.
Two: Can you tilt the table forward 45 degrees and take a picture from the back of the saw looking forward?
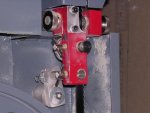
I have a question, what are the two things I point out with the arrows in the pic below..............???

Just wondering.
One thing I have to say, having a look "under the hood" of your saw, man that thing is well built, built like a tank and so nicely put together as well.
Even the steel in the DC compartment, the one with the replaceable piece of plywood, that is not any sheet metal, that is some serious steel!
Having a good look at you MM just shows where the extra quality resides!
I love the idea of the 4 leveling points on the underside of the table, that is really neat, I'm going to look at putting that in my design as well!
Cheers!
Anyway, two more shot, maybe three......... pretty please
One from the front of the saw, meaning looking right up the DC hose connection, well looking above the DC hose connection right into the under part of the table and trunnion.
Two: Can you tilt the table forward 45 degrees and take a picture from the back of the saw looking forward?
I have a question, what are the two things I point out with the arrows in the pic below..............???
Just wondering.
One thing I have to say, having a look "under the hood" of your saw, man that thing is well built, built like a tank and so nicely put together as well.
Even the steel in the DC compartment, the one with the replaceable piece of plywood, that is not any sheet metal, that is some serious steel!
Having a good look at you MM just shows where the extra quality resides!
I love the idea of the 4 leveling points on the underside of the table, that is really neat, I'm going to look at putting that in my design as well!
Cheers!
Marty Walsh
Member
- Messages
- 1,396
- Location
- Southern Georgia
I'm headed out to the shop now and will bring my camera. I'll take the shots you want, and bring them in on a break.
- Marty -
- Marty -
Stuart Ablett
Member
- Messages
- 15,917
- Location
- Tokyo Japan
Thanks Marty, I'm headed to the Dungeon in a bit, so no hurry.
Enjoy your puttying around the Studio
Cheers!
Enjoy your puttying around the Studio
Cheers!
Marty Walsh
Member
- Messages
- 1,396
- Location
- Southern Georgia
Actually Stu, I'm done puttying...until I get the base painted and installed... Today's painting and working on the DC duct design...
Anyway, here are your requested shots...hopefully I got what you wanted:


Those are the two mounting 'brackets' that hold the table to the trunion. The fourth picture above sort of shows them. They're big honking hunks of steel with a large cap screw through them. They capture a large steel pin of sorts that rides in the trunion. Sorry, but to get you better pictures of it, I'd have to remove the table. Not for nothing, you're a good pal and all, but I'd REALLY rather not have to remove that HEAVY table. But then again, you're a good pal, and if you asked real nice...I just might...
Let me know if you need/want more shots. Digital 'film' is free...
- Marty -
Today's painting and working on the DC duct design... Anyway, here are your requested shots...hopefully I got what you wanted:
{snip}
I have a question, what are the two things I point out with the arrows in the pic below..............???
View attachment 6220
Just wondering.
{snip}
Cheers!
Those are the two mounting 'brackets' that hold the table to the trunion. The fourth picture above sort of shows them. They're big honking hunks of steel with a large cap screw through them. They capture a large steel pin of sorts that rides in the trunion. Sorry, but to get you better pictures of it, I'd have to remove the table. Not for nothing, you're a good pal and all, but I'd REALLY rather not have to remove that HEAVY table. But then again, you're a good pal, and if you asked real nice...I just might...
Let me know if you need/want more shots. Digital 'film' is free...
- Marty -
Christian Aufreiter
Member
- Messages
- 28
- Location
- Austria


Norman Hitt
Member
- Messages
- 1,810
- Location
- Odessa, Tx
Well I found this pic on the MM site.........
View attachment 6210
This is the under the table view that they have.
the only part that would be "time consuming" to make, would be the groove in the "L" bracket.
Cheers!
Stu, you can drill a small hole where the pivot shaft would be, and then make a block with a pin in it that would fit in that hole, and then clamp the block onto Kermit's table the distance away from the bit that you want the radius of the arc to be, and then drill a series of nearly overlapping holes around the arc, and then knock off the points remaining with a grinder and a file to make a smooth arc slot.
Alex Reid
Member
- Messages
- 739
- Location
- Zushi, Japan
Stu a standard 14" BS uses either a 93" or a 105" blade. The 105" is a 14" BS with a riser kit on it. I don't know what you are going with but if you go with the 93" blade I have an extra, new in the package Timberwolf, you can have. Let me know. I put a riser kit on mine and now can't use it.
Stuart Ablett
Member
- Messages
- 15,917
- Location
- Tokyo Japan
Stu a standard 14" BS uses either a 93" or a 105" blade. The 105" is a 14" BS with a riser kit on it. I don't know what you are going with but if you go with the 93" blade I have an extra, new in the package Timberwolf, you can have. Let me know. I put a riser kit on mine and now can't use it.
Not that has to be incentive to go with the standard 93" or what
if 93" is standard, I'll most likely go with that.
Stuart Ablett
Member
- Messages
- 15,917
- Location
- Tokyo Japan
Some of the steel I might use...........

............the Square stuff is 2 3/8" square, and the rectangular stuff is 4" x 1 1/2"
The steel is 2mm thick.
What are most 14" welded steel frame bandsaws made from? The size of the tubing that is...?
Cheers!
............the Square stuff is 2 3/8" square, and the rectangular stuff is 4" x 1 1/2"
The steel is 2mm thick.
What are most 14" welded steel frame bandsaws made from? The size of the tubing that is...?
Cheers!
Some of the steel I might use...........
View attachment 6236
............the Square stuff is 2 3/8" square, and the rectangular stuff is 4" x 1 1/2"
The steel is 2mm thick.
What are most 14" welded steel frame bandsaws made from? The size of the tubing that is...?
Cheers!
stu, the 14" saws i`m used to working with are cast out of old truck blocks...
i`d use the 4" and gussett the upper support well......for the lower assembly i`d use 1 1/2" square tubing and weld a piece of 1/4" plate to it to mount the motor and bearing assy.........here`s a sketch..

Stuart Ablett
Member
- Messages
- 15,917
- Location
- Tokyo Japan
Hey, thanks for that Tod.
I am thinking that the stouter I make it the better off I'll be.
I see that most of these saws that you guys are showing me are NOT the "H" type frame that Big Blue is (the only bandsaw I have on hand). The other bandsaws I've used have been cast, so I really appreciate the pics and stuff guys.
I think that using the rectangular tubing for the frame, will kind of give me a built in box, that will be good for the DC as well...?
I need to go to Joyful and see what they have on hand for this structural steel, so I have a better idea of what I've got to work with.
need to work on my SU skills, so I can do some 3d thinking
Cheers!
Bart Leetch
Member
- Messages
- 3,206
93" doesn't allow you to cut up to 12" deep material Stu. go for the full 105" blade. I've never regretted getting my riser block. Of course I know you have big blue but what if?
Stuart Ablett
Member
- Messages
- 15,917
- Location
- Tokyo Japan
Well, I guess that is true Bart.............. yeah, what if........???
Cheers!
Cheers!
Norman Hitt
Member
- Messages
- 1,810
- Location
- Odessa, Tx
I like Tod's design in the sketch, and with that design, the weakest link, (if there was one), would probably be the upright "spine" channel, depending on it's size and wall thickness, but even if that turned out to be a little "flexy" after you get it in operation, you could easily weld two stiffener splines close to the edges on the outside of the upright channel without having to disturb anything else, or the design of the saw.
I've also been thinking about the table, and........you might keep your eyes open around the salvage places for a CI table from some other old junk machine of some kind that could be modified, (ie; "Stuartized" to fit), or another "Wild Idea", might be about a 1/4" or 3/8" thick steel plate cut to fit, and then weld some strips under the bottom for stiffeners like those that are normally cast into CI tables. (OK, no more thinking tonight, or I'll get a headache).
I've also been thinking about the table, and........you might keep your eyes open around the salvage places for a CI table from some other old junk machine of some kind that could be modified, (ie; "Stuartized" to fit),
or another "Wild Idea", might be about a 1/4" or 3/8" thick steel plate cut to fit, and then weld some strips under the bottom for stiffeners like those that are normally cast into CI tables. (OK, no more thinking tonight, or I'll get a headache).
Last edited:
Alex Reid
Member
- Messages
- 739
- Location
- Zushi, Japan
Stu let me know if you go with the 93" blade or the 105. It would probably be worth your while to make it 105" but if you decide to go with the 93" I got one hanging on a nail and it aint going nowhere.
Stuart Ablett
Member
- Messages
- 15,917
- Location
- Tokyo Japan
Well Alex, the offer of the new blade is VERY kind, but after seeing this pic..............

I think I'd be a little nuts to NOT go for some more cutting capacity..........
Still got lots of ideas floating around in my head about all of this.
got the bearing today, to replace the 4 bearings on the two wheels, and the two thrust bearings cost me a grand total of ah.......... $10.......... I'm getting things together, somewhat.......
I think I'd be a little nuts to NOT go for some more cutting capacity..........
Still got lots of ideas floating around in my head about all of this.
got the bearing today, to replace the 4 bearings on the two wheels, and the two thrust bearings cost me a grand total of ah.......... $10..........
I'm getting things together, somewhat.......Bryan Danner
Member
- Messages
- 2
Not that has to be incentive to go with the standard 93" or what
if 93" is standard, I'll most likely go with that.
Not to pick nits here, but the standard blade length for the 14" Delta is 93.5". That'll get you another 1/4" of additional cutting capacity.
I just checked an old Delta catalog....here is some interesting info:
Blade Length: Standard = 93.5", Max = 94", Min = 91.5"
Blade Length with riser block: Standard = 105", Max = 106", Min = 103.5"
Sooooo....this suggests that the blade tensioning mechanism needs at least 1.25" of range in it....a bit more would be better.
Finally...one last fun fact: The distance between my axles on my 14" Delta with a riser block is 30-5/8" center to center with a properly tensioned 1/2" blade in place. My other 14" Delta (w/o riser) is currently in about 30 or so pieces right now as it's being re-built....so I can't measure that one. I have a third one...but that's another story.
Good luck!
-Bryan