
allen levine
Member
- Messages
- 12,368
- Location
- new york city burbs
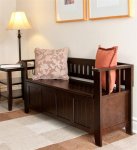
my wife showed me a picture a few months back of a bench that looked something like the one in the picture.
I told her Id get to it eventually.
I havent been that motivated lately, but I decided last week to get going on it and start moving, trying to complete it before our anniversary this weekend. Figured maybe this year Id give elen something besides a card. Not going to happen, Im nowhere near completion.
the thing I like about projects like this is that I didnt have a plan.
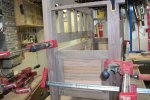
I made 52 out of 54 parts so far. All 52 parts have to fit into at least 2 other parts(mortise and tenons), and if one doesnt fit, the entire build wont fit right. I havent made the tenons on the front legs for the arms, nor made the tenons on the arms to secure to the back legs.
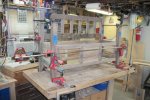
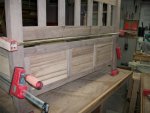
I clamped it all together and kept my fingers crossed every part would fit together.
Panels are all glued, secured with one brad to hold so no overnight clamping, avoiding things moving, as I really needed everything square for this.
It all fit.
I also made holes for a few pocket screws so when I glue it all up, I can secure the panels to the legs and make sure I dont have any movement once I make sure its all square.
Legs are glue ups, I dont have anything other than michigan 4/4 walnut.
The last 2 parts are the bottom(plain ole baltic plywood), and the bench seat which will be glued up.\
Its all walnut, except for the panels, that noname wood that looks great.
I didnt put any slats under the arms, as I intend to extend the bench seat over the side panels. Not sure if Im 100% happy with my decision, but a nice colorful bench cushion and I dont think the arm slats will be missed.
I also tapered the legs a bit, again, maybe I should have only tapered the bottom 2 inches and made the cabinet wider, oh well, I doubt she will keep much in there anyway.Made this unit on the fly, just went along piece by piece and tried to group all machine work together to get work done faster.
and originally, I was just going to plywood the panels in the back, but decided to just do it right.
I know the panels will really pop when they are oiled. Its the same wood I used for my sons bar panels, and his small entertainment unit.(as well as one of the headboards I made)
First time I used the mystery wood with walnut. A great match up.
I believe I also should have thrown in 3 or 4 more back slats, but its too late for that also, like I said, made it up as I went along.
cut the stiles and rails for the doors today, panesl are already made. Hopefully get it all cleaned up and sanded, glued together with base and doors in place by this weekend.
heres a picture of something almost identical* of what my wife showed me, and heres a few shots of my dirty, glue stained project clamped up(not glued)
*my wife made it clear she doesnt like the top opening, asked me if I could make it more like a cabinet that opens from the front. I only put 2 doors in, thinking maybe a third would have made center access easier, but I went for a look. Not changing it now.
She doesnt know I made it for , if she reads this, well, Ill show her as far as I get by sunday.
I told her Id get to it eventually.
I havent been that motivated lately, but I decided last week to get going on it and start moving, trying to complete it before our anniversary this weekend. Figured maybe this year Id give elen something besides a card. Not going to happen, Im nowhere near completion.
the thing I like about projects like this is that I didnt have a plan.
I made 52 out of 54 parts so far. All 52 parts have to fit into at least 2 other parts(mortise and tenons), and if one doesnt fit, the entire build wont fit right. I havent made the tenons on the front legs for the arms, nor made the tenons on the arms to secure to the back legs.
I clamped it all together and kept my fingers crossed every part would fit together.
Panels are all glued, secured with one brad to hold so no overnight clamping, avoiding things moving, as I really needed everything square for this.
It all fit.
I also made holes for a few pocket screws so when I glue it all up, I can secure the panels to the legs and make sure I dont have any movement once I make sure its all square.
Legs are glue ups, I dont have anything other than michigan 4/4 walnut.
The last 2 parts are the bottom(plain ole baltic plywood), and the bench seat which will be glued up.\
Its all walnut, except for the panels, that noname wood that looks great.
I didnt put any slats under the arms, as I intend to extend the bench seat over the side panels. Not sure if Im 100% happy with my decision, but a nice colorful bench cushion and I dont think the arm slats will be missed.
I also tapered the legs a bit, again, maybe I should have only tapered the bottom 2 inches and made the cabinet wider, oh well, I doubt she will keep much in there anyway.Made this unit on the fly, just went along piece by piece and tried to group all machine work together to get work done faster.
and originally, I was just going to plywood the panels in the back, but decided to just do it right.
I know the panels will really pop when they are oiled. Its the same wood I used for my sons bar panels, and his small entertainment unit.(as well as one of the headboards I made)
First time I used the mystery wood with walnut. A great match up.
I believe I also should have thrown in 3 or 4 more back slats, but its too late for that also, like I said, made it up as I went along.
cut the stiles and rails for the doors today, panesl are already made. Hopefully get it all cleaned up and sanded, glued together with base and doors in place by this weekend.
heres a picture of something almost identical* of what my wife showed me, and heres a few shots of my dirty, glue stained project clamped up(not glued)
*my wife made it clear she doesnt like the top opening, asked me if I could make it more like a cabinet that opens from the front. I only put 2 doors in, thinking maybe a third would have made center access easier, but I went for a look. Not changing it now.
She doesnt know I made it for , if she reads this, well, Ill show her as far as I get by sunday.
Attachments
-
 bench (Medium).jpg36.5 KB · Views: 85
 -
 kitchen reface 197 (Medium).jpg74.8 KB · Views: 79
 -
 kitchen reface 198 (Medium).jpg78.1 KB · Views: 70
 -
 kitchen reface 199 (Medium).jpg54.6 KB · Views: 73
 -
 kitchen reface 200 (Medium).jpg71.5 KB · Views: 70
 -
 kitchen reface 202 (Medium).jpg68.3 KB · Views: 62
 -
 kitchen reface 203 (Medium).jpg63.1 KB · Views: 75
Last edited:
")
