hallway/entryway bench

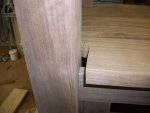
I had to show it to her yesterday, I needed her word on the design, before I continued.

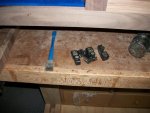
larry, I need clamps.

I cant use the lousy F style clamps I have, I just dont have strength in my hands to turn them.

I keep watching craigs list, hoping to find some used. Theres a guy who shut down his shop out east of me, a cabinet shop, Im going to shoot him an email and see if he has any bessey or jet clamps.
 
well, once again things went flying, kicking, angry at myself for messing up.
I had intended to cut the bench top last, and fit it last, but knew I had to leave the arms off to fit the bench top down into position.
Ofcourse, I glued the arms in, and could not fit the bench top onto the piece.
so I kept cutting and planing(hand planing) until it fit, and now its unacceptable.
Look at this mess.
Do I have to cut the arms off and make another bench top and start all over?
Any suggestions to salvage this, Im not happy that there is a 3/8th inch gap on both sides where the bench hits the front legs, not concerned about rear leg gap.
whats my alternative now, since I glued the arms in and cant slide the top in place?
a little help please, or just tell me Im an idiot and Ill chalk it up as a learning experience.
 

Attachments

  • kitchen reface 207 (Medium).jpg
    kitchen reface 207 (Medium).jpg
    52.1 KB · Views: 30
Any chance of cutting a piece off the front and fitting another strip right across the front with top in situ. Kinda like the way hardwood is fitted to the edge of plywood.
 
Any chance of cutting a piece off the front and fitting another strip right across the front with top in situ. Kinda like the way hardwood is fitted to the edge of plywood.

thats what Im thinking, will make finishing a bit tougher, but I dont see any alternatives.

putting anything in the gap bob doesnt look good.

Im going to let it sit today, see if anyone comes up with any solution, then tackle it tomorrow.

Ill yank the base out today and apply some poly to that(plywood)

eh, not touching it anymore today, I had enough.
 
Another bench seat, but in two pieces (front & back) Notch each piece and either glue the two in place or design it with a small gap. Might be tough to glue, but you should be able to clean up any differences with a sander.
 
thats why Im thinking why do another top, especially after running this one through the drum sander, and now the sander is in storage until after winter.
If I cut off the short lengthwise edge, I can just add another piece and not have to remake the bench.
glueing up is a bit challenging, but I have a few options, like rabbeting, biscuits, even pockets screws to keep it aligned while drying.

I applied finish to the inside of the cabinet while theres no seat on it.

I applied and will reapply another coat of poly to the plywood base.

finishing the insides will make life alot easier once I attach the bench seat.


this is Stus fault.

I started playing around with my bandsaw cutting those little reindeer(and I dont celebrate christmas), and I was in the middle of things, but decided to chop up some 2x4s for fun, and the distraction upset my timeline.
 
I cant use the lousy F style clamps I have, I just dont have strength in my hands to turn them.

Allen, my dad uses a trick to get a little more oomph into his clamping without possessing a grip like an alligator; he drills a hole that matches a #1 phillips screwdriver through the handle and uses a screwdriver as a lever to tighten things up. Here's the same idea with a dowel:

etip020614ws.gif
 
allen if i understand this right you got a seat or lid to your bench that has the bad gap at the back because you needed more room to get it to fit the frnt.. if so that is what i think bill is saying to you for a fix.. but you might be able to use the seat you now have and just add a strip in the center. and it could be the mystery wood , which would lessen the look of a mistake by having a small strip glued in the center.. as for clamping you could have it sized to pressure clamp itself like a folding table leg.
 
I went ahead and did (I think bill mentioned it first), and milled down 2 almost equal pieces and glued them up today.
Ill carefully give them a final planing tomorrow, hit them with 80 grit sanding only, then carefully, glue them up on the bench, which is challenging enough for me. Im hoping to get them straight and flat. I cant use cauls, so IM not sure what the outcome will be.
Ive been passing my limited time in the shop(some minor toe surgery) by making those bandsaw reindeer. I have a tremendous amount of 12/4 12 inch wide, beautifully clean southern yellow pine, and I put a 1/4 inch blade into the bandsaw today, and was able to knock out 7 of them. All were given away except for one, and my daughter wants me to make her 11 for her classroom, for the kiddies.
stu has me addicted to making those little things.(I dont keep them, I give them all as little doodads to everyone we know)

The bench seat that is too short, I might cut down a couple of inches and make a coffee table out of it.
 
I finished up the bench seat.
I had to carefully glue up on the bench, took the clamps apart, slid them underneath the seat, and clamped cautiously.
I cut each piece individually, since I took notice the bench was off square close to a 1/16th of an inch, not noticable by eye, but when I try to fit a perfectly square bench seat, one can tell it was off.(still not noticable, but it irked me. Clamping a large piece all at once, may be square when I check and recheck, but 6 hours later, well, thats life for me)
I had to dig around and look for a rasp/file, used my hand plane a bit, not my cup of tea, but sometimes for each cut I had to work it close, and power tools just wouldnt do it.
My fits look fine, Im happy.
I sanded the bench top with 60 grit, now Ill go up to 120 tomorrow after glue cures.

I used 5 clamps, took those little plastic end pieces off of them, and had to spend 45 minutes before looking for one of them.
I started with 5, ended up with 4.
The good thing was that while I was moving everything and searching every nook and cranny for that plastic end, I found my rockler glue brush I thought I accidently threw away. Id rather have the brush anyway.

Maybe tomorrow Ill have my wife toss the brush somewhere again, and when I look for it, maybe Ill find the plastic end part also. worth a shot.


Took a few pics of the glue up, sorry one shot came out bad, shaky hands this afternoon.
 

Attachments

  • kitchen reface 209 (Medium).jpg
    kitchen reface 209 (Medium).jpg
    48.2 KB · Views: 38
  • kitchen reface 210 (Medium).jpg
    kitchen reface 210 (Medium).jpg
    52.3 KB · Views: 37
  • kitchen reface 214 (Medium).jpg
    kitchen reface 214 (Medium).jpg
    69.3 KB · Views: 37
seems no matter how much sanding, cleaning(with sharp chisel), resanding, then wiping down with mineral spirits, I cant seem to spot all the bad glue joints and planer snipe on panels.
Once the oil goes on, even though its a bit uneven(first coat seems to soak up differently on different boards), every single bad spot is noticable.
Ill try my best after oil dries to fix up a bit, but it is what it is. I need a new pair of eyes, glasses work fine, just cant seem to spot things I need to spot.
If you look closely, you can see some snipe in the doors, and trust me, I ran that orbital over the doors with 4 different grits forever it seemed.I usually get bad snipe when I run very thin panels, this case, 1/4 inch.
Some bad glue spots, and some bad marks on the wood, nothing I can do about that.
The benchtop is fine, so tomorrow Ill fix up what I can, oil up a second coat. (I plan on putting on 3 coats of low gloss, one last coat of higher gloss tung oil/mixture)
 

Attachments

  • kitchen reface 215 (Medium).jpg
    kitchen reface 215 (Medium).jpg
    54.8 KB · Views: 47
  • kitchen reface 216 (Medium).jpg
    kitchen reface 216 (Medium).jpg
    65.5 KB · Views: 41
  • kitchen reface 217 (Medium).jpg
    kitchen reface 217 (Medium).jpg
    59.6 KB · Views: 42
  • kitchen reface 218 (Medium).jpg
    kitchen reface 218 (Medium).jpg
    62.3 KB · Views: 41
  • kitchen reface 219 (Medium).jpg
    kitchen reface 219 (Medium).jpg
    70.2 KB · Views: 43
One's self is their biggest critic...:dunno: 
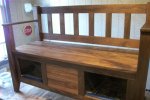
Looks good to me Allen.

Of course I know of a finishing school about 5 hours away from you that would probably teach for some of that NY pizza you brag about though. ;) Just head south towards the DC area.
 
Top