Shop tour with custom stuff

Rob McCune

Member
Messages
13
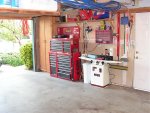
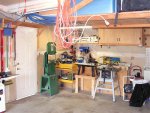
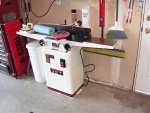
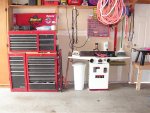
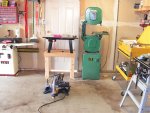
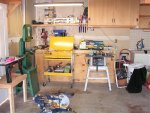
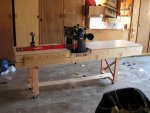
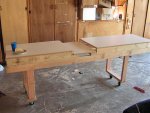
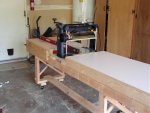
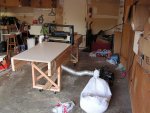
Here are some pics of my shop (garage) that I have recently completed. At this point everything is optimized for the limited floor space. I had planned to park my car in there as well, but now I have seen the futility of it. I will probably re-arrange things as soon as I get a new cabinet saw, but this is how it will look for a while.

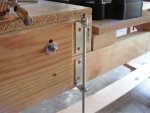
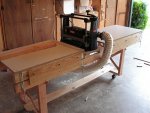
The workbench folds down against the wall for added room. Until I made the planer table, my car still fit in the garage with all this stuff in here.

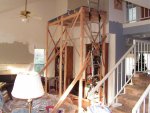
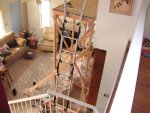
I also added in a couple of pictures of the scaffolding I made to paint the raised cieling in the living room.
 

Attachments

  • shop (6).jpg
    shop (6).jpg
    77.6 KB · Views: 253
  • shop (3).jpg
    shop (3).jpg
    91.6 KB · Views: 198
  • shop (4).jpg
    shop (4).jpg
    97.9 KB · Views: 203
  • shop (1).jpg
    shop (1).jpg
    73.4 KB · Views: 151
  • shop (14).jpg
    shop (14).jpg
    96.1 KB · Views: 193
  • PICT0007.jpg
    PICT0007.jpg
    92.4 KB · Views: 130
  • PICT0008.jpg
    PICT0008.jpg
    77.8 KB · Views: 157
  • PICT0009.jpg
    PICT0009.jpg
    97.5 KB · Views: 175
  • scaffold 2.jpg
    scaffold 2.jpg
    79.6 KB · Views: 203
  • scaffold (8).jpg
    scaffold (8).jpg
    72.1 KB · Views: 187
Last edited:
Custom planer table

This was yesterdays project. It cost about $80 and took me about 9 hours. The tops are melanine and the frames are 2x4. I used some 3/4" plywood for the side brackets.

I made a sled for the planer and made two moveable tables for infeed and outfeed. The plywood is mounted to the sled and the tables slide inside it. I use some inside corner brackets and all thread to make the adjusters. I had to cut the brackets down to minimize the width of the table. I used about a hundred nuts and washers, but the ende result is very fine adjustment on the tables. I didn't have any crossmembers under the tables and ran a couple boards through. I still had some snipe that way. Then I put some crossmembers in and the snipe was reduced dramatically. I still have a little fine tuning but the results are looking promising considering I only spent $80 on it.

The dust collector was a temporary thing to test it out.
 

Attachments

  • planer table (4).jpg
    planer table (4).jpg
    69.2 KB · Views: 64
  • planer table (2).jpg
    planer table (2).jpg
    81.9 KB · Views: 82
  • planer table (1).jpg
    planer table (1).jpg
    83 KB · Views: 85
  • planer table (6).jpg
    planer table (6).jpg
    62.5 KB · Views: 93
  • planer table (7).jpg
    planer table (7).jpg
    78.8 KB · Views: 78
  • planer table (9).jpg
    planer table (9).jpg
    110.7 KB · Views: 72
  • planer table (11).jpg
    planer table (11).jpg
    58.4 KB · Views: 68
  • planer table (14).jpg
    planer table (14).jpg
    71.4 KB · Views: 62
  • planer table (16).jpg
    planer table (16).jpg
    80.1 KB · Views: 90
  • planer table (18).jpg
    planer table (18).jpg
    85.5 KB · Views: 98
Nice shop Rob. Couple of question though. The door that is being blocked, is that used for anything? Are you going to have a kid or wife careen into you in the middle of a cut? And do you still build models? If so how about a pic of them?
 
Nice use of limited space there. I don't see a lathe. :eek: Hope that gets remedied soon. ;) And, I see you have one of those ultra-light weight/duty Delta tables saws like mine. Surprisingly, they do yeomans work if you aren't in a hurry.
 
..... I still have a little fine tuning but the results are looking promising considering I only spent $80 on it.

Rob,

That is a very nice looking setup you have built. I particularly admire the bed adjustments that you designed into it. Nice work !!

cheers
 
Rob, Nice looking shop you have there. I am intrested in the planer stand you made.How long are the beds on it and does it stay adjusted once set?
Al
 
Jim, that door was only blocked during the picture. I wanted to see the bench while it was folded down. I still do models but not right now, because the house is taking up all my time. You can see some of my models at http://community.webshots.com/user/rtwpsom2.

Probably won't be getting a lathe anytime soon. To me you have to be artistic to do lathe work, and I am not artistic. Maybe some day. The table saw just plane sucks. I am getting a Jet Cabinet saw soon though.

The beds are made from two sheets of melanine that I got at Home Depot. They started 24" x 48", but the infeed table got cut down for the planer base. I seriously don't think the needed to be as long as they are but I thought what the heck, I will have extra counter space when I am done.
 
Rob,

Quite impressive. You are sure one of the guys that gets things done.

The second picture showing the garage door open has me puzzled. It looks like that there is an overhead storage are where the garage door would need to be if it is open. Did you do away with the door? I must be missing something. I went back and looked at the first picture and I think that I see the garage door. I suppose that the second picture is an optical illusion.
 
Last edited:
Rob, That Tiger is awesome. I don't recall a kit that has that much detail, who makes it or did you make some of the parts? Makes me want to go drag a kit out of the basement. Kinda miss my model days.

Second, how do you know what color to paint everything?

 
re: tiger

The Tiger is Academy's interior one. The colors came from tiger1.info, a website dedicated to modeling the tiger. That Tiger sold for $225 on eBay.

If you don't know about the advances in Tiger kits I would direct you to Dragon's new set of Tigers. It has been widely acclaimed as the best model kit ever made. Also here's a friend of mine's interior that was made mostly from aftermarket stuff. Lee Lloyd's Tiger I

I didn't get back into modeling until I was in my late 20's. There is a whole online community of modellers just like me. Go to Armorama and look around.
 
Last edited:
Aside from the fact that it's far too clean, nice shop tour. ;)

I really like the bed levellers you made for the planer table. I've got the Ridgid MSUV that Bart mentioned, but the two little rollers aren't as supportive as the two fine-adjustable tables. Great job.
 
re:

I was worried that only two rollers would not support the wood enough to avoid the snipe. Wood prices the way they are in California, I can't afford snipe.
 
nice setup. Funny how little time you need to decide the car has to live outside. :)

Just out of interest what sort of timber prices are you paying in California ?

For instance 6x1 roughsawn macrocarpa is $1.00 a lineal foot here in NZ.
And 12 x 1 radiata rough sawn is $0,50 per Lf
 
...
Just out of interest what sort of timber prices are you paying in California?...
Here in the Los Angeles area, I've not found a place to consistently buy roughsawn wood during the hours I'm able to go shopping for it, so I buy most of mine surfaced on four sides, at full retail prices. I've been paying $10-$12 per BF for nice 3/4 curly maple, and have even paid that much for 4/4 skip-planed curly maple. Cherry has been running anywhere from $8 to $12 for decent stuff. I think I've paid about $8 for jarrah. Most of the other hardwoods are comparably priced in the $4 to $16 or so range.

One of the benefits of woodturning is that if I pay attention, I can pick up free wood. Free always fits my budget. :D
 
re:

Ralph, I just paid $3.29/bf for some 4/4 FAS poplar. I don't know how that compares around the country but internetlumber.com has 1000 bf package of 4/4 poplar for $1.34/bf.

Your welcome Tod and thank you Tyler, though I am not sure who Dan is! :p
 
Top