hole in the wall insert for my nephew

today this project moved along some. i found that i needed a mobile platform for this, so it was written, so it was done. then pop and i tilted it up and onto the platform, and he went on to other things. then as i was gluing up the second adjustable shelf, my somewhat shop assistant showed up, and i put him to work clamping up the adjustable shelf. trust me, that hair is longer than it looks, when pulled straight out, it's a little over a foot long. according to him, girls just love the curls. then he helped to cut and tack the back in place, and he too was done for the day. then i set to work on the dvd drawer. cutting the parts, rabbets, and assorted dadoes. with that accomplished, i temporarily assembled it with the blue tape holding it together, and fitted it to the rest of the cabinet. tomorrow its the other two drawers, and two doors.
 

Attachments

  • 017 much needed mobile platform.jpg
    017 much needed mobile platform.jpg
    141.1 KB · Views: 26
  • 018 up on mobile platform.jpg
    018 up on mobile platform.jpg
    117.4 KB · Views: 26
  • 019 my assistant tightening clamps.jpg
    019 my assistant tightening clamps.jpg
    133.8 KB · Views: 29
  • 020 second adjustable shelf clamped.jpg
    020 second adjustable shelf clamped.jpg
    110.9 KB · Views: 25
  • 021 back tacked in place.jpg
    021 back tacked in place.jpg
    120.5 KB · Views: 24
  • 022 rabbets cut for dvd drawer.jpg
    022 rabbets cut for dvd drawer.jpg
    111.6 KB · Views: 21
  • 024 dvd drawer fitted with bottom.jpg
    024 dvd drawer fitted with bottom.jpg
    101.4 KB · Views: 21
  • 023 dvd drawer checked for square.jpg
    023 dvd drawer checked for square.jpg
    118.7 KB · Views: 21
  • 025 dvd drawer fitted out with dividers.jpg
    025 dvd drawer fitted out with dividers.jpg
    109.3 KB · Views: 21
  • 026 dvd drawer in place.jpg
    026 dvd drawer in place.jpg
    122.2 KB · Views: 25
another busy day, can't wait to get back to the peace and quiet of work.... lol. today both of the big and small drawers were put together and set in place. the big drawer was a real bear, things just didn't seem to go right. the smaller one was much better. i added the hardware to check the look, and i will be adding a smaller version of the pulls to the dvd drawer. i also added some side bracing to see how it would look with the adjustable shelves adjusted. i was going to tackle the doors, but decided that after today's adventures it would be better to rest and regroup, and get back to it on thursday.
 

Attachments

  • 027 big drawer set up.jpg
    027 big drawer set up.jpg
    108.6 KB · Views: 18
  • 028 big drawer dadoes.jpg
    028 big drawer dadoes.jpg
    92.3 KB · Views: 19
  • 029 big drawer ready to be fitted.jpg
    029 big drawer ready to be fitted.jpg
    100.6 KB · Views: 19
  • 030 big drawer in place.jpg
    030 big drawer in place.jpg
    118.1 KB · Views: 18
  • 031 small drawer set up with dadoes.jpg
    031 small drawer set up with dadoes.jpg
    100.4 KB · Views: 16
  • 032 small drawer ready to be fitted.jpg
    032 small drawer ready to be fitted.jpg
    122.4 KB · Views: 16
  • 033 small drawer fitted.jpg
    033 small drawer fitted.jpg
    117.1 KB · Views: 22
well, we're getting closer to taking it back apart, finishing it off, and reassembling. got the pull for the dvd drawer added, then it was on to getting the doors built. i found that with the hinges i'm using, i needed to add a small bit of wood, wrap around hinges. adjusted the plans for the doors and kept going. then i checked the frames to the openings, and was happy, then added the panels, and checked the fit with the hinges taped in place, and was satisfied with the fit. tomorrow it's fitting the knobs to the doors, then take everything apart for sanding and finishing
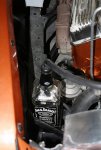
. i'm still having evil thoughts about adding a secret compartment somewhere.
 

Attachments

  • 034 dvd drawer pull added.jpg
    034 dvd drawer pull added.jpg
    113.2 KB · Views: 13
  • 035 doors set up.jpg
    035 doors set up.jpg
    111.9 KB · Views: 13
  • 036 doors glued up.jpg
    036 doors glued up.jpg
    129.2 KB · Views: 14
  • 037 doors fitted.jpg
    037 doors fitted.jpg
    117.8 KB · Views: 14
  • 038 doors placed with hinges.jpg
    038 doors placed with hinges.jpg
    92.1 KB · Views: 19
well, it was too hot today and i gave up on the secret compartment for now, i may add it to the bottom drawer. with that said, on to what was done today. added the knobs to the doors, added the drawer all of the drawer stops, then laid it on it's side again for disassembling, laid out and drilled all of the holes for the adjustable shelves. from there it was over to the garage where my brother was working on the '40, and gave him a hand with the trunk lid. took some pics of that too....
 

Attachments

  • 039 doors with knobs.jpg
    039 doors with knobs.jpg
    111.7 KB · Views: 13
  • 040 drawer stops glued in place.jpg
    040 drawer stops glued in place.jpg
    115.3 KB · Views: 11
  • 041 ready for disassembly.jpg
    041 ready for disassembly.jpg
    122.6 KB · Views: 11
  • 042 adjustable shelf holes laid out.jpg
    042 adjustable shelf holes laid out.jpg
    93.5 KB · Views: 11
  • 043 adjustable shelf pin holes drilled.jpg
    043 adjustable shelf pin holes drilled.jpg
    100.6 KB · Views: 11
the '40.....
 

Attachments

  • engine 1.jpg
    engine 1.jpg
    118.6 KB · Views: 19
  • engine 2.jpg
    engine 2.jpg
    120.4 KB · Views: 17
  • rear view.jpg
    rear view.jpg
    117.5 KB · Views: 17
  • front view.jpg
    front view.jpg
    110.5 KB · Views: 18
  • unique insert.jpg
    unique insert.jpg
    100.8 KB · Views: 16
got the majority of the sanding out of the way today, finishing it up tomorrow. also for tomorrow, taking the adjustable shelves over to the local shop to have them run them through the big belt sander just enough to flatten them out. then i can turn the whole works over to my sister for staining and finishing. once that is out of the way, final assembly.
 
well, my sister got it stained the other day (missed a few spots, but i guess that happens when you subcontract :rolleyes:
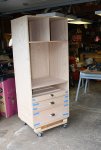
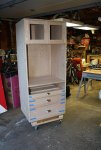
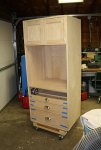
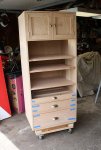
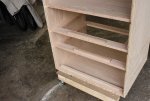
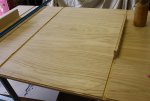
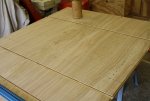
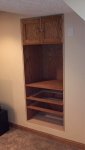
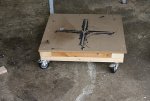
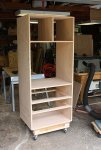
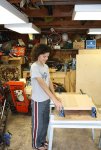
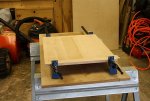
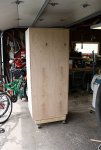
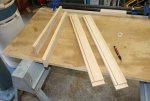
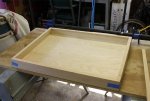
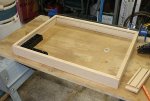
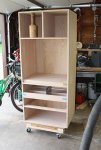
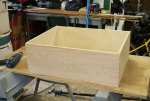
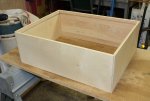
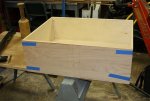
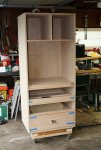
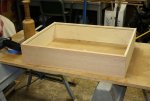
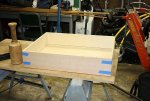
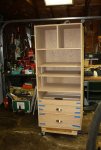
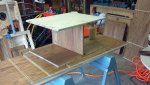
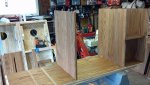
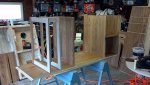
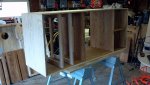
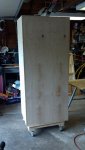
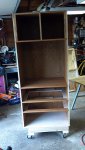
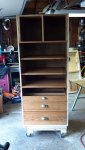
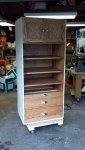
). after touching up the missed spots yesterday, settled in for food and fun. today was final assembly day. set up the top, divider, and cabinet shelf as a single unit, and then added it to the one side. then it was on to adding the dvd shelf, and drawer shelves, then the bottom. then pop and i tipped it upright onto the mobile platform, and it was on to the three drawers. once those were done, it was on to the doors, with pop helping to hang them. now it is completely assembled, and all that is left is to take it over to my nephew's house, and shuck it into the hole, and do up the trimwork around it. that will happen first thing tomorrow morning.
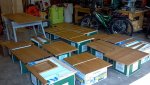
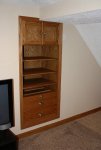
 

Attachments

  • 044 all stained.jpg
    044 all stained.jpg
    123 KB · Views: 14
  • 045 top and divider assembled.jpg
    045 top and divider assembled.jpg
    110.7 KB · Views: 13
  • 046 top and divider in place.jpg
    046 top and divider in place.jpg
    109.9 KB · Views: 13
  • 047 top shelf in place.jpg
    047 top shelf in place.jpg
    111.9 KB · Views: 12
  • 048 drawer shelves in place.jpg
    048 drawer shelves in place.jpg
    108.3 KB · Views: 11
  • 049 bottom and other side in place.jpg
    049 bottom and other side in place.jpg
    101.6 KB · Views: 12
  • 050 back in place.jpg
    050 back in place.jpg
    84.3 KB · Views: 11
  • 051 front view.jpg
    051 front view.jpg
    99.3 KB · Views: 12
  • 052 drawers and adjustable shelves in place.jpg
    052 drawers and adjustable shelves in place.jpg
    99.1 KB · Views: 12
  • 053 fully assembled.jpg
    053 fully assembled.jpg
    100 KB · Views: 16
me too! the adjustable shelves had me a bit worried, but they fit nice and flat, and are within about a cat hair of space between the edges and the L shaped shelf pins.
 
Last edited:
today was the day! that hole sure did get stuffed. that blur to one side is my nephew. we loaded up pop's van and off we went to put this thing in it's place. the first 2 pics are bad because of the cell phone trying to make like a camera. so you all now have seen the hole as it was when we got there. it went in quite easy once we got it up off the floor, then about halfway in, it started binding up. not sure why as i had left a good quarter inch on the sides and top for clearance. i guess when they walled it in, it wasn't all that square somewhere along the line. with some healthy shoves, a few non too gentle taps (really could have used the persuader here), and some oaths :tantrum: that would have curled larry's beard :eek:, it finally went in :woohoo:, much to the amusement of my wife :blah:
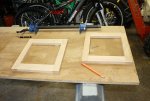
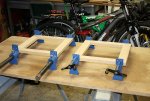
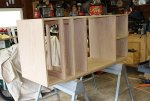
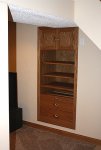
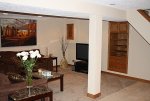
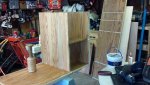
, who was there as well. then it was time for the trimming. that went well enough for 3 out of 4 sides, but the top decided to be a bit difficult. it doesn't help much when there is a main support beam in the way. the madman trimming skills were up to the task, and pop was shown that a chop saw wasn't good for everything. with that out of the way, here are pics of all the fun, and one of the installation supervisor.
 

Attachments

  • 054 hole in the wall.jpg
    054 hole in the wall.jpg
    55.8 KB · Views: 24
  • 055 insert in place.jpg
    055 insert in place.jpg
    60.8 KB · Views: 22
  • 056 insert trimmed from left.jpg
    056 insert trimmed from left.jpg
    89.1 KB · Views: 22
  • 057 insert trimmed from right.jpg
    057 insert trimmed from right.jpg
    96.1 KB · Views: 22
  • 058 insert in it's room.jpg
    058 insert in it's room.jpg
    111.9 KB · Views: 22
  • 059 installation supervisor.jpg
    059 installation supervisor.jpg
    87 KB · Views: 18
Top