Need advice for finishing basswood craftwood

Messages
27
If anyone can offer some advice it would be greatly appreciated.

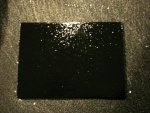
I am an artist and I'm trying to make novelty boards. I take craft basswood and cut it into shapes, paint the wood with Behr flat black paint, and then use decoupage to glue my art prints onto the wood.

After waiting 24 hours for the paint and decoupage to dry, I brush on a thin coat of Minwax water based polyurethane. I coat one side and wait 3 hours before coating the back. I then let the wood sit for 3 days to dry. After 3 days the poly appears to be firm, shiny, and no figure prints appear in the finish. Everything looks good.....until....

I took the boards and put them inside small clear plastic bags to protect them. I had them sitting inside the house on the table for about 2 weeks. I pulled one of the boards out to look at it and the poly was marked up and dull where it made contact with the plastic. I checked the other boards and they all had the same problem.

I don't understand why that happened. I followed the directions and waited way longer than the recommended drying time. Is there a cost effective clear that I can brush onto the boards? I just need something to stay firm to protect the wood and artwork, offer some minimal UV protection, and survive sitting in a plastic package. My goal was to eventually sell these, but I can't now.

I chose brush method because I didn't like the texture that spray cans made. I don't want to sand if I don't have to. Brush strokes are OK.

Thank you in advance.

Matt
 
Welcome to the forum, Matt. It sounds to me like the poly on your boards was not fully cured, despite the appearance. Without knowing your location, my guess is that the humidity in your area caused the water-based finish to cure more slowly than usual. I'll let some of the finish experts here chime in, but I suspect you might have better results with a solvent-based finish.
 
Welcome to the forum, Matt. It sounds to me like the poly on your boards was not fully cured, despite the appearance. Without knowing your location, my guess is that the humidity in your area caused the water-based finish to cure more slowly than usual. I'll let some of the finish experts here chime in, but I suspect you might have better results with a solvent-based finish.

Thank you for responding Vaughn. I live in Phoenix AZ. The temps are between 103-106 degrees with low or no humidity. Not fully cured was my guess as well...just wasn't sure. The directions on the can is kind of misleading.

Unfortunately I can't wait 30+ days for for each side to cure. I was thinking maybe an epoxy or a clear that uses a catalyst to make it cure faster and harder, or something like Zinsser Shellac? I don't think I need anything super industrial. I'm such a complete noob when it comes to clear coats. I only tried the Minwax because I figured it was a lesser evil when it comes to fumes and the environment. Fumes really bother me even when wearing a respirator. But at this point I'm willing to try something else. Do you think the existing boards are salvageable? Like sand them a little, re-coat, and then let them sit for a month to cure? All I know is I refuse to sell any of my boards until its done correctly.

Thank you again and any suggestions are welcomed and appreciated.
 
My thoughts are is there any chance that your decoupage was still moist internally and when u bagged it, it came out and upset the top coat?

If i understand correctly you decoupaged over the bass wood. Well bass wood is low density soft and i imagine pretty porous. Should u not consider sealing the basswood on its own first then put the decoupage down and make sure it has dried properly then topcoat.
I dunno but this is how i see it. The bass wood could have absorbed water from the decoupage then its gotta go somewhere when you sweat it in the plastic bag.????Just my wild imagination.

Have you tried to recreate the problem without any fancy artwork just process samples for each stage and then change one thing up at a time.


Sent from my MB860 using Tapatalk 2
 
Thank you Dave & Rob for the replies.

Dave, I might have to try brush on shellac. I tried Zinsser spray shellac but it left the boards kind of pitted. I'm trying to figure out a process to produce a lot of boards. There's no way I'd be able to hand make and sand that many boards too. When I brush the poly on its pretty smooth eliminating the need to sand.

Rob, the boards are only 4.5" x. 3.25" in size. The artwork is the exact size as the board and I only put just enough decopauge on the back of the artwork in order to glue it to the painted wood. I don't put decopauge over the top of the artwork or anywhere else on the board because it has a tendancy to flake off along with any poly. I let the decoupage sit for several hours before doing anything else. I did brush the Minwax over the entire board including the artwork to seal everything up.

I haven't tried putting the poly onto a blank board, letting it dry and putting inside the bag. Its a test I need to try to rule out the Minwax or the Behr paint.

I think your onto something when you say something might be sweating when the board is in the bag. When you look at the bagged board it looks like its moist in the bag and as if the bag has stuck to the board. When you pull the board out of the bag, both the board and bag are dry....but where the bag touched the board the finish is dull and you can see a pattern where it touched. The rest of the board is glossy.

I'll take some pictures and post them here shortly.

Thank you again for the responses.
 
uploadfromtaptalk1379742914631.jpg

The board in the bag. You can see how it looks like the bag is stuck...but its not.

uploadfromtaptalk1379743015473.jpg

The board removed from the bag. You can see where the bag touched the board.

uploadfromtaptalk1379743098519.jpg

A board never placed in a bag and has been sitting on the table for a week. No marks.

Sorry the pictures aren't that great but it shows what I'm trying to explain.
 

Attachments

  • uploadfromtaptalk1379743099489.jpg
    uploadfromtaptalk1379743099489.jpg
    118.7 KB · Views: 22
Dave Hawksford please take a look. Something very wrong on the go here but its over my head.

Looks to me like u got something on the board in the first place thats causing orange peal effect. So i think you should show us a pic of the board itself blank to start with. Are u sure this wood is basswood and oil free. Looks to my pea brain like some residue or something is on the board even before you paint it.
What paint did u use. You should not have orange peal looking finish.

By the way...if u wanting to do production of this kind of thing, think of spray application. You dont need to use the rattle can approach. With a small gun and a "nail gun" type pancake compressor you can do a pretty good job of spraying water based coatings...thats how i do my covering.

If things take off then you can always upgrade to a big compressor.

The thing is this form of application will give you a better finish.
But its not going to fix your immediate problem.

You got something going on with that board that says to me one coating dont like the other and is dimpling. So fix that before any further process steps.

Sent from my MB860 using Tapatalk 2
 
Hey Rob thank you for all your feedback. I very much appreciate your advice. I finally found the answer to my problem.

I'm using Revell model building basswood. Even though its already sanded smooth, when I paint it with the Behr paint the wood absorbs moisture and the fibers expand. Which is OK. I don't mind and actually want the wood grain texture....not a glass smooth finish.

I've been doing things correctly and waiting the proper dry times during each process. What's destroying the project is the plastic bag I package the board into. Even though the board appears dry, the plastic reacts with the poly finish and draws out moisture trapped in the wood fibers messing up the finish.

The guy I spoke with said I'd get the same result even if I used automotive clear. Its just an issue with the plastic. He recommended using a lacquer finish because it will dry much faster than water based poly and then said to wrap the boards in thin sheets of parchment paper to prevent contact with the plastic, which makes sense because when you buy wood items such as a desk or whatnot, its always wrapped in thin paper and then wrapped in plastic. So I need to rethink the packaging.
 
I dont think that wood u using is basswood its probably balsa wood which is even more porous. Is it very very light in weight because then its definitely balsa wood. Thats typically what is used in model kits etc.
Also just considering your overall goals buying wood where its been packaged and branded and gone through a distribution chain to the point of buying it at a craft hobby store....well your input cost is going to be very high. So you might consider finding a different source like getting wood direct from a lumber yard that provides what is called DS4 wood meaning dimensioned and surfaced 4 sides. Some would even cut to size for u.


Sent from my MB860 using Tapatalk 2
 
Hey Rob, my mistake. I thought I was using basswood, I re-checked and its actually Revell birch plywood/craftwood. My memory isn't what it used to be. :confused:

It's not the best or most exotic wood but it works perfect for what I'm doing and its lightweight. The retailers who saw my samples didn't seem to mind.

I bought a 6 pack of 1/8" x 12" x 24" for $19.68, $25 after shipping.
After I cut the the pieces to the size I need, I get 90 pieces for $0.28 each. If I could find it for cheaper that would be great, but like you said, that type of wood is mostly carried by craft stores who mark it up 6 times.

I tried looking for local lumber yards and they mostly sell wood for building houses and decks or sell wood pallets. There is a one place called Woodworkers Source but their wood is more specialized and exotic like zebra wood or purple heart. I'll keep searching for a good supplier.
 
Also if this is going to be a high production item I would look into Dipping instead of spraying. Had a friend of mine go to that and it worked Great you just need to play around with the thinning to get right and hang so the drip goes to one point and dab it off with some foam. He was making thousands of lamps and done all his finishing that way using waterbase finishes.
 
...my mistake. I thought I was using basswood, I re-checked and its actually Revell birch plywood/craftwood. My memory isn't what it used to be. :confused:...

Your lumber dealer, or specialty wood dealer might well have 3mm (1/8") Baltic Birch plywood available. If so, a five foot by five foot (25 square feet) sheet of it should cost you less than your little six-pack did - and it'll be either the same, or better, quality than what you're using.

BTW, I agree with Jay - dipping your parts in finish might be the way to go. Shellac will work well, but will wear quickly if the parts are handled a lot. General Finishes' "Arm-R-Seal®" is a poly blend that provides good durability, too.
 
Good point Jim I never even thought to suggest Baltic Birch to him I use a lot of it on the Organ builds. I get it from a wholesaler for about $12.00/sheet. Most big box stores don't carry it and the small stuff that hobby suppliers have is VERY pricey. Check with some cabinet shops and they can get it for you or tell you where to find it as a lot of them use it for drawer sides and bottoms.
 
Matt Where are you located in Phoenix. Timber woodworking in Mesa. They are on Southern between Stapley and Mesa has all of the Baltic birch you will ever need and like other have said you will save a ton over what you have been using. Also IN Chandler there is Powers wood source they are located behind the Antique Mall on Arizona Ave Just south of Warner. If you need phone number send me a PM If you go to powers wood source tell John I said hi. Either place is a lot cheaper then Woodworkers source.
 
Last edited:
Thank you Jay, Jim, and Don. You all have been extremely helpful I and I really appreciate the feedback. I will try the methods suggested.

Don, I'm in the Litchfield Park area, its a ways away from Mesa and Chandler, but I don't have an issue driving to a good supplier. I will check out the places you mentioned. I was able to find them by typing their specific names info Google.

I also found the answer for the reason the plastic bags messed up the polyacrylic finish. I called Minwax and they said I need to let my projects sit out for 14+ days for the finish to fully cure before packaging. 3 or 4 days wasn't long enough. So I have to refinish 35 boards. Glad to be only 35 boards in and not thousands!
 
Minwax water based poly is one of the first water based finishes I used, and because of the poor appearance and application, I didn't try other water based finishes for several years. I recently sanded off and refinished the coffee table on which I used MinWax Polycrylic. I have now gone to Target Coatings (mail order) finishes - over 100 gallons so far - try EM 6000 water based Lacquer - virtually odorless, clear (no yellow), can be recoated in 15 minutes, although full cure is 120 hours (5 days). I recommend spraying - once you get the hang of it, it is far easier and faster (and smoother) than brushed finishes.
 
I should add that the cleanup time for a spray gun with the Target coatings is 60-90 seconds. Nothing like cleaning latex paint, even faster than cleaning a brush.
 
Thank you Charlie for the feedback. I greatly appreciate it.

I'm an airbrush artist / illustrator, and CGI artist. Working with wood and clear finishes are all new to me. I went to targetcoatings.com and looked at the EM6000 WB flat. I'm going to try a gallon of that.

I'm thankful for finding this forum. I'm pretty tired of going to Home Depot and being blindly directed. Its refreshing to communicate with other creative people.

You want to know whats really sad? I have a 30 gallon compressor and a sprayer with a #3 tip and have never used it. Just my airbrushes. :confused:
 
Well Matt welcome to the family. ;):thumbup: lol.

Hey if you have a compressor even if its a small one look at Harbor freight and get one of these spray guns.
http://www.harborfreight.com/touch-up-air-spray-gun-66871.html

I use one of these with a pancake nailgun compressor and its a hoot and works well. All it means is fill up more frequent if i do a big item. I have sprayed water based general enduro this way and its fine.
http://www.generalfinishes.com/reta...coats-sanding-sealers/enduro-var#.UkJKBp5Z7Zg

But now i too am about to follow Charlies recommendation, just recieved my gallon can of Em6000.

Good luck with your projects. Dont be a stranger to the forum. Good people here. :thumbup:

Sent from my MB860 using Tapatalk 2
 
Top