
Al Launier
Member
- Messages
- 1,683
- Location
- Bedford, NH
Well, after working on this on & off for over a month, it's finished. It started with two pieces of oak firewood logs from behind our home & ended up as a jewelry box for my wife's birthday yesterday. Thankfully, she was very pleased.
Since you all know how to build a BS box, I'll just note the lessons I learned as a novice from this limited experience as a novice.
1. A simple sled was made to cut the logs into 5/8" thick "slabs" on the BS.
2. Logs had "aged" for a year stacked outside & drying caused splitting from each end, leaving only ~8” usable wood in the center.
3. Jointed the saw-cut face & one edge. I have so far to go to learn how to joint!
4. The face of each piece ended up tapered sideways & lengthwise. Had to alternate positioning the wood for each pass to “average” out the tapering. Next time I will focus on jointing with the grain – perhaps that will help??? Gotta practice more!!!
5. The TS was next to size the boards & to get enough pieces to build up a good size block.
6. Then sanding the cut side to get a reasonable glue surface. MUST GET A PLANER ASAP!!! The DW735 is looking better all the time!
7. Gluing 12 pieces of uneven thicknesses all at once was quite an experience to say the least. They wanted to slide all over while clamping. Did I mention I need a thickness planer?
8. Layout & BS the outer profile, the rear block face, two drawer blocks, four drawer end caps, and two drawer tray contours. Saw ran well, everything square & no drifting – happy camper!
9. Sanded everything on the Ridgid oscillating edge/belt sander. Since I made the block 5” deep, and the sander has a oscillating working range of 4”, the block had to be flipped to sand/blend the excess over 4”. Remind me to keep things less than 4” tall if planning to use this sander.
10. My wife preferred an off-white paint instead of the natural wood grain. I do not like to paint! But……………it’s her preference. The upside is that the uneven thicknesses of the oak doesn’t show with the paint!
11. Cut & glue the velvet lining for the trays & feet.
12. Done! A jewelry box made from a tree from our property. How good is that!
Lessons learned:
This is fun! Next project???
Since you all know how to build a BS box, I'll just note the lessons I learned as a novice from this limited experience as a novice.
1. A simple sled was made to cut the logs into 5/8" thick "slabs" on the BS.
2. Logs had "aged" for a year stacked outside & drying caused splitting from each end, leaving only ~8” usable wood in the center.
3. Jointed the saw-cut face & one edge. I have so far to go to learn how to joint!
4. The face of each piece ended up tapered sideways & lengthwise. Had to alternate positioning the wood for each pass to “average” out the tapering. Next time I will focus on jointing with the grain – perhaps that will help??? Gotta practice more!!!
5. The TS was next to size the boards & to get enough pieces to build up a good size block.
6. Then sanding the cut side to get a reasonable glue surface. MUST GET A PLANER ASAP!!! The DW735 is looking better all the time!
7. Gluing 12 pieces of uneven thicknesses all at once was quite an experience to say the least. They wanted to slide all over while clamping. Did I mention I need a thickness planer?
8. Layout & BS the outer profile, the rear block face, two drawer blocks, four drawer end caps, and two drawer tray contours. Saw ran well, everything square & no drifting – happy camper!
9. Sanded everything on the Ridgid oscillating edge/belt sander. Since I made the block 5” deep, and the sander has a oscillating working range of 4”, the block had to be flipped to sand/blend the excess over 4”. Remind me to keep things less than 4” tall if planning to use this sander.
10. My wife preferred an off-white paint instead of the natural wood grain. I do not like to paint! But……………it’s her preference. The upside is that the uneven thicknesses of the oak doesn’t show with the paint!
11. Cut & glue the velvet lining for the trays & feet.
12. Done! A jewelry box made from a tree from our property. How good is that!
Lessons learned:
- Practice on the jointer/planer.
- Get a thickness planer.
- Plan projects better to be within limits of equipment - unless want to justify purchase of new tool(s). ;o)
- Get into stains more to appreciate the wood grain.
This is fun! Next project???


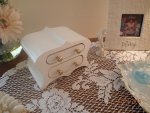
 I really like the shape of the box. It has a cool "Arabesque" look to it.
  And personally, with that shape, I think the white paint is a great look.
")
