TS Blade Storage

Paul Douglass

Member
Messages
4,993
Location
S E Washington State
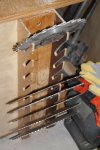
In my quest for an more organized shop, I am looking for a better way to store my TS blades. This is what I currently have:

IMG_1847.jpg

It has it's drawbacks. The slots I put into the bottom were soon filled so I found myself just slipping blades in between blades. Hasn't happened yet but they could roll out, and fall, don't want that to happen.

I'm looking for ideas of something better, like a cabinet type storage that I can mount on the wall. Sure like to see some pictures of what you organized woodworkers have made so I can get some ideas.
 
Great minds - similar track. I've been storing my TS and miter saw blades on hangers on my pegboard wall, but I'm preparing to build something more efficient. I'm still doing the layout but it's essentially a set of drawers (shown below) that fit under the extension table to the right of my table saw. The first drawer will hold push sticks, finger boards, etc. The second will hold my table saw and miter saw blades on tempered hardboard panels set at a 30° angle in dadoes. The drawers are about 12.5" wide inside to accommodate up to 12" MS blades. The hardboard panels have short dowels in the center to fit in the arbor hole of the blades and a solid wood handle at the top edge. All three drawers are the same size so I can swap them around if needed.

BladeDwr1.jpg
 
I hang my TS blades on nails, each with blades of the same number of teeth, in an overhead girder. I separate the blades with a circular piece of cardboard cut from boxes to keep the teeth from contacting each other. Not pretty, but effective & keeps them out of the way & easy to find different type blades. I hang my BS on large plastic coated hooks screwed into the bottom of floor joists. Both are easy to find, sort & out of the way taking up no other storage capacity.

I thought that storage units, made or bought, would eventually limit the number of blades needed to be stored.
 
Last edited:
Good ideas, Mine will hang on the wall, I'm thinking. I'm thinking of trying to keep them hung by type of blade, all rip on one peg, cross cut on another, combo ,,,, etc.

Al, just a thought maybe no better than cardboard, but a bottom portion of a 5 gal. bucket is a nice fit for 10" saw blades. Course it would harder to cut out than the cardboard, but you could leave the little rim on the very bottom and it would circle the blade and protect the teeth even more, just a thought. I cut off a bottom, about 1 1/2" from the bottom and that is what I clean my blades in.
 
Good idea Paul, sounds like it would work well. Unfortunately I have more cardboard boxes than 5 gal pails. I cut a bunch of cardboard squares, stack them up together & then use a circle cutter on my BS to cut them all at the same time to the dia. I want. I do use a 5 gal lid to soak/clean the blades though.
 
Great minds - similar track. I've been storing my TS and miter saw blades on hangers on my pegboard wall, but I'm preparing to build something more efficient. I'm still doing the layout but it's essentially a set of drawers (shown below) that fit under the extension table to the right of my table saw. The first drawer will hold push sticks, finger boards, etc. The second will hold my table saw and miter saw blades on tempered hardboard panels set at a 30° angle in dadoes. The drawers are about 12.5" wide inside to accommodate up to 12" MS blades. The hardboard panels have short dowels in the center to fit in the arbor hole of the blades and a solid wood handle at the top edge. All three drawers are the same size so I can swap them around if needed.

View attachment 79236

That is a real nice set up. I like the slanted slanted panel, makes me wonder if I should incorporate that into my cabinet.
 
Wood magazine has a cool "table saw blade locker", if you go to their website and search for "table saw locker" you will find detailed FREE download plans. it is set up for 6 blades, but you can adjust for as many as you wish:)
 
I have a bit of wall space behind the DC and just to the right of the tablesaw operator's position so, mine go here.


Blade-Storage-2009.jpg

Made it in about 30 minutes out of some BORG pine scrap about 10 years ago. It has followed me ever since. Drill the row of holes through both halves at once, use the bandsaw to cut the slots back to the holes, glue and screw together and screw to the wall. You can sort of see the 1/2" dowels at the bottom that stick out and hold extra ZCI's via the finger holes.

I played around with an idea for putting them into a drawer but, they are out of the way and easily accessible where they are so the "what if I do nothing" decision rule won out on that one ;-)

Blades in drawer idea.jpg

My dado stacks do go in the drawers in their respective cases.
 
Last edited:
Simple!
My dado set along with the wrench's to change blades on the left side of the saw.
7-4-11 003.JPG
My other blades hanging on screws on the front right of the saw.
7-4-11 001.JPG

I was at one time gonna make one of those fancy blade holders that fit in a drawer and had dividers but realized why complicate something that's worked just fine for 50 plus years in my family.
 
Interesting ideas, but mine need to survive driving along I40 at 60 miles per hour. That is a very rough piece of road and would like for things to stay out, be available easily, without being cocooned. Love new ideas so keep them coming. There is a nugget in there some place.
 
Well, after thinking it over, a cabinet under the table saw wing/fence rails is a good way to go. It is wasted space in a small shop. Plus I need a good place for my miter gauge to reside when not in use. Now all I have to figure out is, how to work around the dust collection port. If I had the tools, was a good sheet metal worker and new how to do it I would move the port to the back of the saw. It is now mounted to a access door on the side of the saw. I guess I could put a 90' connection it and extend it out to the back. I've got to think this over.
 
paul give us a couple pics of your dust connection area and where you want to put it,, we might be able to come up with a simple solution for you many of us have rerouted our dust collection once or twice:)
 
OK, Here is what I have been using since, "back before" woodworking was something to do to repair or make something I needed. Glenn has used the same model. I cannot remember which of us copied it from the other.

It used to hang on the wall and was twice as long. The "prongs" protrude 2" from the 3/4" backboard. The hangers are 4.25" c to c apart. The slots and the prongs are 5/8". Originally I tried 1/2"; you can easily cut your knucles that way. DAMHIKT. Also it is a heck of a lot easier to slip the blades into a 5/8" slot than a 1/2".

The first acceptable version of this was over twice as long, before I sawed it in half. It had my 10" blades, my floppy Dado, and several 12" sanding disks. It hung on the wall and worked very well. When wall space became more precious, the blade half of the unit was hung under the TS extension. This was a minor inconvenience when I had two 70 tooth, similar looking blades. They were easy to tell apart from the front but not from the edge.

Then the space under the TS extension became too precious and the blades ended up in their current location. This is on the side of the BS cabinet where they are easily reached from the TS.

ADVANTAGES:
The unit can be almost any length.
The blades are easily removed and replaced.
The slots can be different size. Note the top slot with the floppy dado blade.

DISADVANGTAGES:
In spite of dust collection, there is dust in the shop. The dust lands on the blades as well as the floor. My shop doors are open whenever it is practical.
Like all of the other blade storage plans, you need to be cautious around sharp objects.
In humid locations a desiccant would not help prevent rust on the blades.

That's my 2 cents worth.

Enjoy,
JimB
 

Attachments

  • 008.jpg
    008.jpg
    83.8 KB · Views: 28
  • 009.jpg
    009.jpg
    100.8 KB · Views: 26
  • 012.jpg
    012.jpg
    94.2 KB · Views: 26
  • 014.jpg
    014.jpg
    81.4 KB · Views: 26
paul give us a couple pics of your dust connection area and where you want to put it,, we might be able to come up with a simple solution for you many of us have rerouted our dust collection once or twice:)

This is what I have.
IMG_1852.JPG

As you can see I'm a DHD (dust hose dragger). If I had the correct tools, it wouldn't be hard to move that port to the back of the saw. I'll have to check with my BIL and nephew. They have quit a few sheet metal tools for working in their race car. On the other hand I could put a 90' elbow on what is there. The under-shelf cabinet will have to be a little ways from that side because that is where the crank is to adjust the angle of the blade. I think I would be better off with the cabinet on wheels instead of attached. I have to move my saw pretty often, depending on what I am cutting. The joys of a little shop.
 
was that where the steel city had there DC hook up or did you make it there ? i would suggest you not use a 90 degree connection if possible, restricts flow to much use a 45 or two of them or come out the back.. could cut hole in back of saw and reuse the flange your usin now. just plug old hole.. also sometimes it helps to have a couple small holes opposite the main hole to help in flow of air across the pile of dust,, like a stream running across a road on high water conditions..
 
Paul if you have a hand held jig-saw & a drill you can drill a starter hole & cut the big hole with the jig-saw & clean up the edges with a 1/2 round file. You can also use a automobile choke cable to open & close your blast gate with the gate on the back side of the saw just run the cable around the side & fasten it somewhere on the front of the saw where it is easy to reach.
 
so then all you need to do is make a hole in the back paul, and cover the side hole and your off to the races:) but sometimes the saws have a pre-tilted floor in them to direct chips to the port if that is the case then your better to stay with old hole.. and reroute duct with 45 degree connectors
 
so then all you need to do is make a hole in the back paul, and cover the side hole and your off to the races:) but sometimes the saws have a pre-tilted floor in them to direct chips to the port if that is the case then your better to stay with old hole.. and reroute duct with 45 degree connectors

Yes the floor of mine is tilted towards the port. I'm not sure it matters, I always have 1"+ of sawdust in the bottom of the saw. I scoop it out every few weeks. Maybe that is normal or maybe that is because I do not have the best dust collection set up having to use the drag around hose and all. I could add a piece of sheet metal in the bottom and have it slant towards the middle of the bottom. That way it would have a shallow "V" in the bottom and put the port in the middle of the back. What do you think?
 
Top