Family Room Project

It looks like a great drafting table. I hope you just refurbish it and don't modify it. They don't make them like that anymore.

Actually, they do, it's new. We got it at a local furniture store, they must have bought a crate full, it was made in India. Still has the A, B, C part stickers on it from assembly. ;) Found it by the part number online: http://fischerfurnitureinc.com/details.php?productID=220307450&productName=GURU-3074

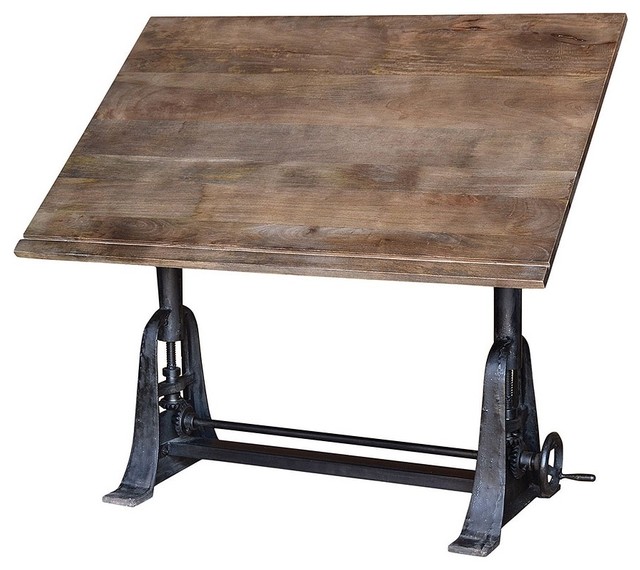
That drafting table is cool as all get out!

I'll get some better pics once it's setup.
 
Ok, I'm about ready to be done for a while. I got the painting done in the sun room, floors cleaned, all the outlets and switches and plate covers replaced. Last night I removed my daughter's carpet, pad, and tack strip. This morning I got busy putting down the new flooring, finished it around 5:00. She usually works on the weekend, so worked out well to get it done.
2014-03-30 18.07.41.jpg2014-03-30 18.07.47.jpg2014-03-30 18.07.58.jpg

Found a nice throw rug for $60 at lowes the other day, also picked up a new fan for the sun room and got it hung today.
2014-03-30 20.06.44.jpg2014-03-30 20.07.17.jpg

I still need to build a valance for my wife, mill out some stair treads, trim around the floors, and install some transition strips where the new floors meet the tile areas.
 

Attachments

  • 2014-03-30 18.07.58.jpg
    2014-03-30 18.07.58.jpg
    27.8 KB · Views: 16
  • 2014-03-30 20.06.44.jpg
    2014-03-30 20.06.44.jpg
    45.1 KB · Views: 16
  • 2014-03-30 20.07.17.jpg
    2014-03-30 20.07.17.jpg
    34.7 KB · Views: 15
Looking good. I love that drafting table. I have an old cast iron one that I took the wooden table off and added a slab of granite. Makes a great desk.
 
Thanks Guys!

I think you need a vacation :)

I'm about due for one, but have a few weeks left to get things ready for the baby shower. Just when I get the heavy stuff done, the little details and decorating take over and that is where I have to make my wife's visions reality. She's been shaking rattle cans all weekend long and getting decor stuff ready to hang.

I still need to also do a lot of clean-up. There are 20 boxes of flooring to move back up to the garage. The poor kids that delivered all of it carried 3 boxes at a time down there. I'm still young enough I could do that or easily carry 2 boxes at a time back up, but the older wiser me will take it a box at a time. ;)
 
This was a recent purchase my wife made just before we started this project. It's worked great for me to pile all my tools and supplies on. :) It is a cool little (300lb) drafting table, which is height adjustable via the hand wheel. She plans to use it for a bar table. And no, I didn't spill the paint on the top, it came that way as an extra cost. ;) Those little 3 wheel dollies under each leg have been life savers getting things shuffled around for this project.
View attachment 81914

I started my engineering career as a tool designer. Spend many many hours on a drafting table. Mine was significantly larger than that, but NO WHERE NEAR as robust as than one. WOW - that thing is like a battleship. Mine was like a canoe in comparison.

That would be a cool addition to any shop.
 
Spent most of this weekend getting pictures and wall decor put up (sometimes more than once...in different places :doh: ). Got most of the tools back up to the shop, the extra flooring taken back to the garage, and finished the floor thresholds. Still need to put the quarter round around the floor and to mill out the stair treads, but wife said those can be done after the baby shower. :)

2014-04-06 17.23.55.jpg 2014-04-06 17.20.43.jpg

A few detail pics...
2014-04-06 17.21.37.jpg 2014-04-06 17.25.30.jpg 2014-04-06 17.24.23.jpg

The chair got moved after the pics above. This is the one that my wife saw and said "that would be perfect for rocking a baby" just before we found out we were going to be grandparents.
2014-04-06 19.54.21.jpg

Some pics of the sun room side decor. The drafting table and an old media cabinet we have which I put IR repeaters in so the equipment would be out of view.
2014-04-06 17.24.34.jpg 2014-04-06 17.24.52.jpg 2014-04-06 17.25.03.jpg

The valance was a project this week. I used some pocket screws and built a wood frame that was 14'-7" x 12". My wife picked up a cheap quilt for $10 and we cut it up for padding then stapled about $20 of some close-out fabric on it. used some more pocket screws to add some cleats for hanging and a couple of metal L brackets for hanging the centers over some left over curtain rods from our last house.
2014-04-06 17.27.18.jpg
 
Part 2:

My creative wife took the time to cut out some of the flowers of the fabric for her valance and pasted them together in some picture frames to carry the pattern across the room.

2014-04-06 17.25.47.jpg 2014-04-06 17.25.53.jpg 2014-04-06 17.26.01.jpg

She also painted an existing mirror. The boards with branches and birds were identical, she painted some of the birds the color of valance pattern to make them a little more unique.
2014-04-06 17.26.39.jpg2014-04-06 17.26.44.jpg
 
Last edited:
Well you have done a great job and its handy having a wife with a creative flair. Well done to both of you. Sunroom looks real inviting for a winter day with sunshine but real cold outside. Like the table and chairs.

Sent from my SGH-I337M using Tapatalk
 
Thanks Guys

Darren, you really should have your wife help you if you find making those decisions difficult.;)

Well, the conversation started something like this...she said "you're going to be mad, but....". I only had to patch/paint one hole, the other 5 were covered by the items that went up the second round. ;)
 
Well, the only thing constant in our house is change. Here is the proof...

My wife wasn't entirely happy with the fabric she got for the valance.
attachment.php


So today after about 6 months of trying to let it grow on her we took it down and replaced the fabric.
BTW...I DO NOT like rework. We had a long discussion about me not needing practice when it comes to projects and this will not be done again...so she had better get it right this round. (sequence of events to follow >>>) :blah::gonnagetit::scram::crutches:

Sorry forgot to get pics of the sub-frame again, so will try to explain how it's attached to the wall. The "L" brackets mounted towards the ceiling support the center area of the valance. I have some 3/4" pieces of ply attached at a 90* angle at the top (flat with the ceiling), they slide in above the brackets, then I use door shims to shim it up to the ceiling, then a screw in each secures them in place. There are 4 other vertical pieces about 6" wide, one on each end to secure to the wall, then two in the middle, which keep the valance from tilting down. The curtain rod brackets are mounted with a space between them to allow for the vertical supports.
2014-11-09 15.03.14.jpg

Here is the valance before adding garnishments and after installation again.
2014-11-09 15.02.59.jpg2014-11-09 16.51.23.jpg

She's happy...that's all that matters.
 
Darren - that all looks SUPER.

You started in January - and I started in January.

I wish you were doing mine - you would have been done months ago.

For me - I am at a point where you were at the end of January.

And you are still working on your shop too?

I just envy people that have energy. I used to have some.
 
Everything looks great Darren, I like specially the tilting table on pic 7. What was it originally? and how did it arrive at your hands?

Thanks Toni. The table is a re-production drafting table, made in India. They typically ship them here with various style and prices go from $2500 to $500, I paid $500. It's a very versatile table as all the mechanics work and can raise/lower and tilt it to fit what ever the task is. It's just extremely heavy to move. ;)

Here is a similar one showing the base.
contemporary-desks.jpg
 
Top