can't let leftovers go to waste....

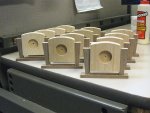
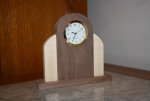
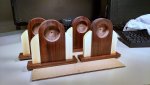
got the inserts yesterday, and put them to good use today. only one small problem now, my wife :blah: wants me to make 4 more of these to send to friends of hers in north carolina. :doh:

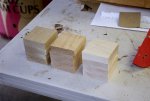
now it is on to the next batch, to use up the smaller clock inserts...
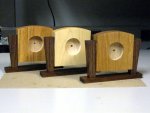
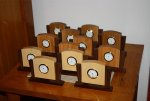
 

Attachments

  • 010 first batch finished.jpg
    010 first batch finished.jpg
    100.4 KB · Views: 35
beginning of the second batch! they will be hard maple, red oak, and white oak, with walnut accents and base. cut all of the blanks for the main parts and will set up a jig for the accents.
 

Attachments

  • 011 blanks for next set.jpg
    011 blanks for next set.jpg
    100.8 KB · Views: 17
today i laid out the locations for the clock inserts, and rounded off the tops. then it was on to making the bases, and the side supports. just for the fun of it, decided to put one of them together, and changed the height of the clock in the supports to something that looks a bit better to me.
 

Attachments

  • 012 walnut parts cut for clocks.jpg
    012 walnut parts cut for clocks.jpg
    105.9 KB · Views: 26
  • 013 test assembly of one clock.jpg
    013 test assembly of one clock.jpg
    64.2 KB · Views: 32
almost done with this batch. set up the building jig on monday, and put them together last night. all sanded and ready for finishing.
 

Attachments

  • 015 all assembled ready for finish.jpg
    015 all assembled ready for finish.jpg
    136 KB · Views: 12
  • 014 first one in the building jig.jpg
    014 first one in the building jig.jpg
    122.9 KB · Views: 11
had a bit of time on my hands last night, so i hit all of the clocks with blo. today is shellac day.
 

Attachments

  • 016 first three oiled.jpg
    016 first three oiled.jpg
    108.3 KB · Views: 14
  • 017 all clocks oilde.jpg
    017 all clocks oilde.jpg
    96.9 KB · Views: 14
i hope so vaughn! got started on the four clocks for the wife :blah:. i didn't know that there were so many clocks hiding in the scraps....
 

Attachments

  • 018 parts for clocks for the wife.jpg
    018 parts for clocks for the wife.jpg
    94.5 KB · Views: 12
a little bit more done yesterday. cut all of the parts to the final sizes. today it will be rounding off, sanding, and hopefully assembly. since i was being noisy yesterday, pop was being noisy in his own way too....
 

Attachments

  • pop being noisy too.jpg
    pop being noisy too.jpg
    134.4 KB · Views: 14
  • 020 parts for wifes clocks cut to size.jpg
    020 parts for wifes clocks cut to size.jpg
    113.5 KB · Views: 13
got all of the round parts of the parts cut and sanded to round. got all of the parts sanded to 220, and did a test set up of one to see what it would look like.
 

Attachments

  • 021 second set parts finish cut.jpg
    021 second set parts finish cut.jpg
    111.4 KB · Views: 9
  • 022 second set test set up.jpg
    022 second set test set up.jpg
    55.6 KB · Views: 8
got a bit more done last night. made a quick and dirty assembly jig, and glued them all up, and hit them with the boiled linseed oil. now it is just sanding sealer, shellac, and was, and they will be ready to send out.
 

Attachments

  • 024 first one glued up in jig.jpg
    024 first one glued up in jig.jpg
    97.3 KB · Views: 8
  • 025 all glued up.jpg
    025 all glued up.jpg
    89.3 KB · Views: 8
  • 026 all oiled.jpg
    026 all oiled.jpg
    91.3 KB · Views: 9
yay! the last of the clocks for this year! all hit with shellac and pledge, and the inserts put in place. now the wife :blah: will be happy.
 

Attachments

  • 027 wifes clocks finished.jpg
    027 wifes clocks finished.jpg
    63.2 KB · Views: 5
Top